Contents
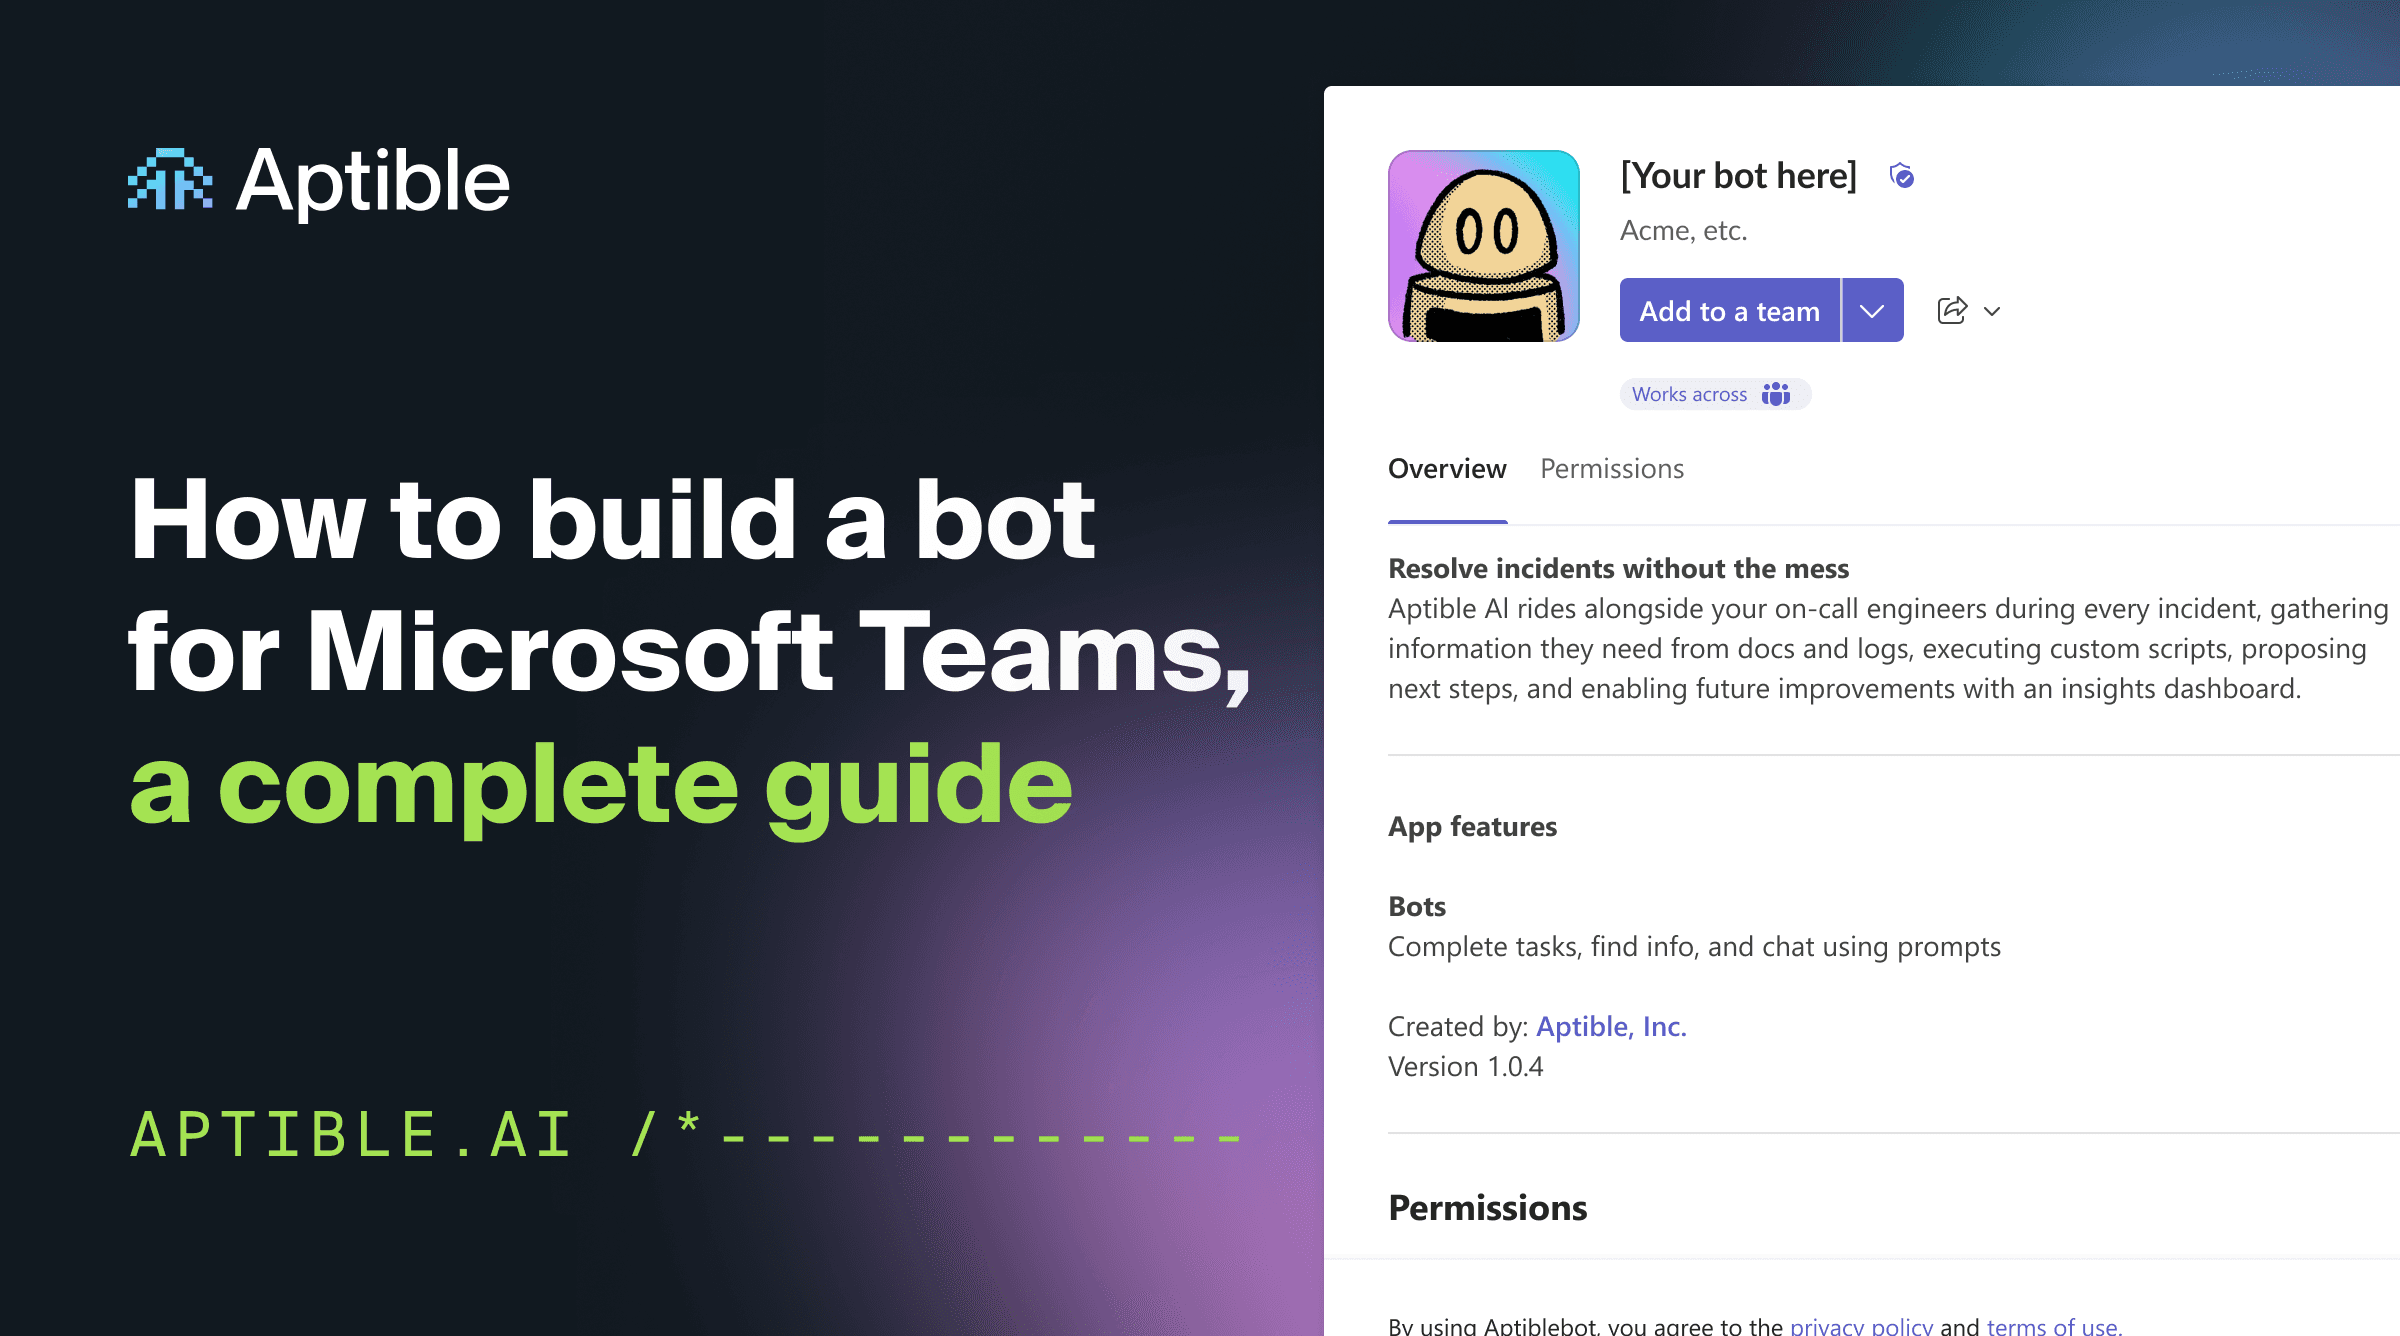
We're open sourcing the infra knowledge graph that powers our AI SRE Agent 👇

So, you're exploring ways to utilize Teams to enable more productivity and efficiency for your organization? If you're reading this, you're likely either:
Just beginning to investigate the effort involved in building a Teams bot using the Python SDK; or
You’ve been trying to build a bot in Teams, and you’re looking for examples that illustrate how you might build something more production-ready.
Either way, this guide will get you sorted out.
What we’re going to build: a bot-based Teams app
Before we get moving, let’s make sure you’re on the right train. In this tutorial, we’re going to walk through (and provide code samples for) how to:
Create a new bot application in Teams and install it into our organization while we develop it.
Use the Microsoft Bot Framework to build an “echo” bot that just echoes back the message it receives. We’ll start here so that we can establish a feedback loop and iterate quickly.
Extend our echo bot with asynchronous processing capabilities. This will allow us to process messages using a background worker (like Celery) for expensive operations, like calling an LLM or slow external APIs.
Use OpenAI to give our bot application some brains so that it can help with more complex tasks.
Understand Microsoft Graph and how it relates to the Microsoft Bot Framework (we'll use this to retrieve the conversation history for a Teams post to pass along to our bot so it can follow the conversation).
Understand the different kinds of events that a Teams bot can handle and implement one to send a welcome message when the bot gets installed for the first time.
Let's get to it.
Step 0: Get organized
The first and most important thing we need to do is to get organized. The Microsoft APIs and SDKs can be deep and daunting (and at times, disorienting) so it’s important that we start by setting ourselves up for success.
Prerequisites
First, let’s start with a checklist of things you’ll need to have if you want to follow along with the tutorial:
An Azure account (or a colleague with an Azure account) with enough access to create and manage an App Registration in Microsoft Entra ID.
A Python environment with Python 3.12 or later (it may work with older versions of Python, but we haven’t tried it).
Access to a Microsoft Teams account for testing and bot configuration.
The ability to side-load apps into your Teams organization.
The ability to use
ngrokordevtunnel(or a similar tool) so that your bot can receive messages from Teams as you’re building.
Useful bookmarks
You’ll also want to have the following URLs bookmarked, since you’ll be using them a lot:
The Microsoft Teams Developer Portal (https://dev.teams.microsoft.com/)
The App Management page of the Teams Admin Panel (https://admin.teams.microsoft.com/policies/manage-apps)
We’ll add some more specific bookmarks as we scaffold out our app in the next section.
Step 1: Scaffold the app
The first thing we need to do is scaffold our app so that we can quickly get into a feedback loop. We’ll start by setting up a very basic Flask application, starting an ngrok tunnel, and then setting up the Microsoft entities necessary to get Teams to start sending direct messages to our bot through that tunnel.
Scaffold a simple Flask app
We’ll start by standing up a very simple “hello world” Flask app. So that we can point our ngrok tunnel at it.
Create and activate a new virtualenv for the project, and install Flask
We’re using Python’s built-in venv module for simplicity, but you can feel free to use your favorite dependency manager (uv, poetry, pipenv, etc) if you like.
# Create a directory for the project
$ mkdir teams-bot
$ cd teams-bot

# Create a new virtual environment in a .venv folder in our project
$ python -m venv .venv

# Activate the virtual environment
$ . .venv/bin/activate

# Install Flask
$ pip
Create a “hello world” app
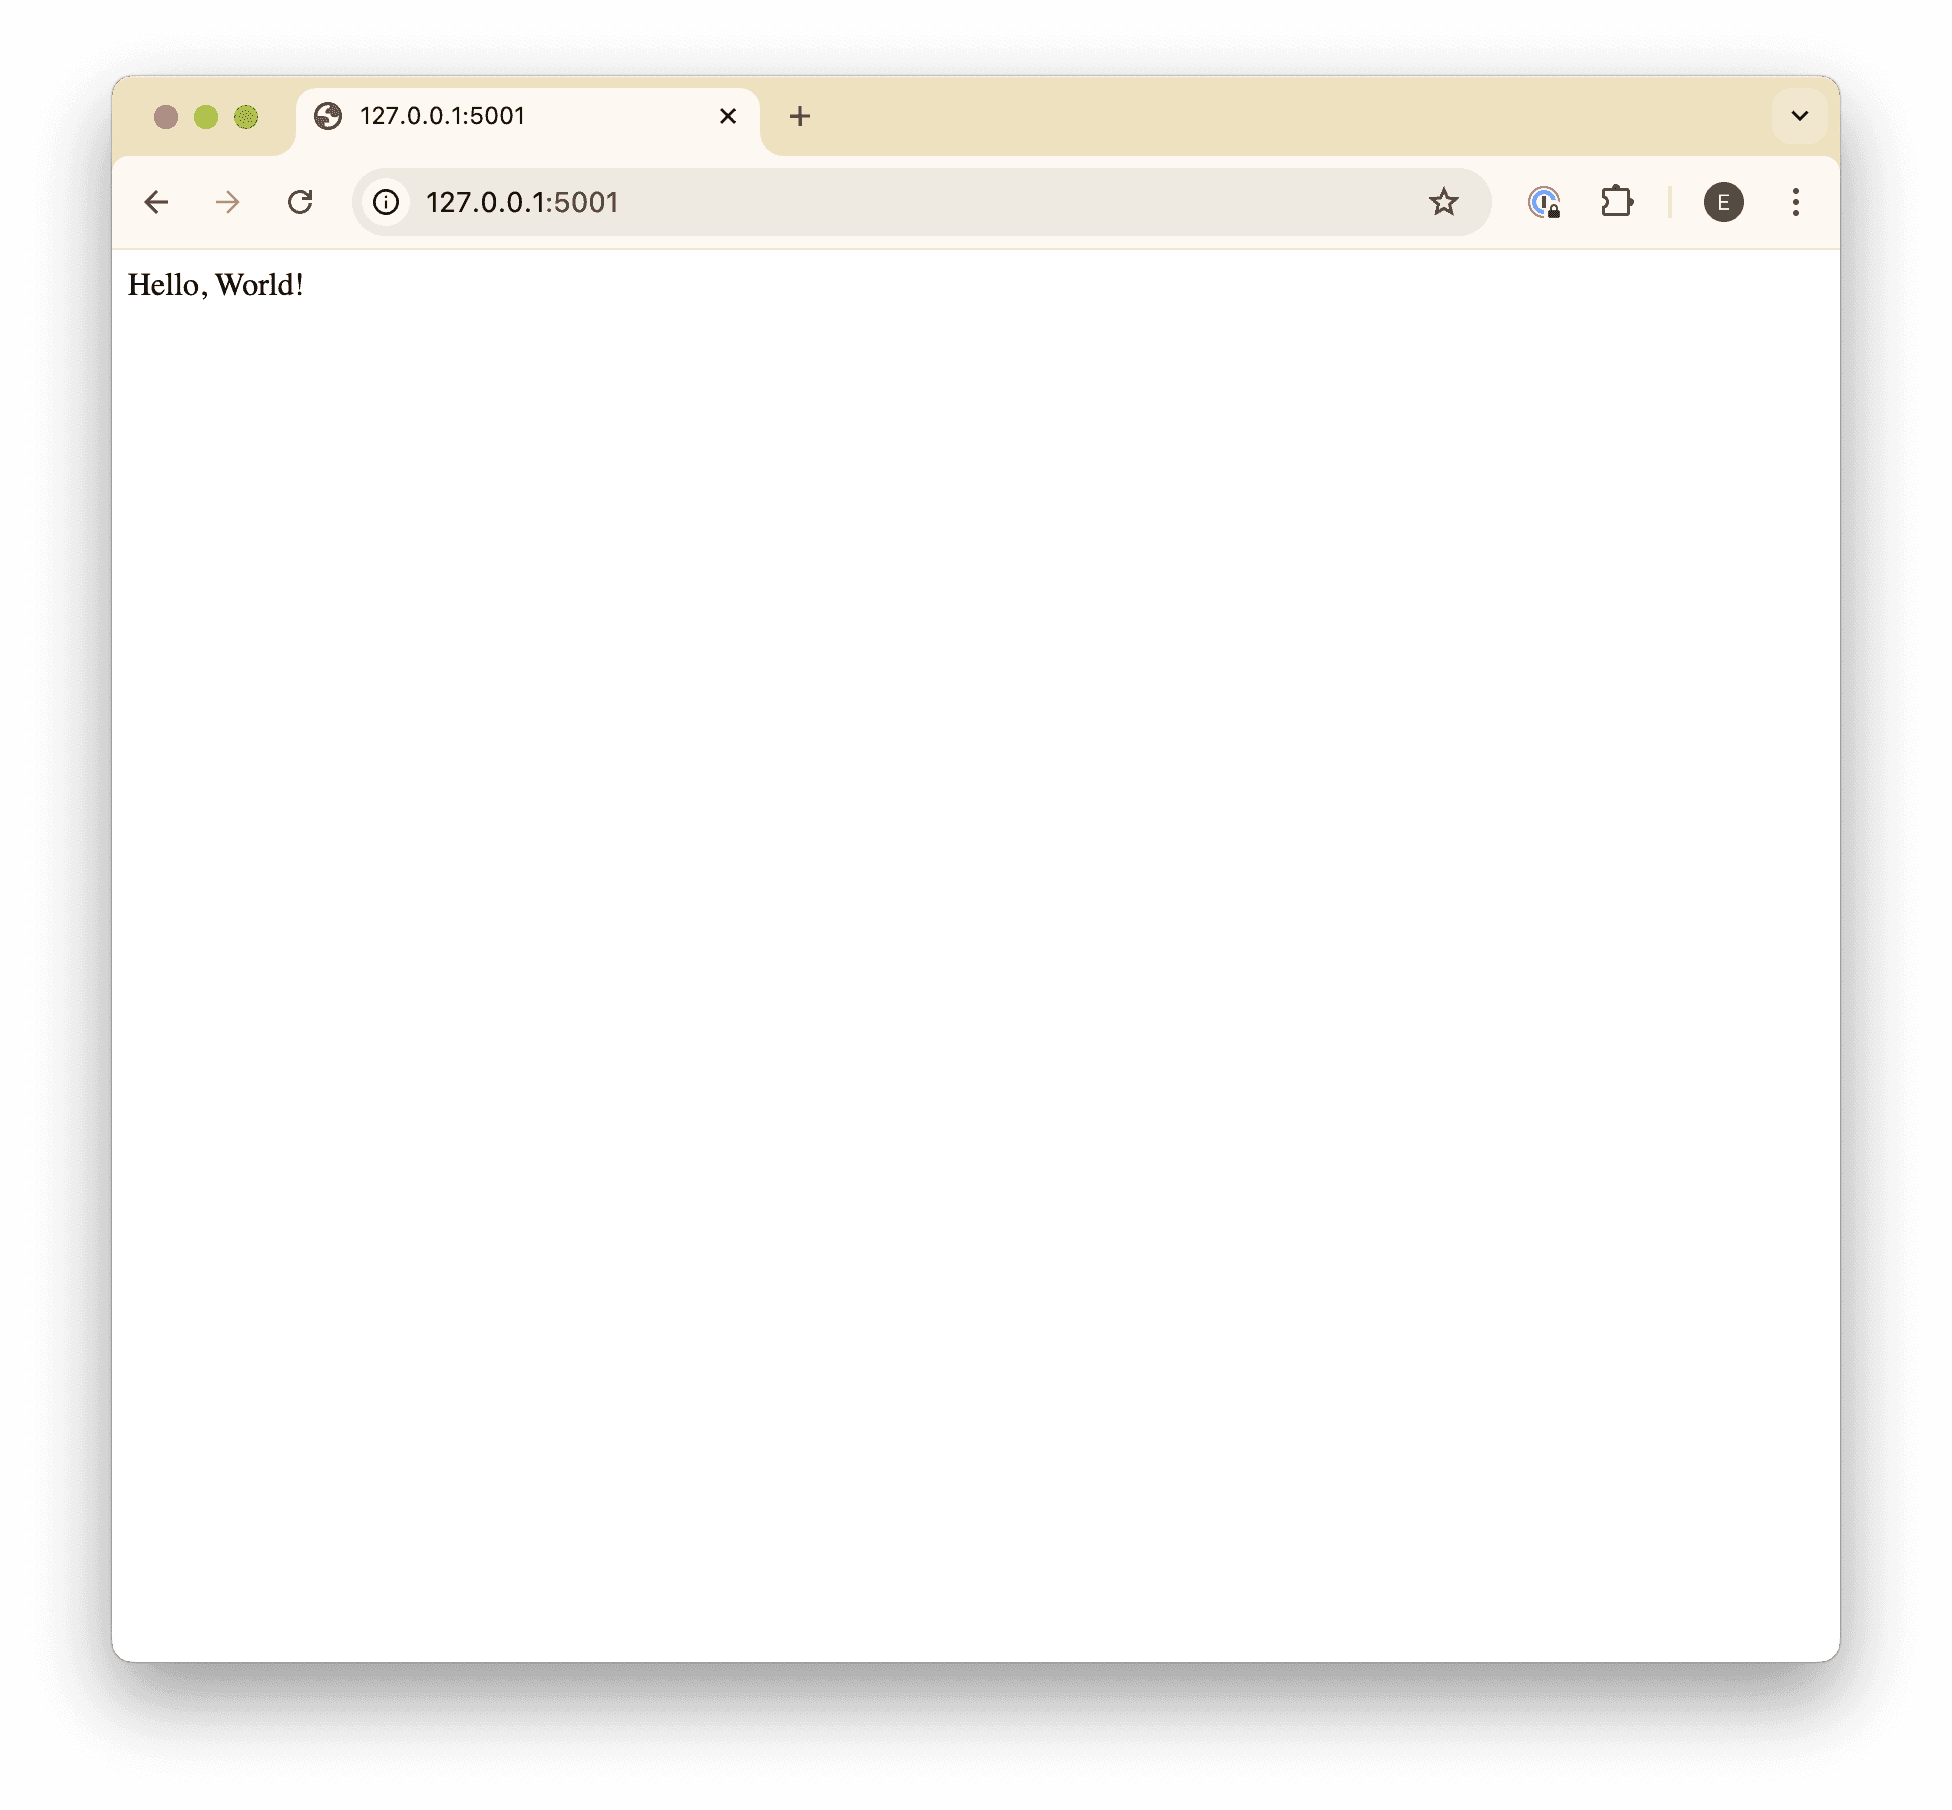
Now that we’ve got a virtual environment ready to go, we can create a simple Flask app just to serve up the text “hello world”. Create a new file called app.py with the following contents:
from flask import Flask

app = Flask(__name__)

@app.route("/")
def hello_world():
    return "<p>Hello, World!</p>"
Start the app and make it listen on all hosts
Back in your terminal, start the app:
$ flask --app=app run --host=0.0.0.0 --port=5001

 * Serving Flask app 'app'
 * Debug mode: off
WARNING: This is a development server. Do not use it in
⚠️ You can use whatever port you like here, but note that Flask’s default of 5000 is typically already in use by MacOS’ *AirDrop & Handoff* feature, so we’re using 5001
Make sure the app is working
Open up a browser and head to http://127.0.0.1:5001/. You should see a page like this:
Open a tunnel
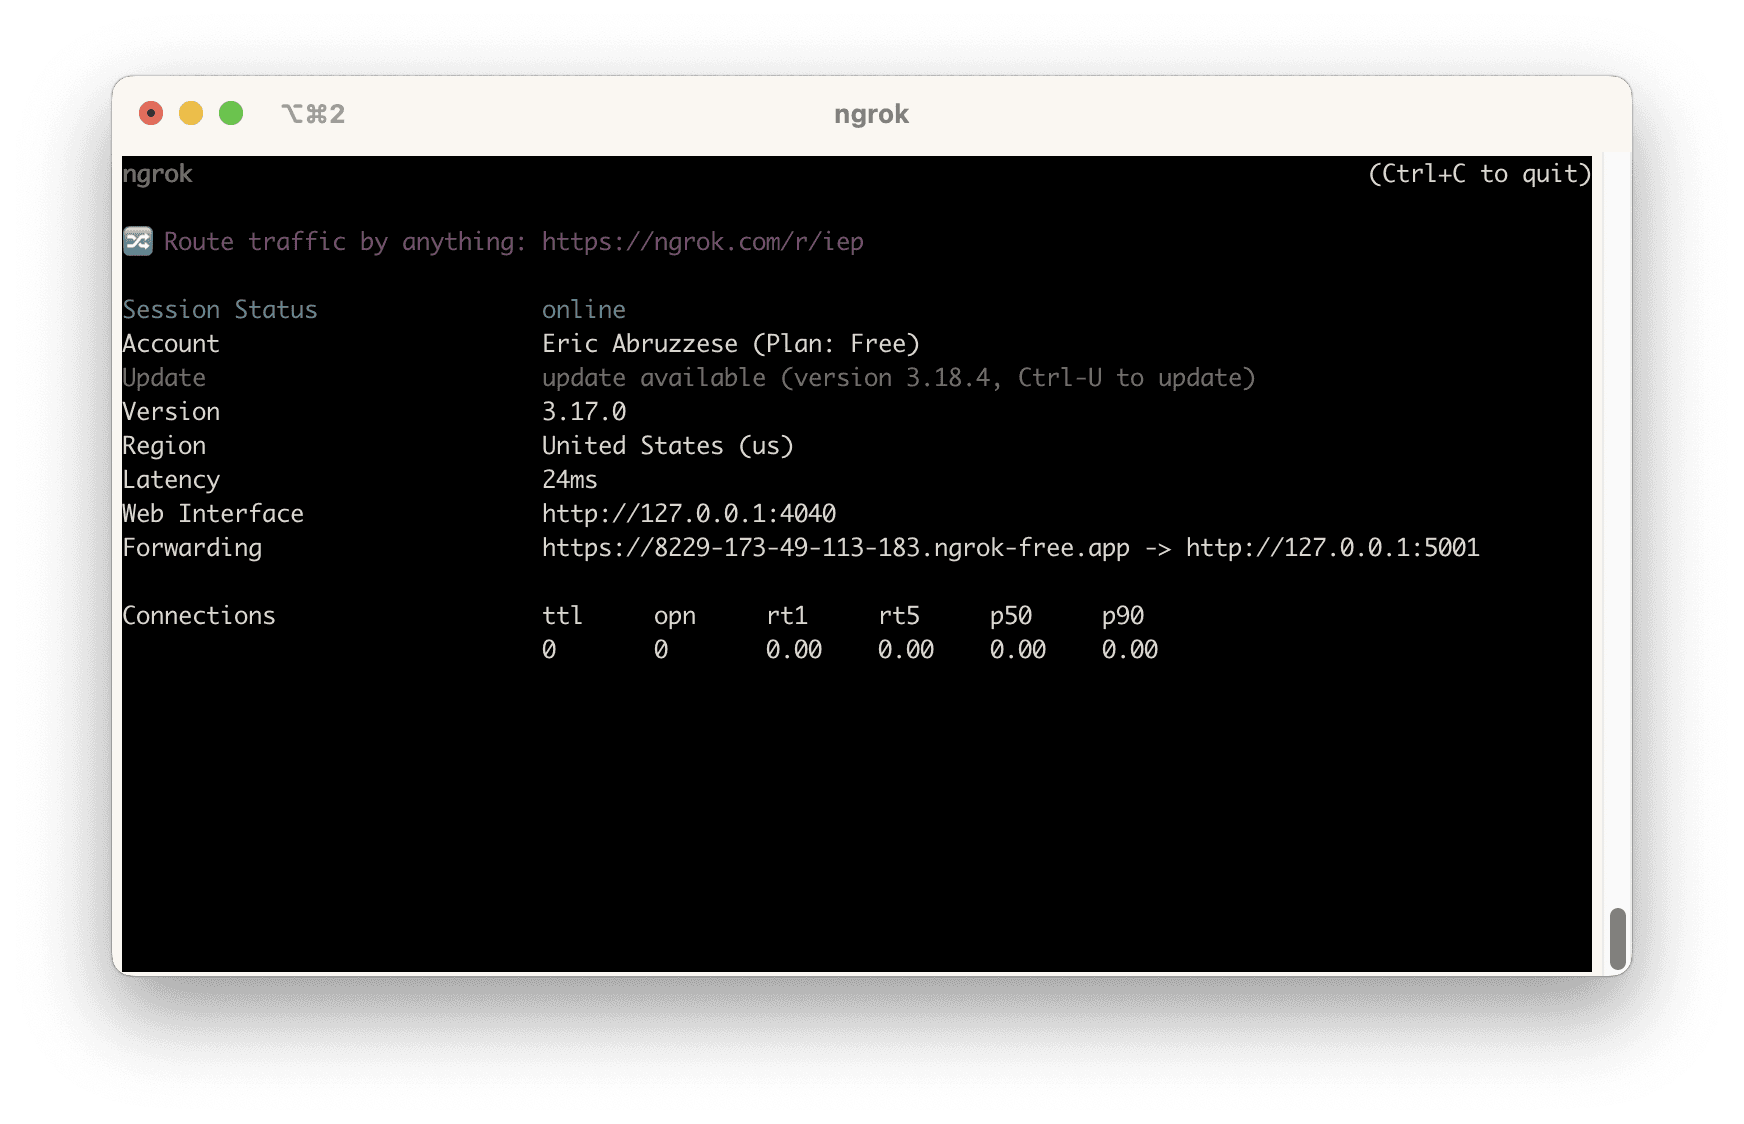
With your app listening, open up a new terminal in a separate tab or window, and start an ngrok tunnel pointing to the Flask app:
You should see something like this:
Make sure the tunnel is working
With the tunnel open, navigate to the URL it assigned to you on the “Forwarding” line (ending in ngrok-free.app. You’ll get a page like this one:
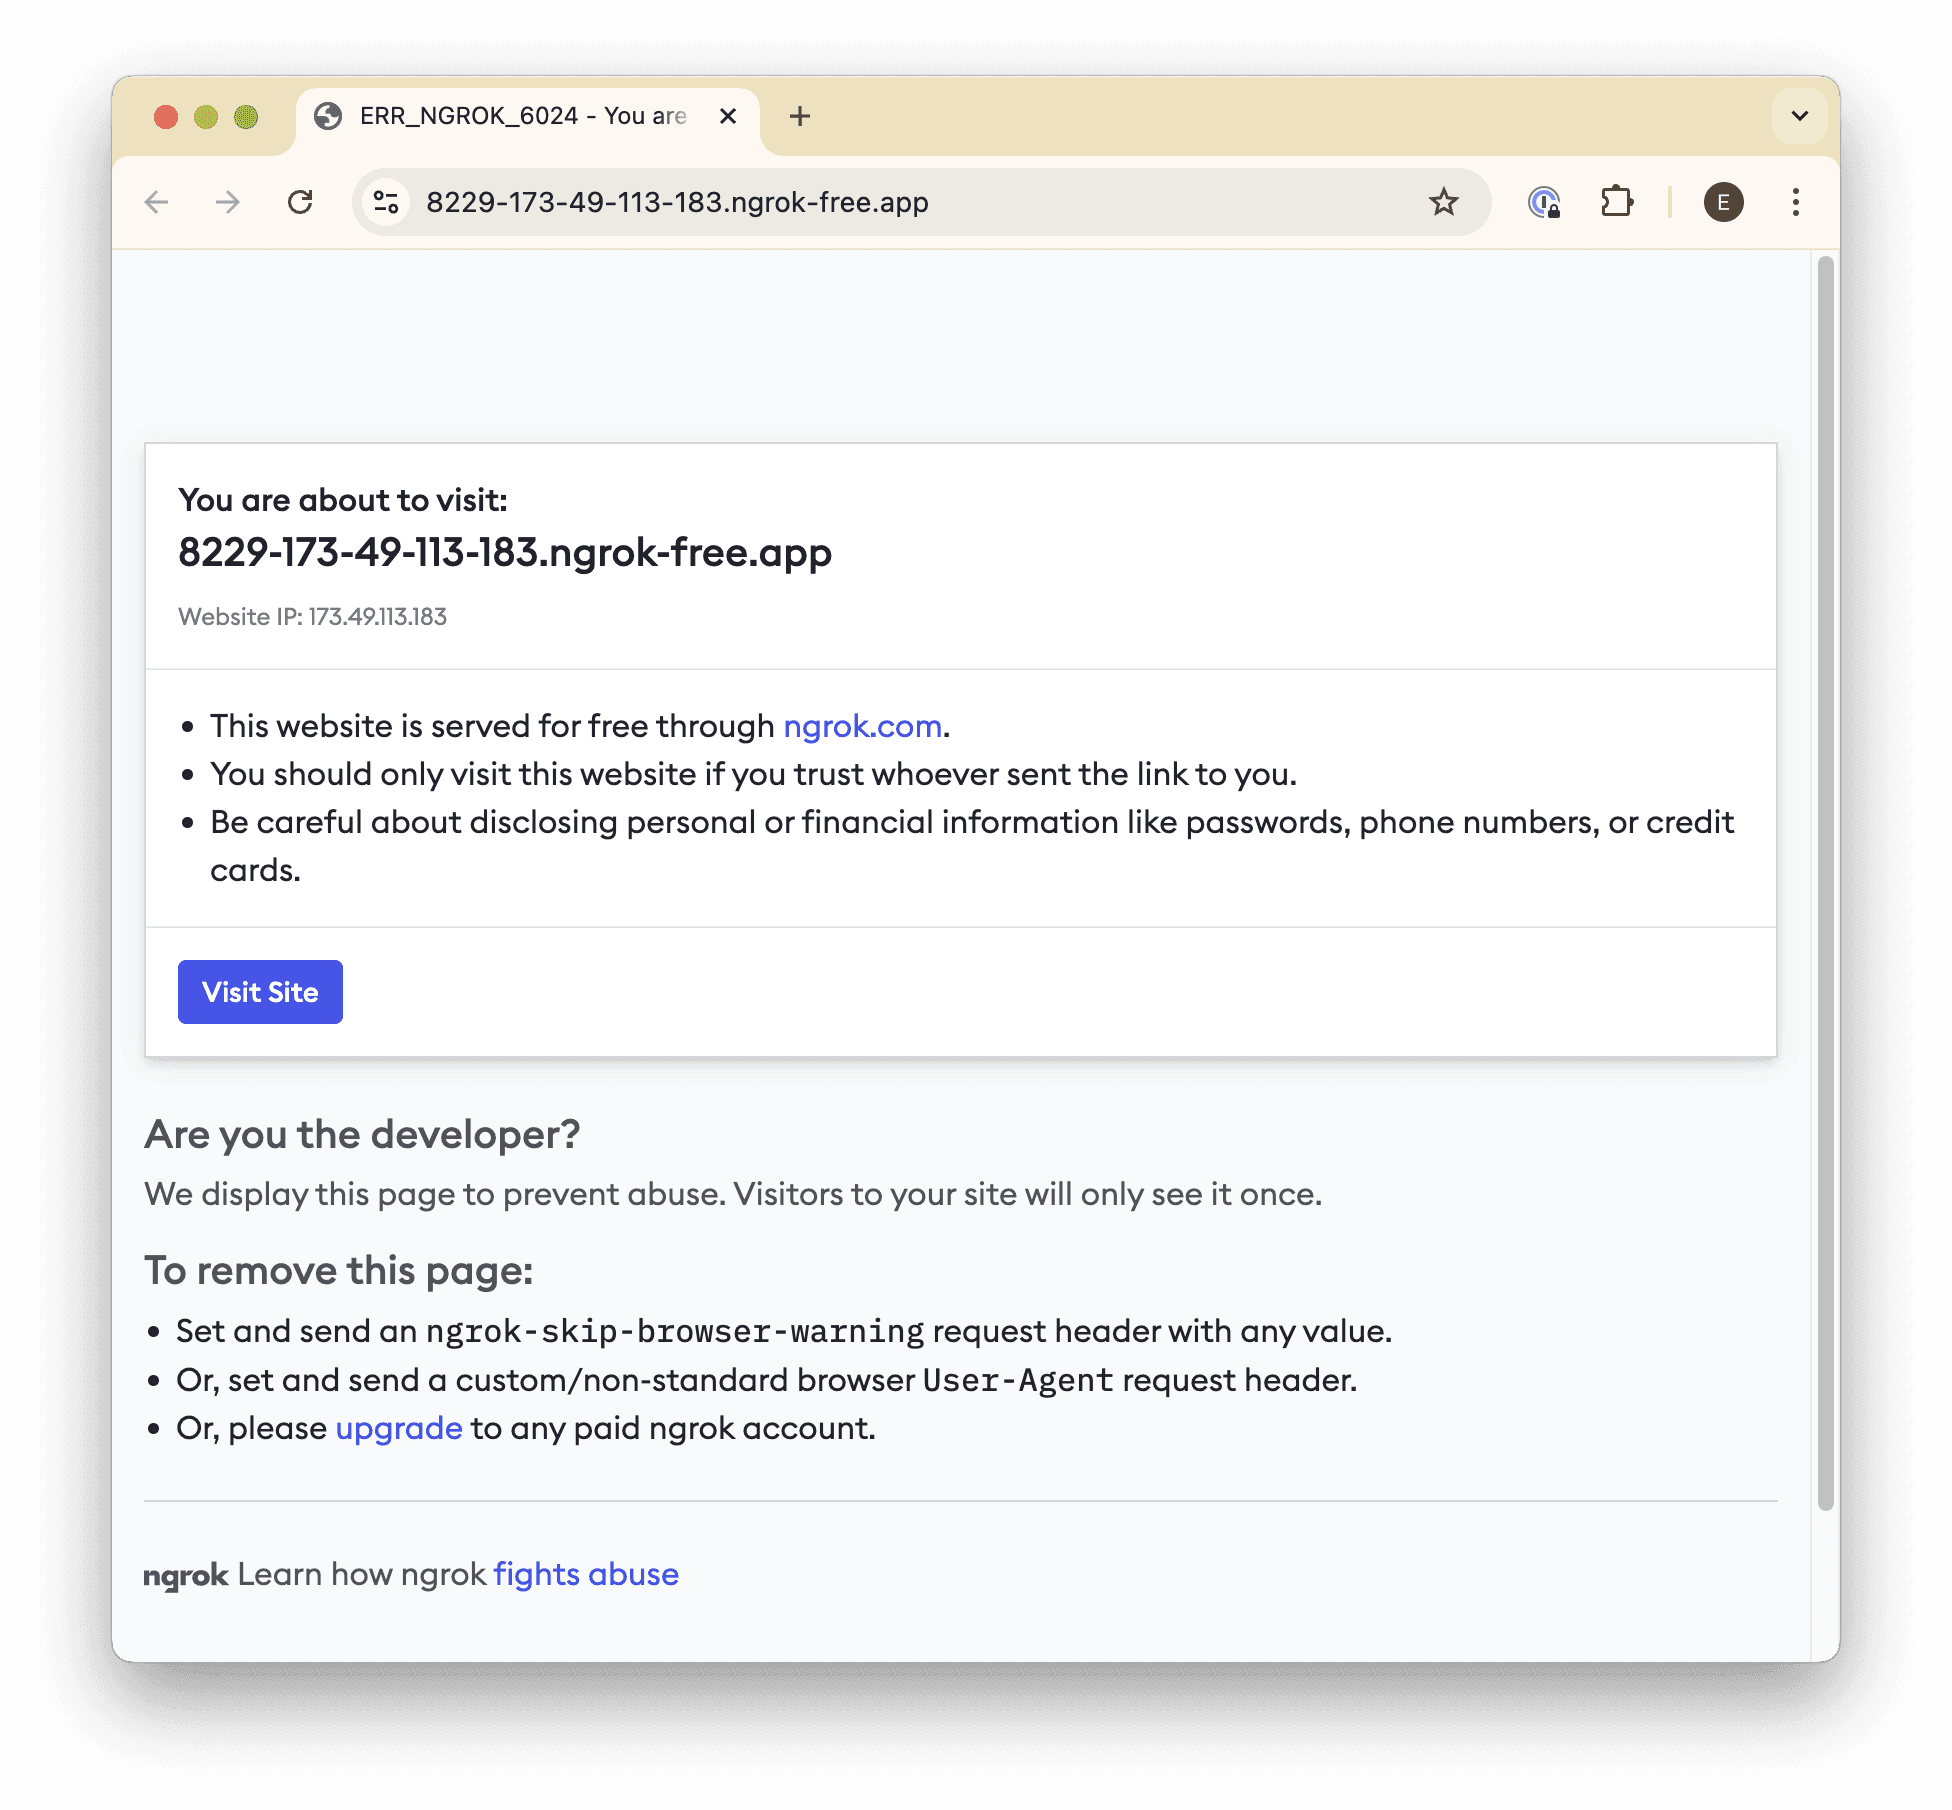
Be sure to click the Visit Site button to make sure that the tunnel is opened. Once you click it, you should see your app again.
You only have to click the “Visit Site” link once for each tunnel opened, so as long as you leave the tunnel running, you won’t have to click it again.
Just remember that if you do close your tunnel and open a new one, you’ll need to click through before Teams will be able to send you messages!
Step 2. Bot configuration
Before we can start writing the bot-specific code (we'll provide code samples for this later), we need to scaffold a few administrative things in order to create a package that we can install (or rather, “side-load”) in a Teams organization.
From the Teams Developer Portal, click Create a new app and give it whatever name you like, then click Add.
Navigate to Configure → App features, and click Bot.
Click the Create a new bot link below the “Select an existing bot” dropdown.
Click New bot, and give your bot a name (I typically use the same name as the app), and click Add.
Note that this may take a moment, as it will create a new “app registration” in the Azure portal behind the scenes.
Click on the bot you created.
Navigate to Configure in the sidebar, and set the Endpoint address to (your ngrok tunnel URL)/events (e.g.,
https://9999-111-22-333-444.ngrok-free.app/events). Note that we haven’t created this endpoint yet, but we’ll do that in the next section.You may also find it helpful to to bookmark this page so that you can update the URL in the future.
Navigate to Client secrets in the sidebar, and click Add a client secret for your bot.
Copy the generated secret and keep it somewhere safe, like a password manager, then click OK.
Navigate back to the Bots list (you can use the button at the top of the page).
Copy the Bot ID for your bot.
Navigate back to Apps → (your app) → Configure → Basic Information, and fill in all of the required fields (using the Bot ID you copied for the Application (client) ID field), then click Save.
Note that you can use fake information (e.g., example.com URLs) for things you don’t have yet. They just need to have valid values for now.
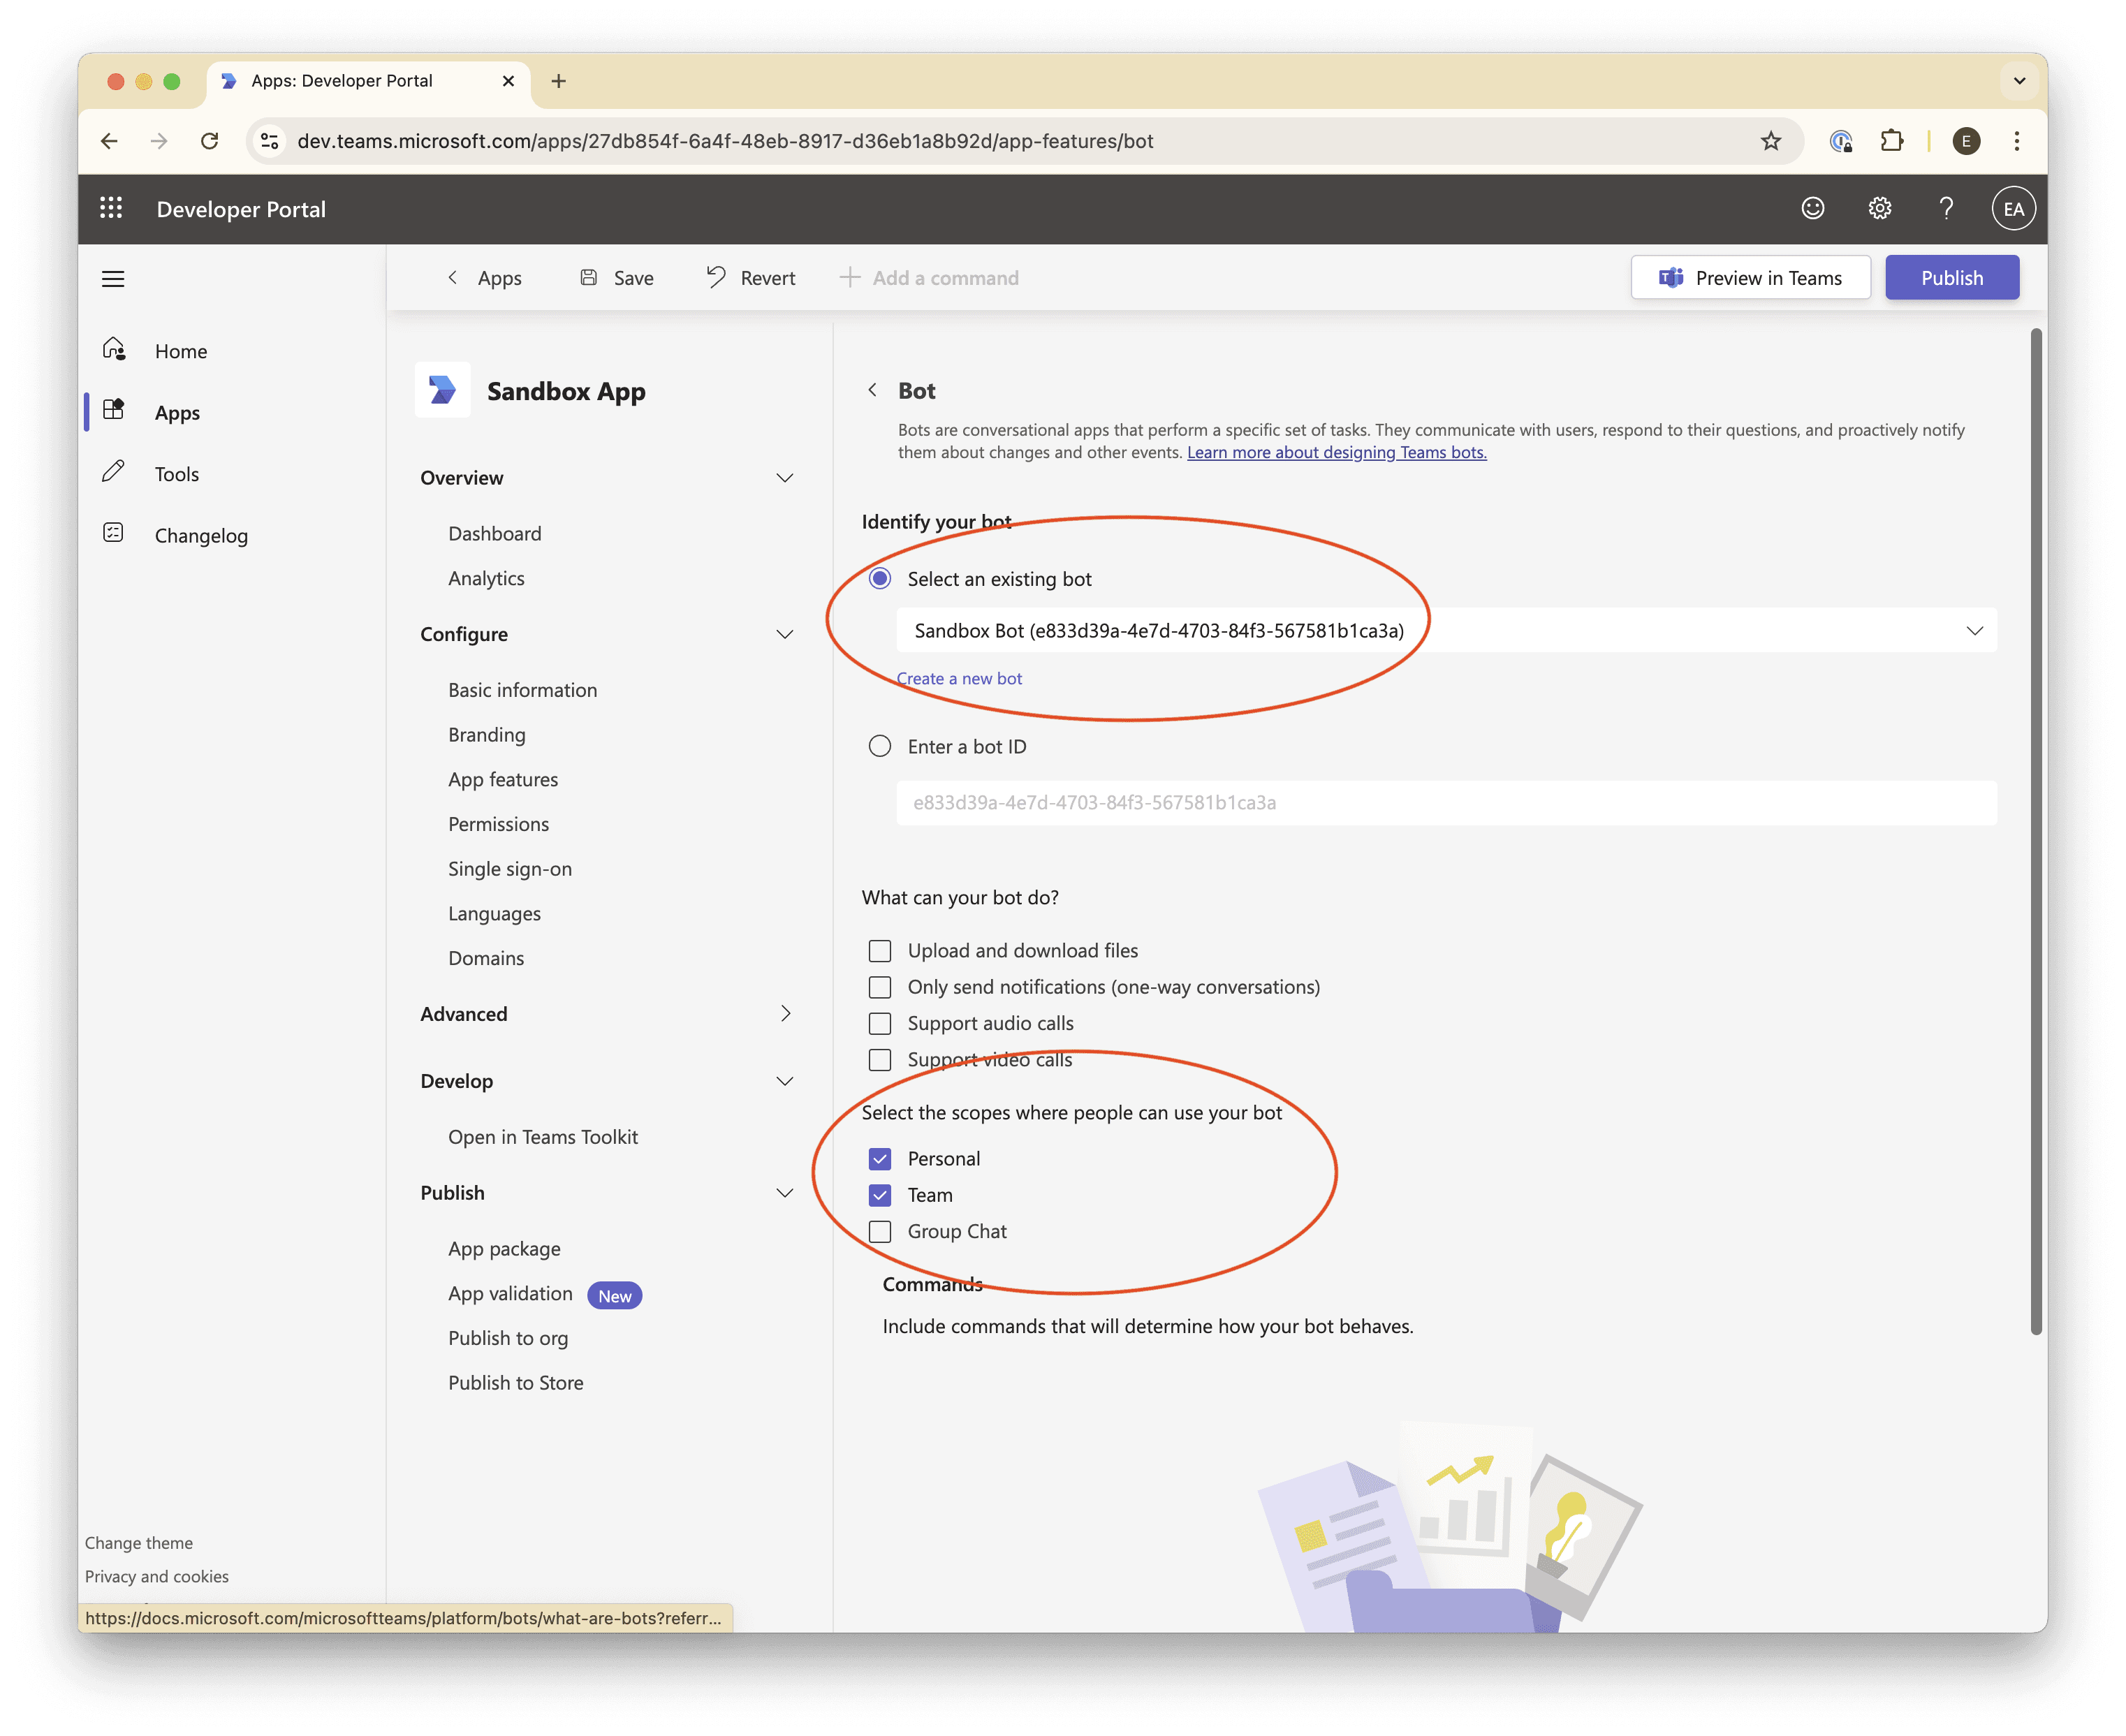
Navigate to Configure → App features, and click Bot.
In the Select an existing bot dropdown, select the bot you created.
Under the Select the scopes where people can use your bot, check the Personal and Team checkboxes.
Next, navigate to Configure → Permissions → Team Permissions → Application, check the box for
ChannelMessage.Send.Group, to make sure our bot can reply to the messages it receives.Scroll to the bottom and click Save.
Boom! Bot configuration complete ✅
Review
You should now have:
An app with all of the basic information filled in.
A bot with its endpoint address configured to send messages to our
ngroktunnel.A client ID (the Bot ID) and secret that we’ll use to authenticate our app.
Step 3. Publish the Teams app
Before we can install our bot into our organization, we need to:
Publish it to the organization.
Make sure our organization supports installing “custom apps”.
Approve our app for installation.
Let’s get started.
Publish the app to the organization
From the Teams App Developer Portal, navigate to Apps → (your app) → Publish → Publish to org.
Click Publish.
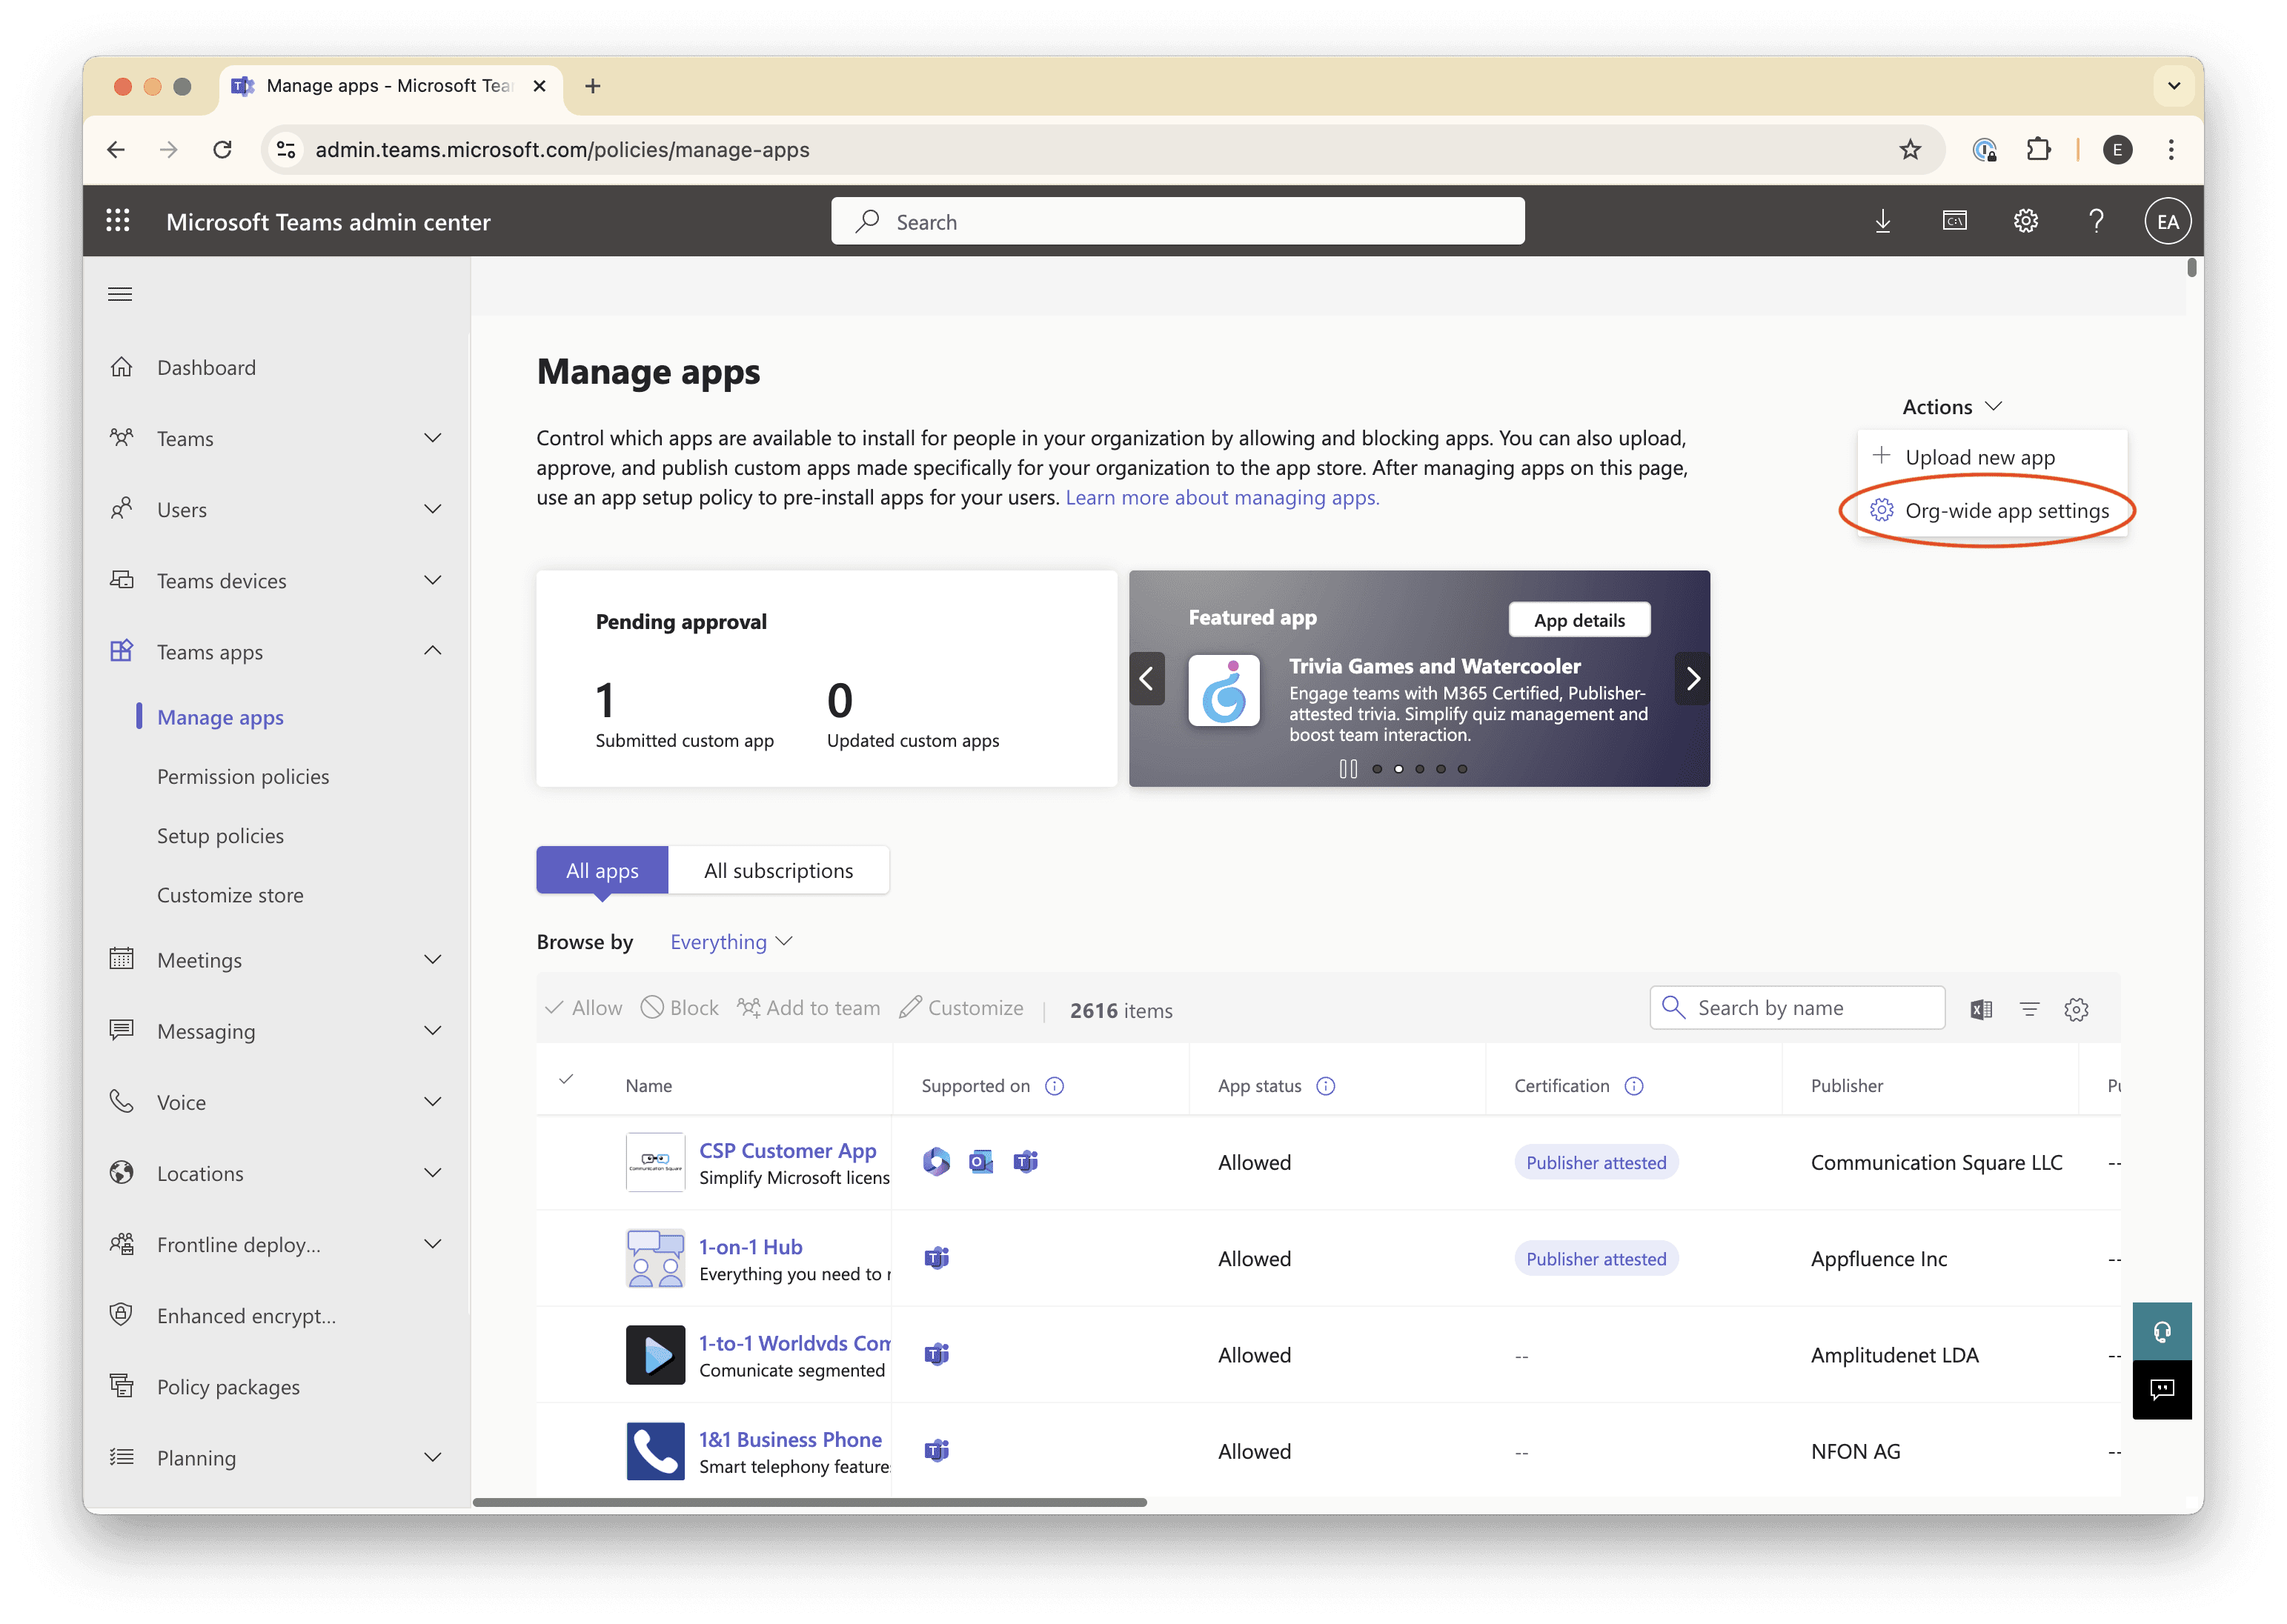
Enable custom app installation for your organization
In a new browser tab, navigate to the Microsoft Teams Admin Center, and then to Teams apps → Manage apps in the sidebar.
Click the Actions dropdown in the upper right, and then click Org-wide app settings.
Make sure the Custom apps toggle is “on”.
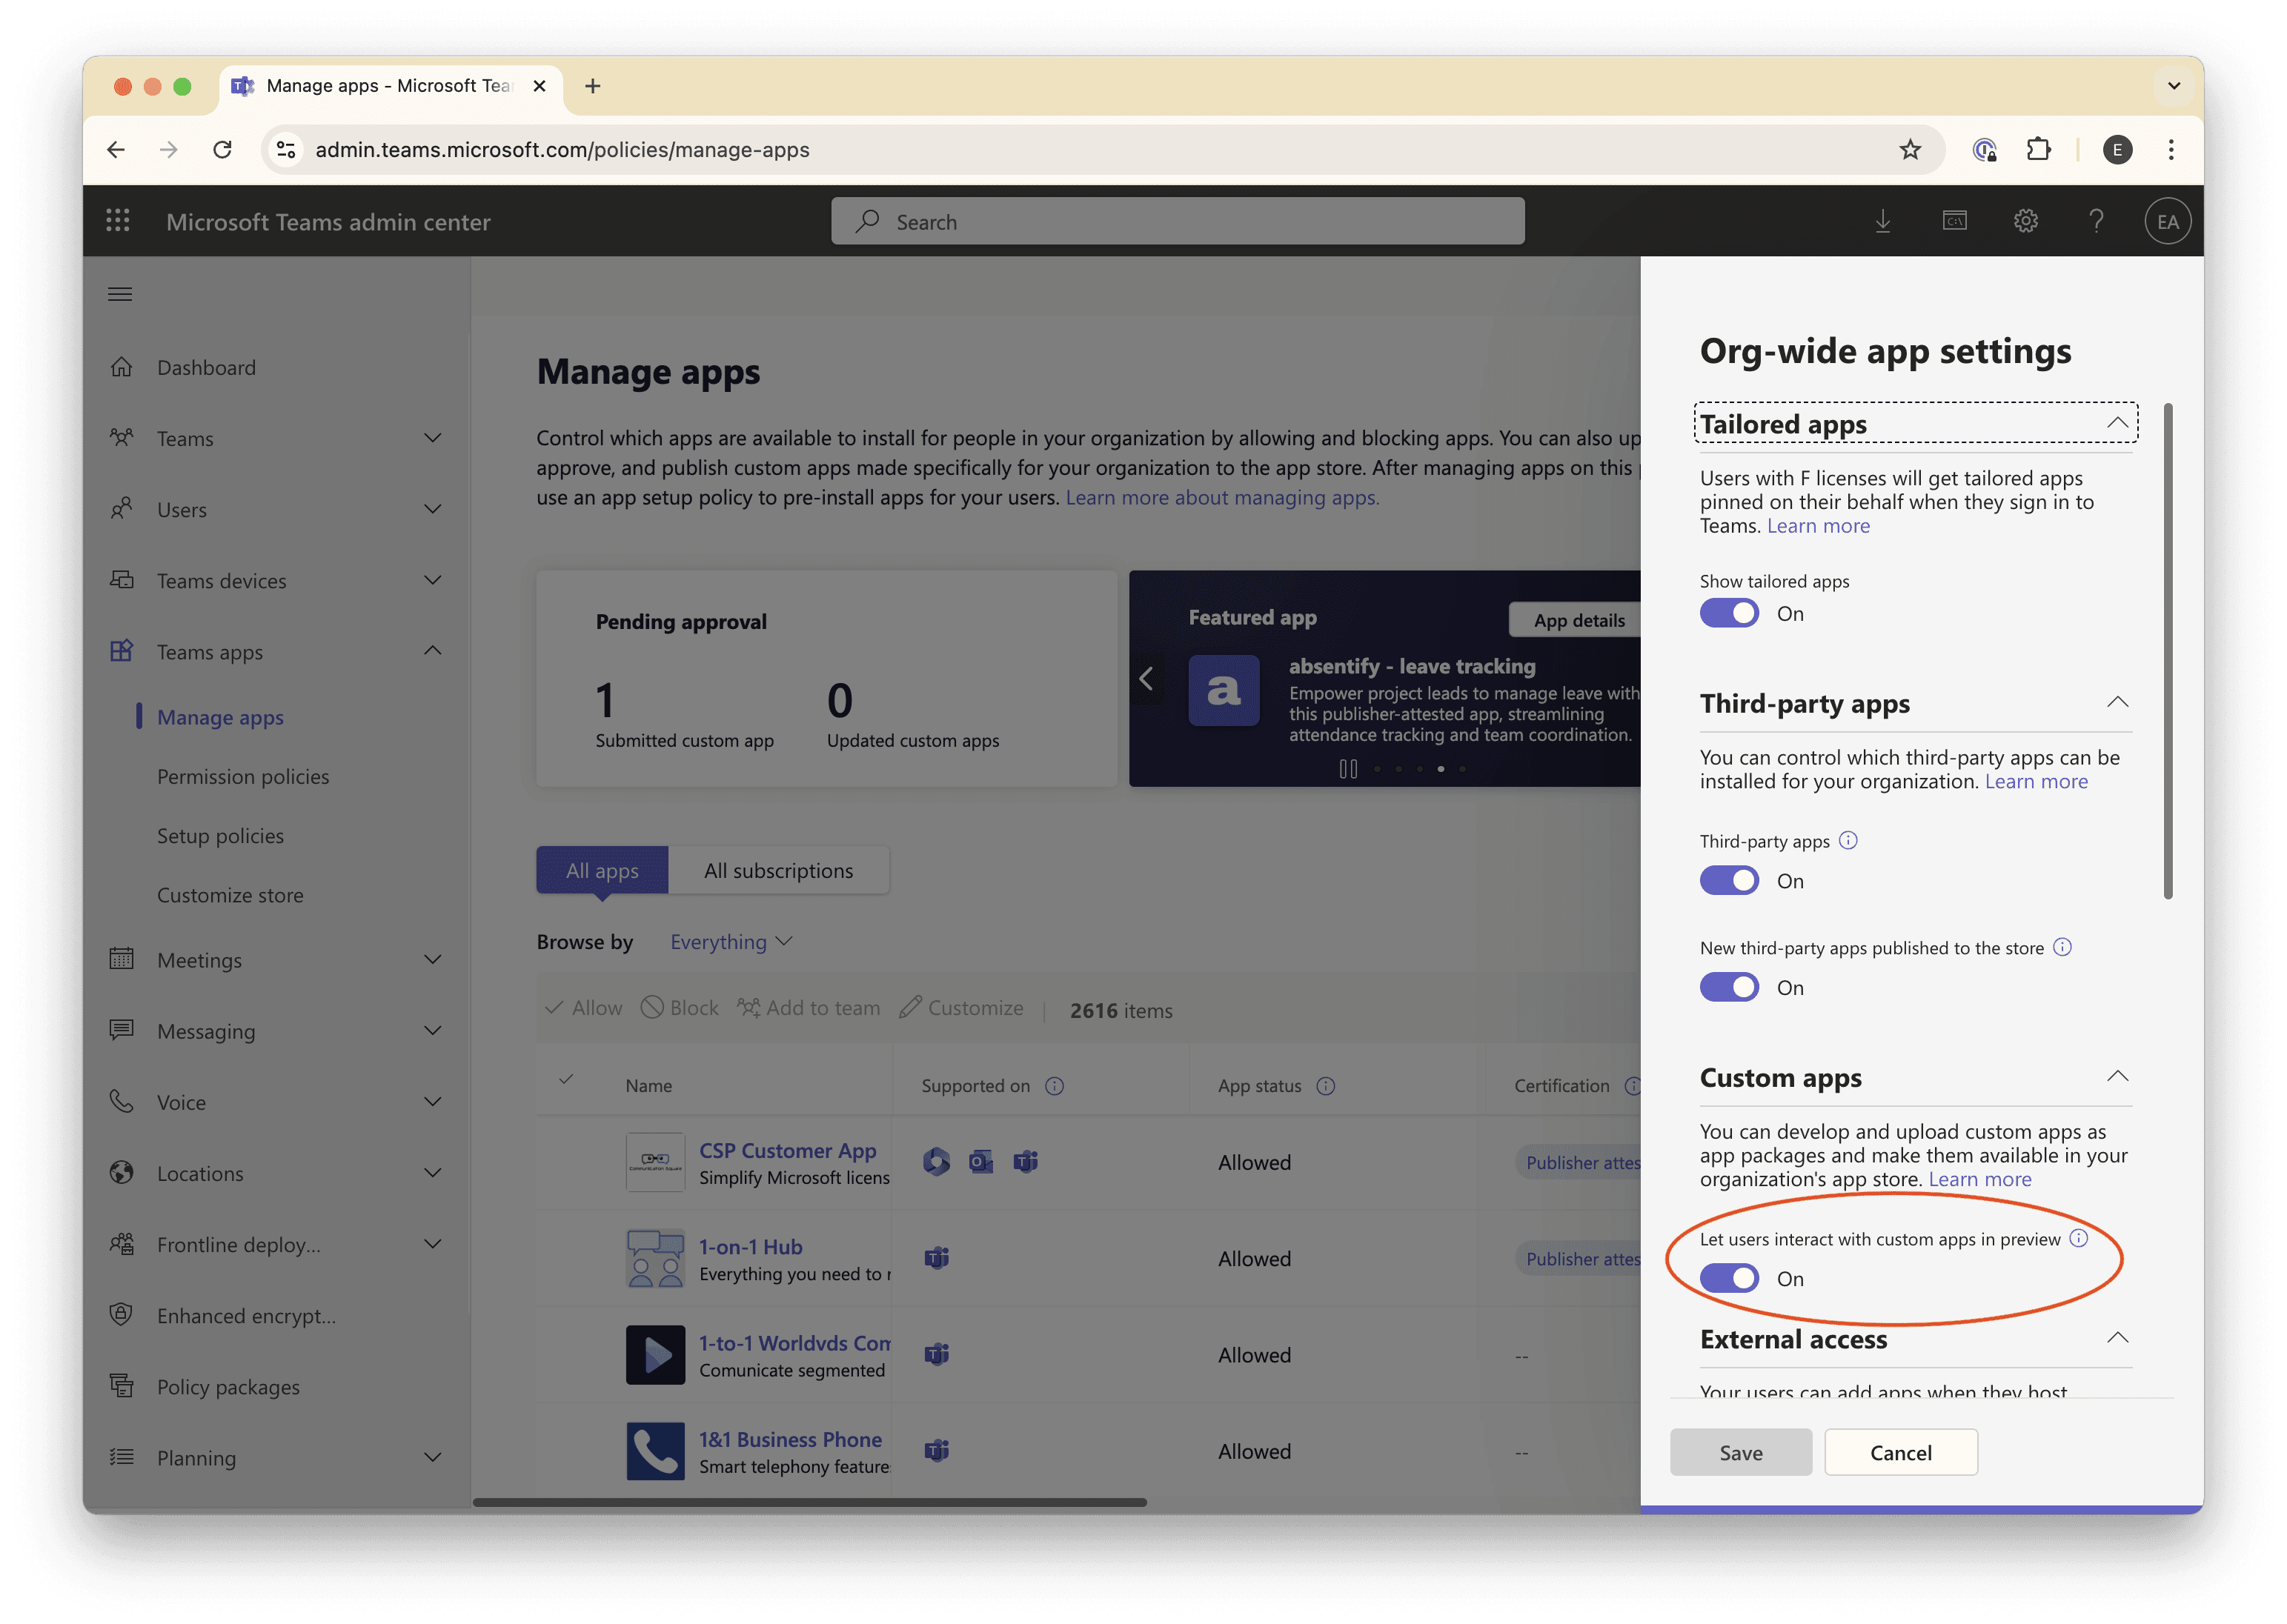
Click Save, then use the sidebar to navigate to Teams apps → Permission policies.
Click Global (Org-wide default).
Ensure that the Custom apps dropdown is set to Allow all apps.
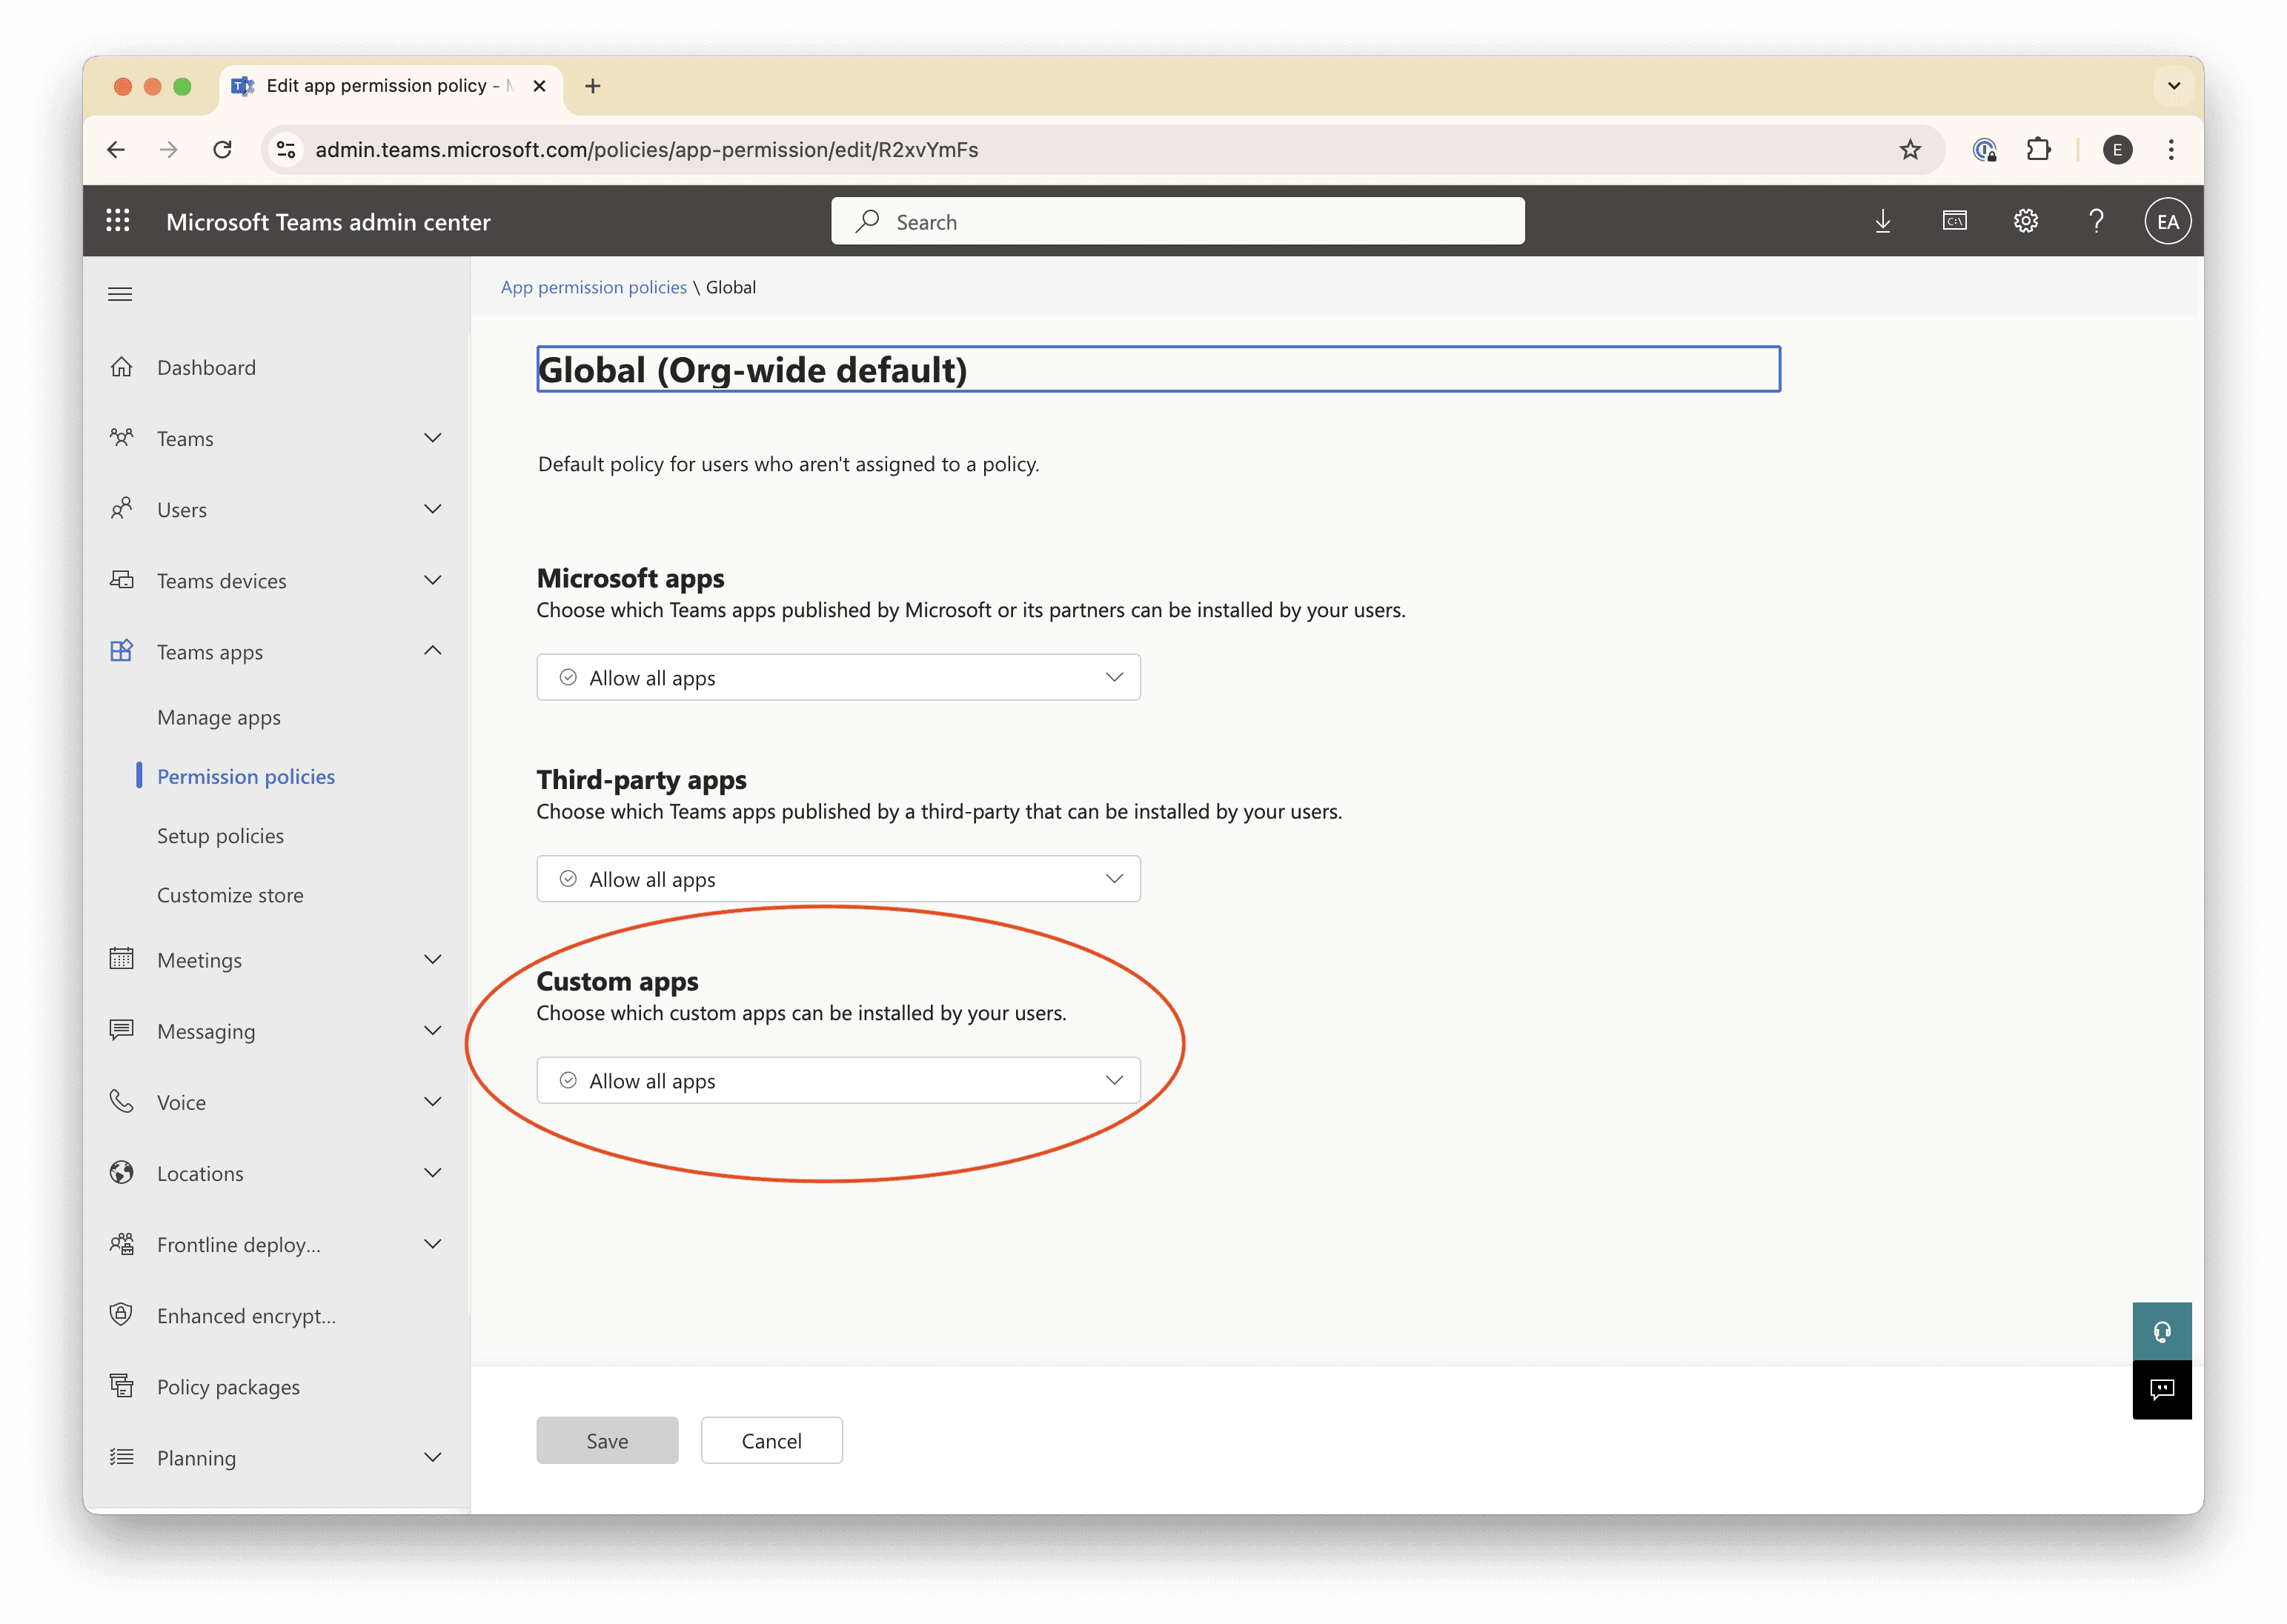
These settings will allow you to install “custom” (i.e., unpublished) apps like the one we’re building.
Approve the app for installation
Finally, we need to approve our custom app that we published to our organization, so that we can request to install it.
Navigate to Teams apps → Manage apps.
Search for the name of your app in the table’s search field.
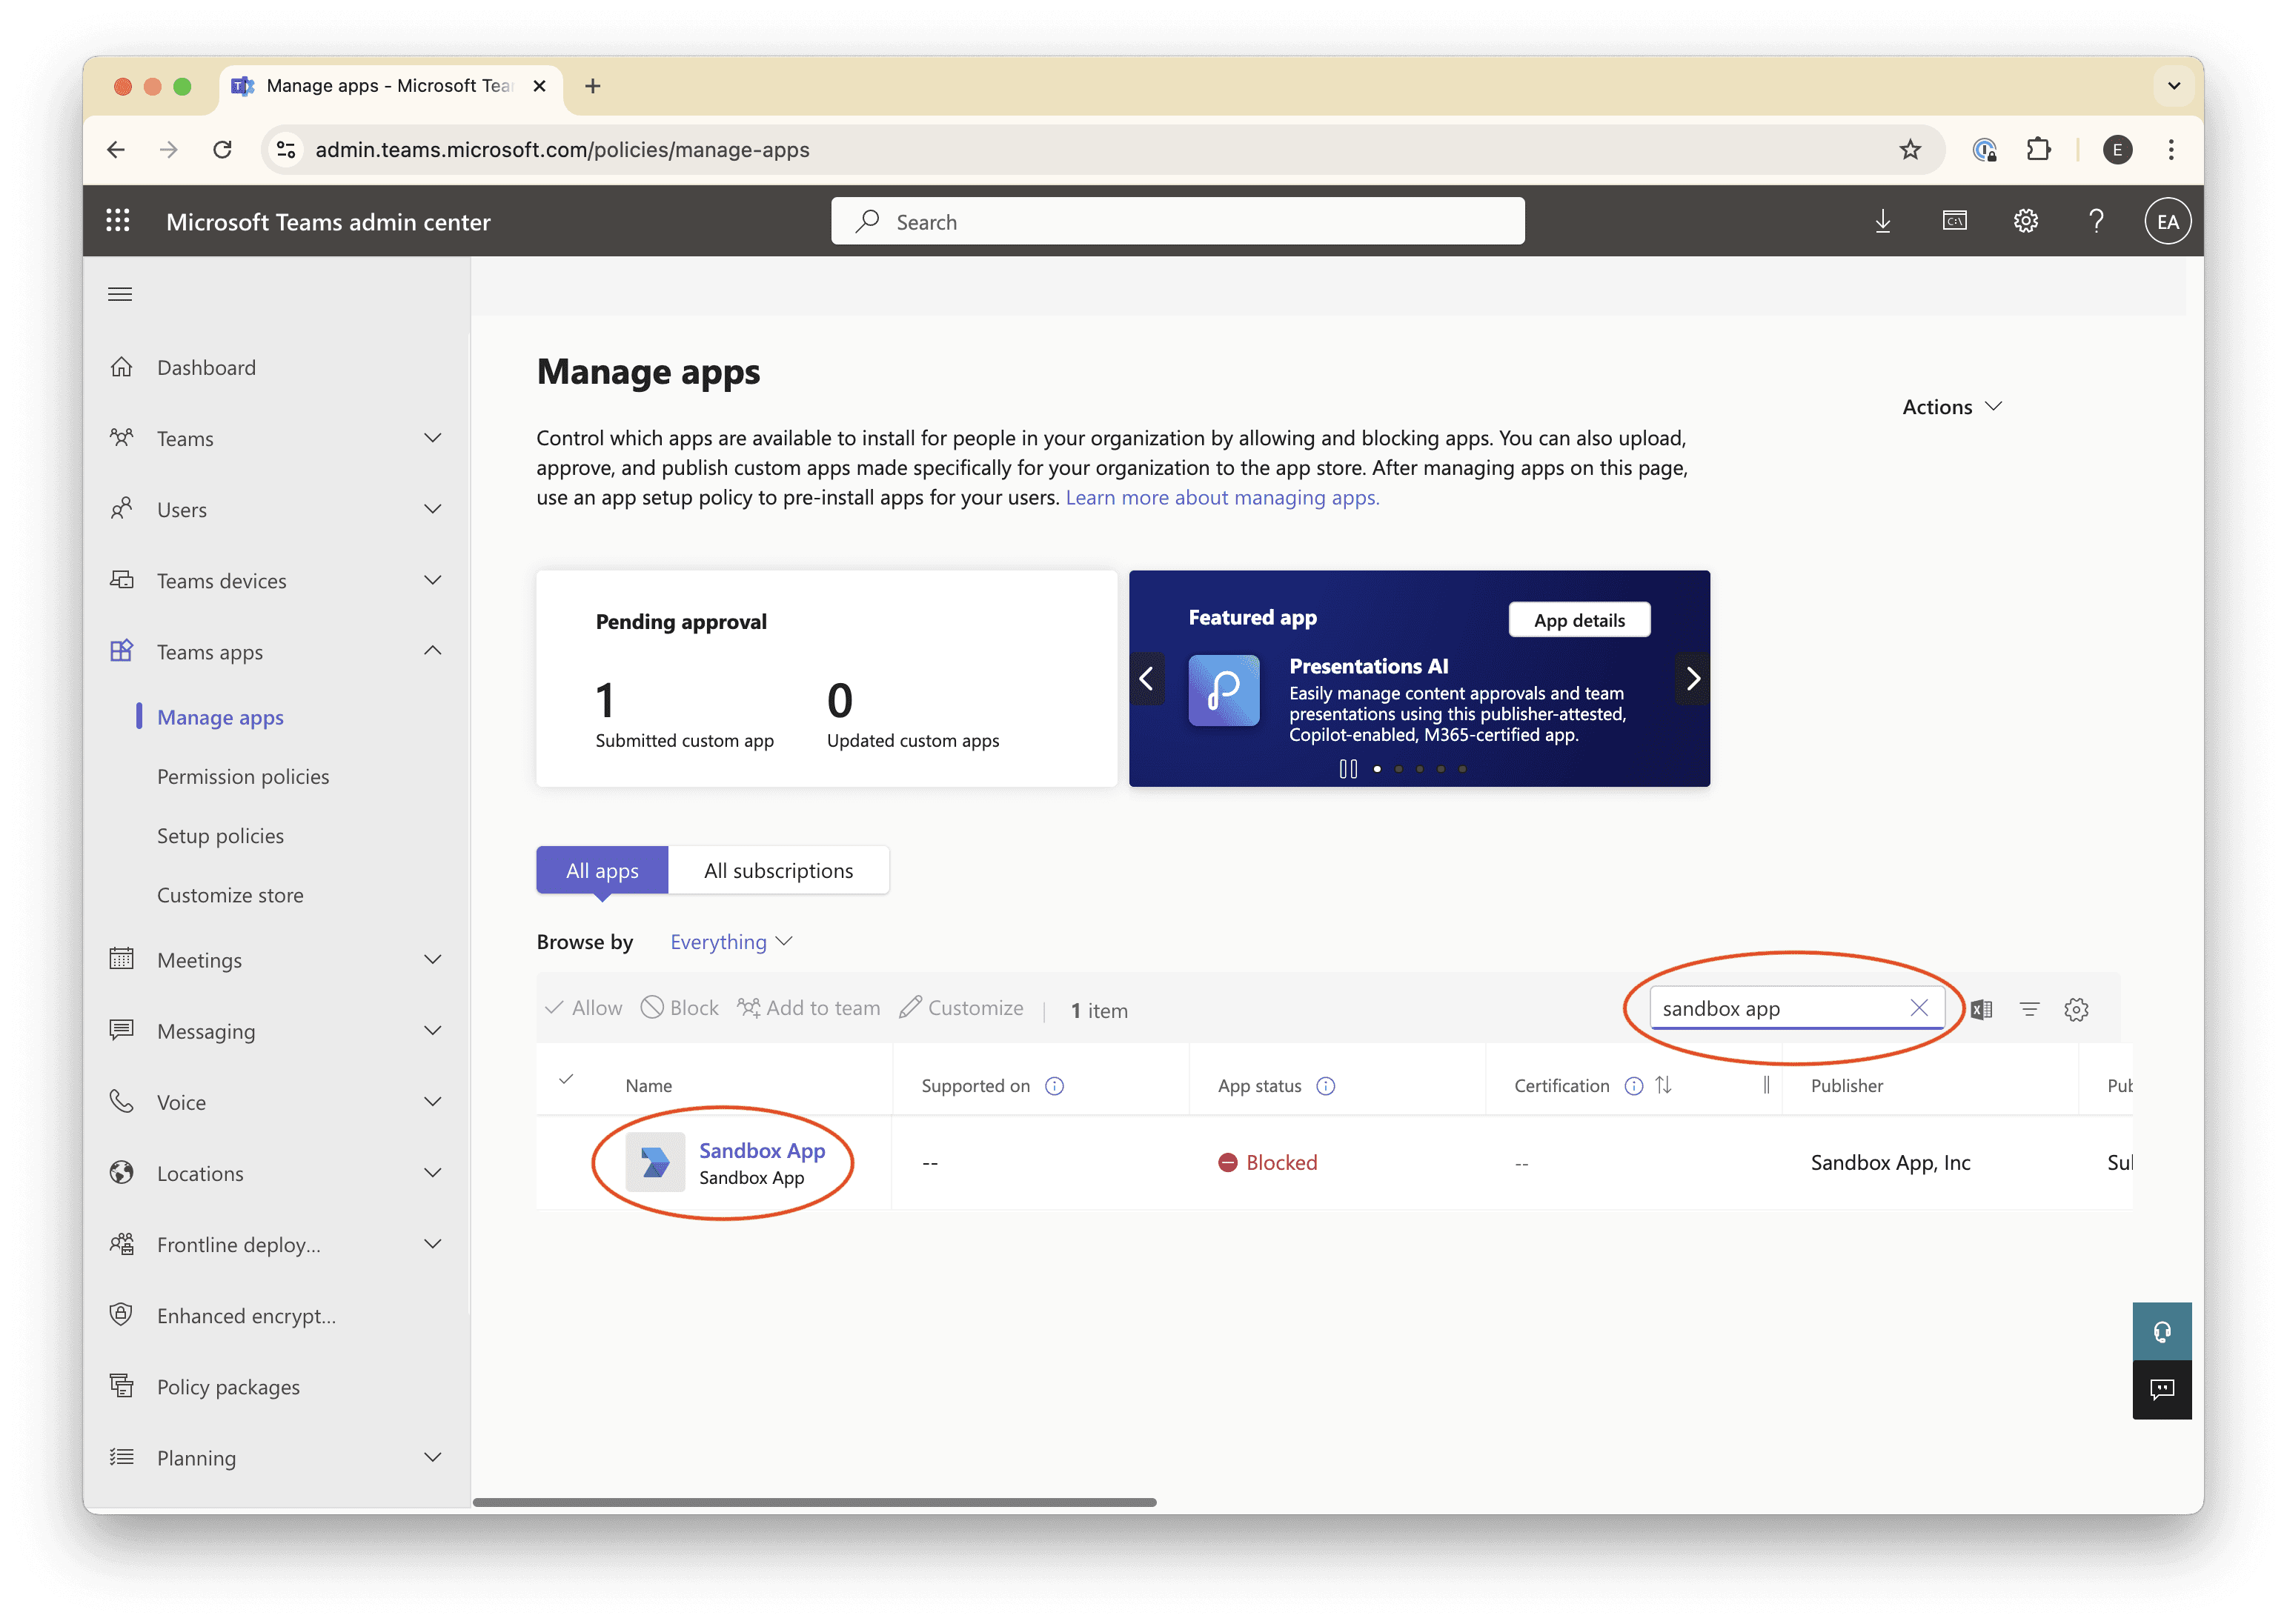
Your app probably says it’s “blocked”, which is what we’re going to fix.
Click on the name of your app.
Click Publish, and confirm the action in the modal that appears.

Install the app
Finally, we can install our app into our team!
From the Teams App Developer Portal, navigate to Apps → (your app).
Click the Preview In Teams button in the upper right of the page.
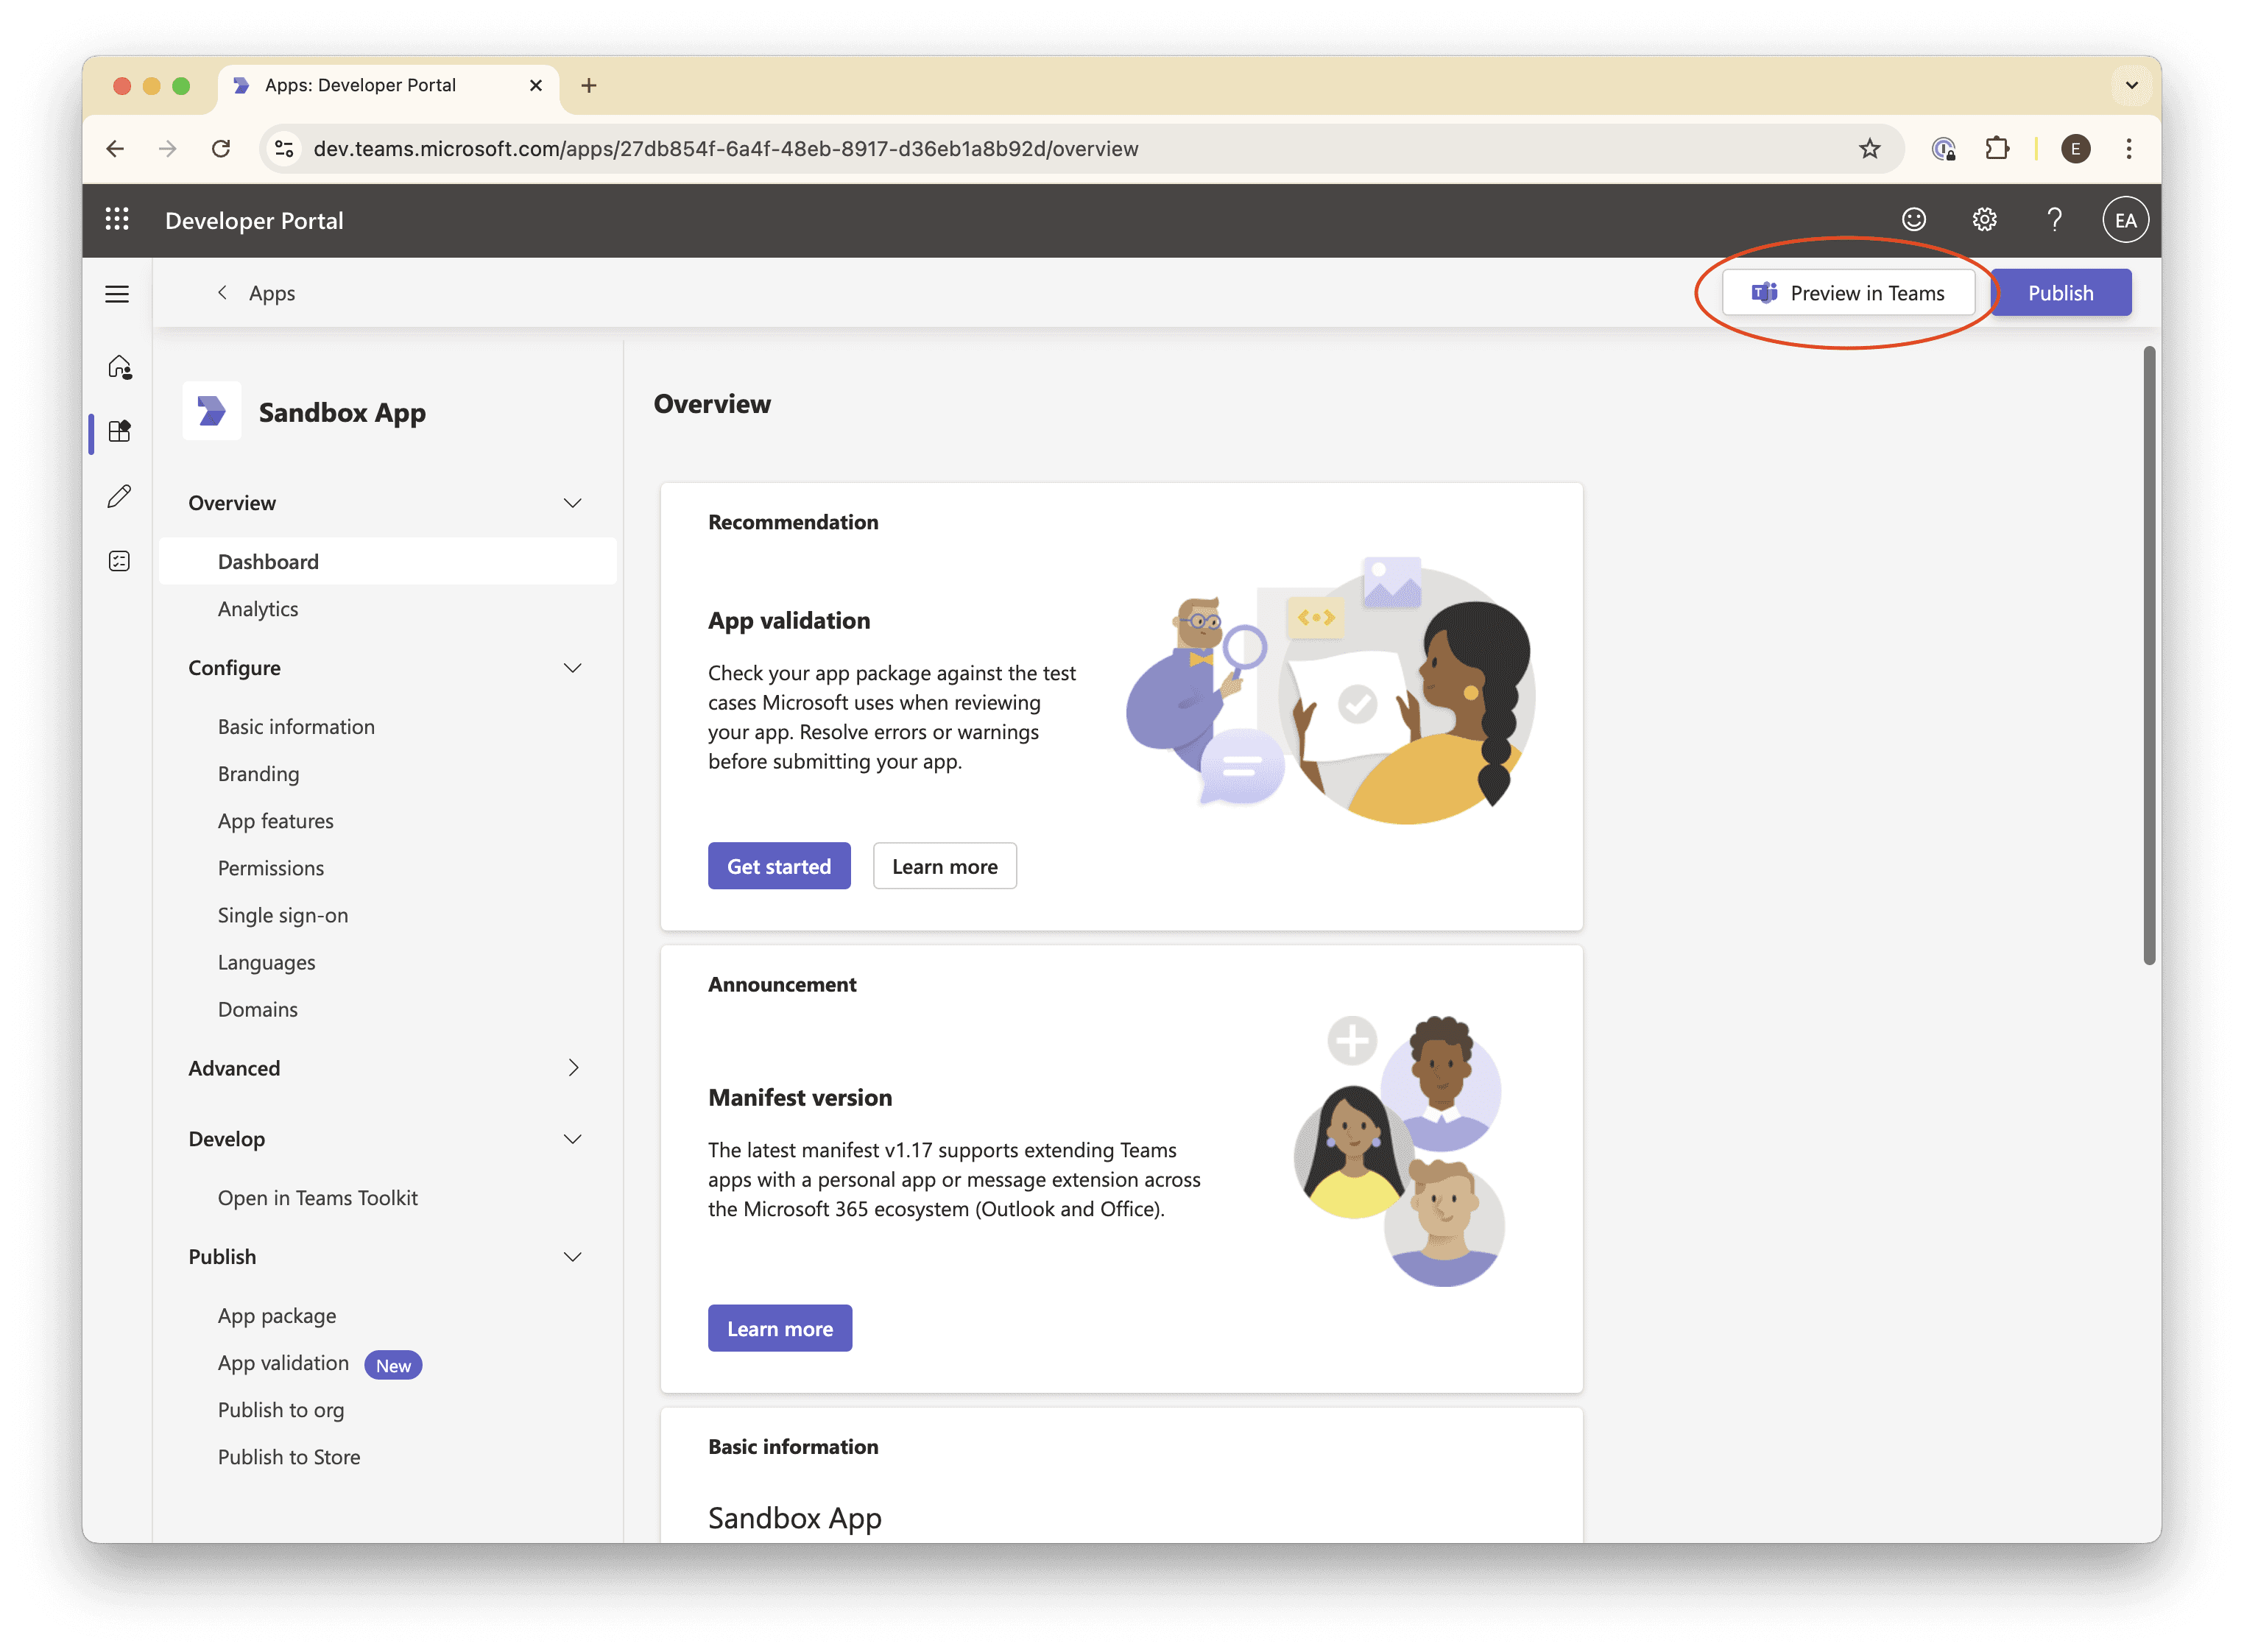
Teams will open to an installation page for your bot.
Click Add to a team.

Select the team to which you want to add your bot, and then click Set up a bot.

Congrats, you’ve installed your app in Teams! 🎉
Make sure messages are making it to our app
While we haven’t set up the webhook endpoint (/events) yet, we can still try to send our bot a message and see if a request shows up in our logs.
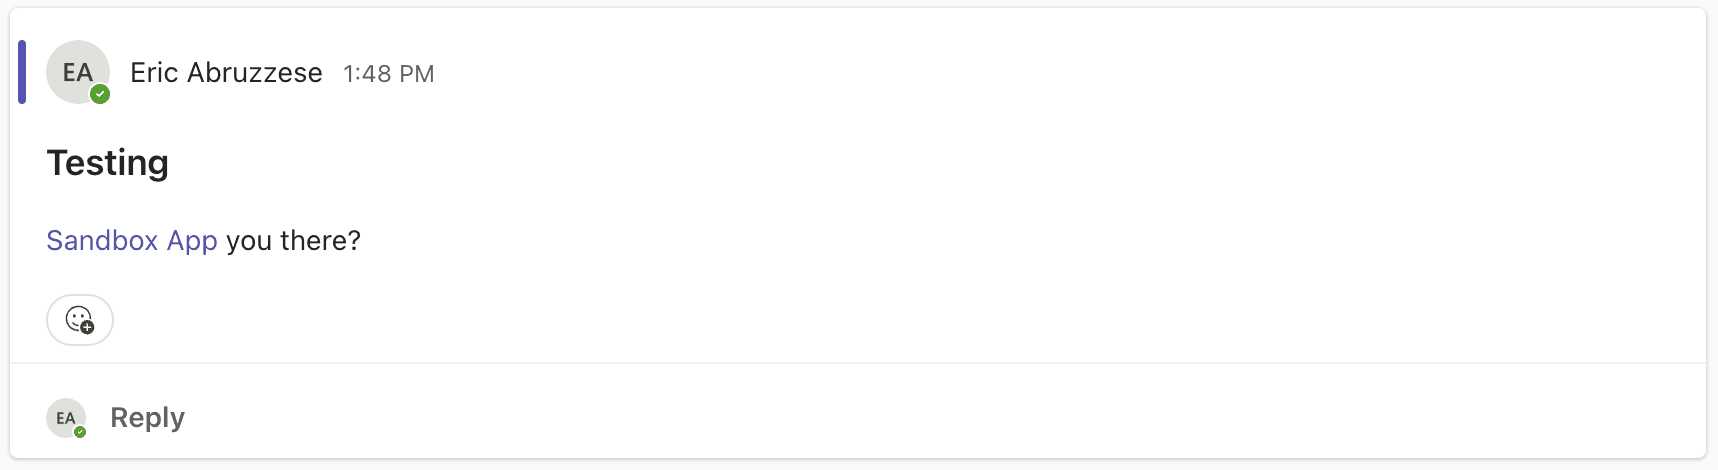
Create a new Teams post in the channel where you installed your bot, and make sure to tag your bot in it.
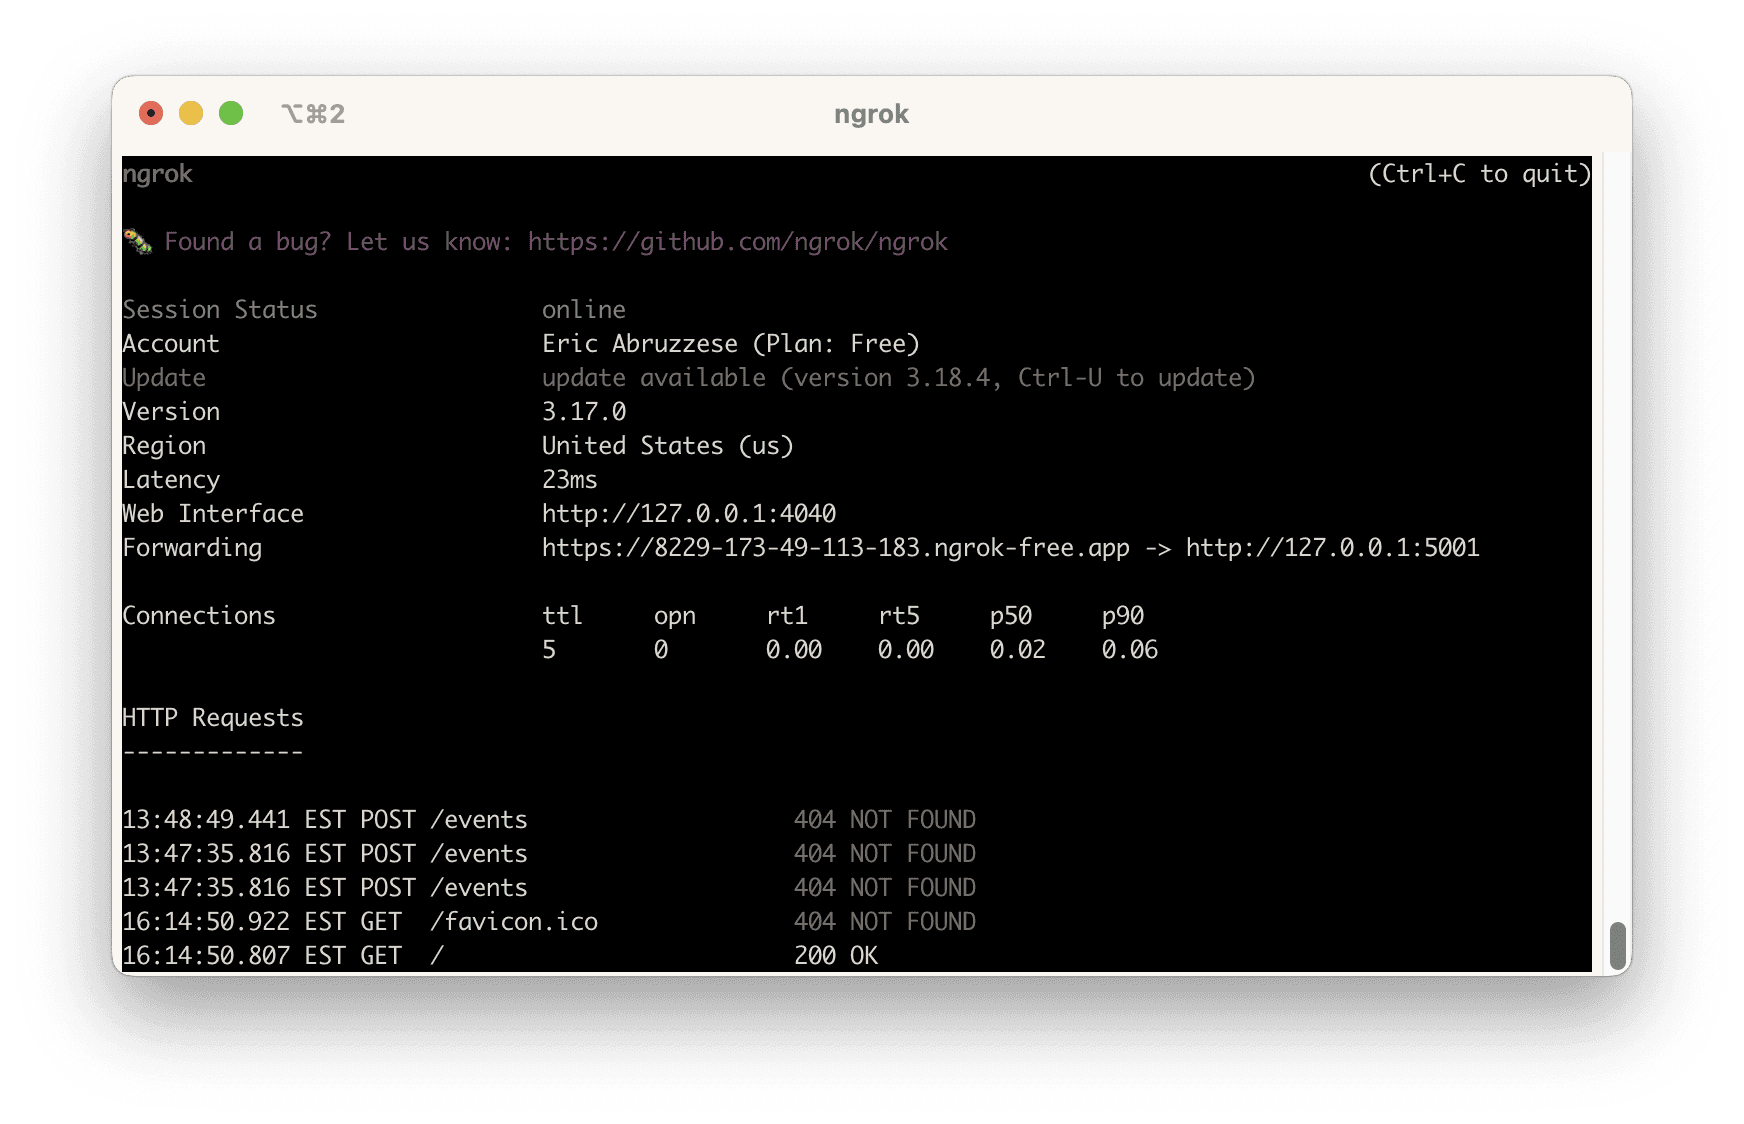
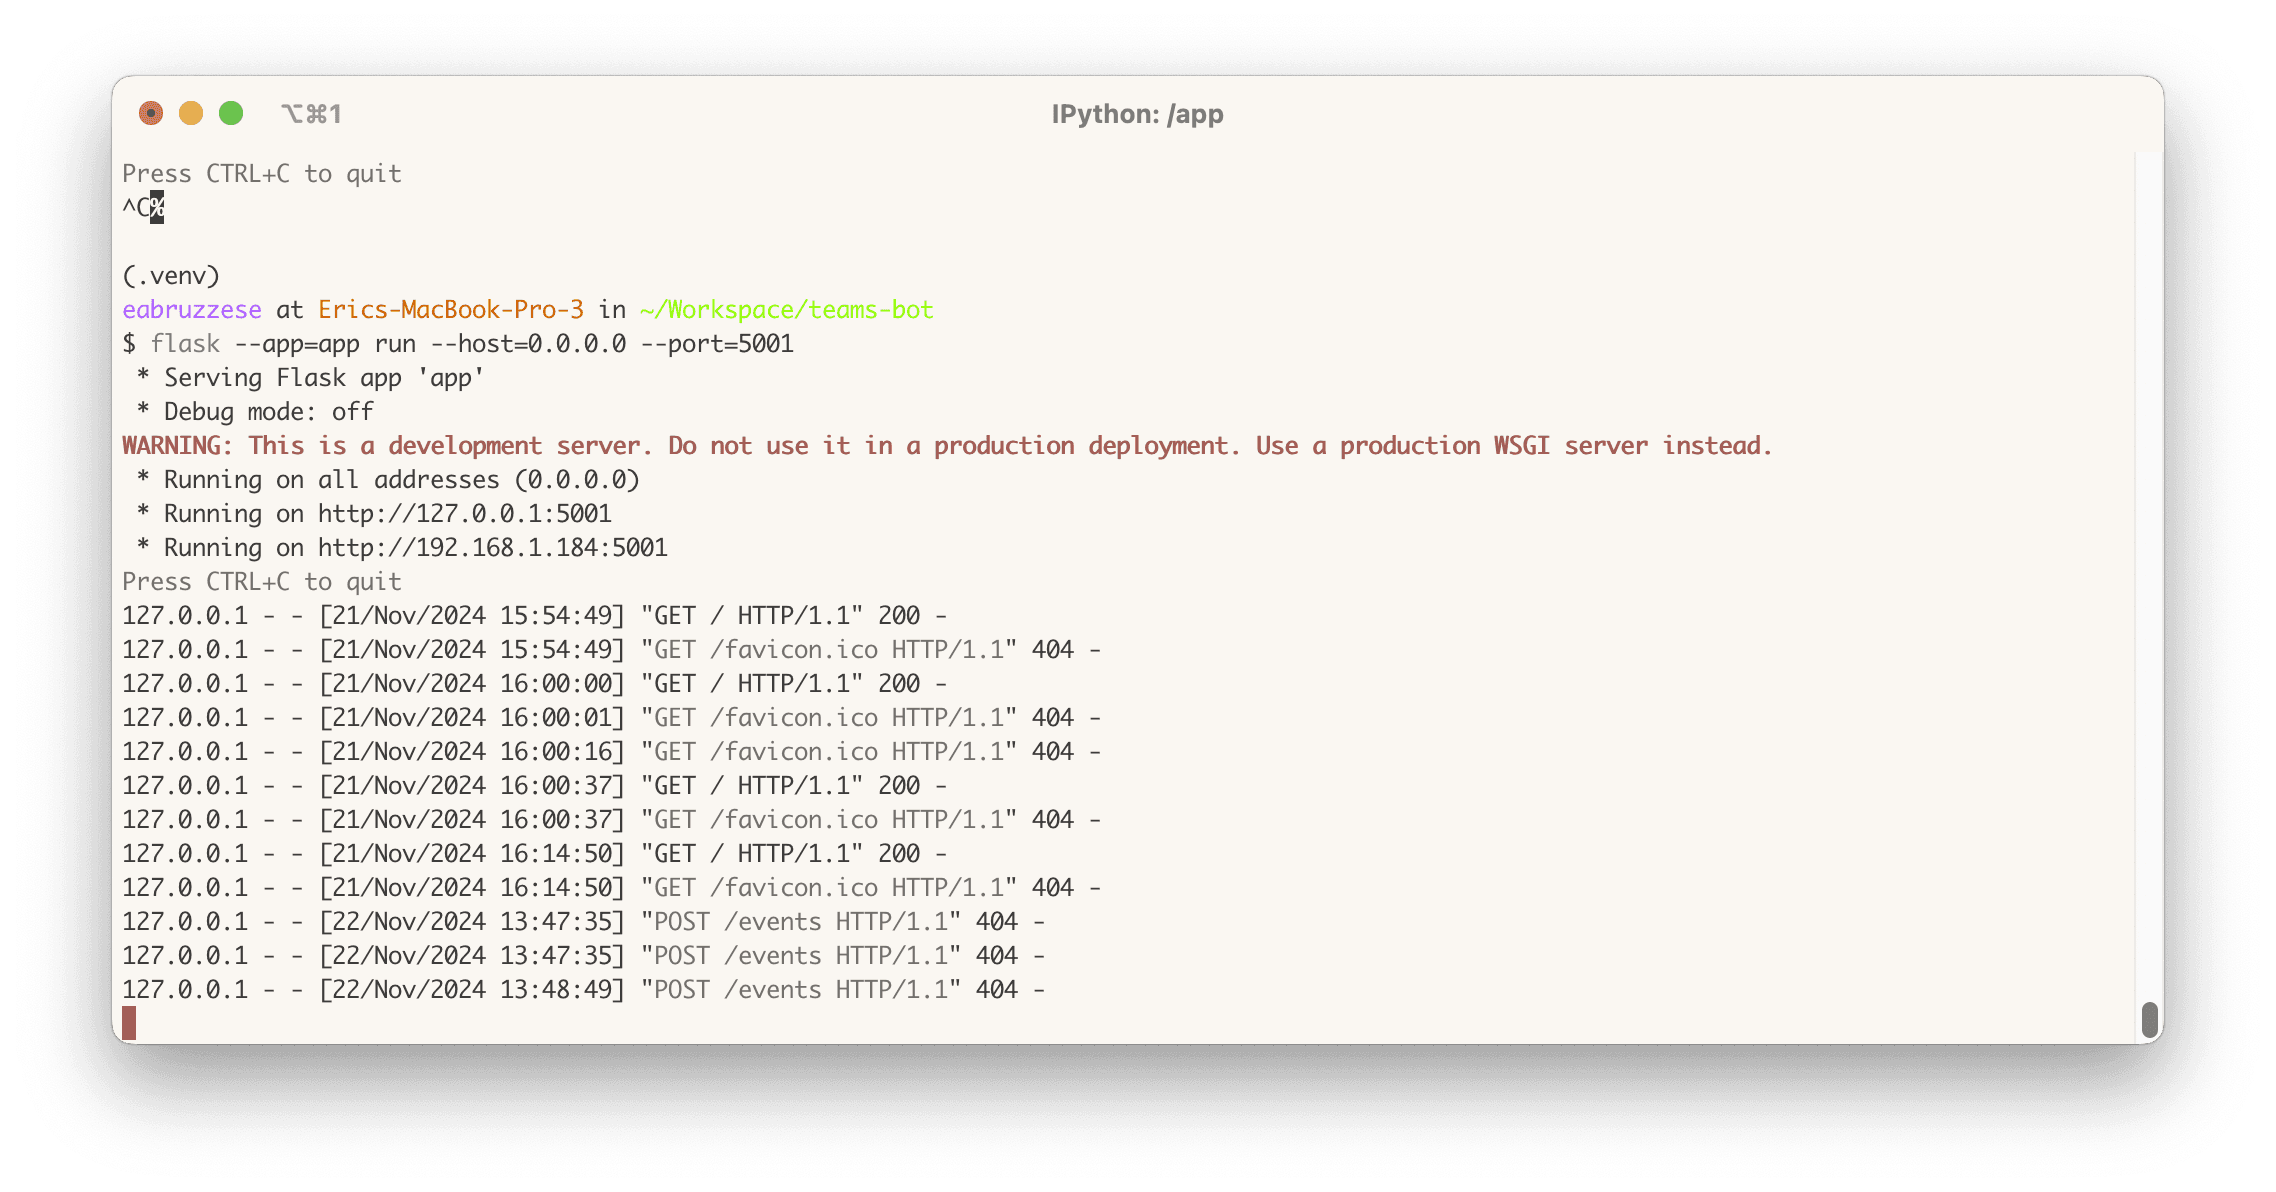
You should see some 404s in the ngrok and Flask logs in your terminal, letting us know that Teams tried to POST a message to our /events webhook (albeit unsuccessfully):
Review
We’ve now configured our organization to:
Allow the installation of “custom” (unpublished) apps in our organization.
Approved our app for installation within our organization while we develop it.
Installed our app into a team.
Checked that messages are making from Teams to our Flask app through our tunnel.
Next up: let’s write some code!
So, you're exploring ways to utilize Teams to enable more productivity and efficiency for your organization? If you're reading this, you're likely either:
Just beginning to investigate the effort involved in building a Teams bot using the Python SDK; or
You’ve been trying to build a bot in Teams, and you’re looking for examples that illustrate how you might build something more production-ready.
Either way, this guide will get you sorted out.
What we’re going to build: a bot-based Teams app
Before we get moving, let’s make sure you’re on the right train. In this tutorial, we’re going to walk through (and provide code samples for) how to:
Create a new bot application in Teams and install it into our organization while we develop it.
Use the Microsoft Bot Framework to build an “echo” bot that just echoes back the message it receives. We’ll start here so that we can establish a feedback loop and iterate quickly.
Extend our echo bot with asynchronous processing capabilities. This will allow us to process messages using a background worker (like Celery) for expensive operations, like calling an LLM or slow external APIs.
Use OpenAI to give our bot application some brains so that it can help with more complex tasks.
Understand Microsoft Graph and how it relates to the Microsoft Bot Framework (we'll use this to retrieve the conversation history for a Teams post to pass along to our bot so it can follow the conversation).
Understand the different kinds of events that a Teams bot can handle and implement one to send a welcome message when the bot gets installed for the first time.
Let's get to it.
Step 0: Get organized
The first and most important thing we need to do is to get organized. The Microsoft APIs and SDKs can be deep and daunting (and at times, disorienting) so it’s important that we start by setting ourselves up for success.
Prerequisites
First, let’s start with a checklist of things you’ll need to have if you want to follow along with the tutorial:
An Azure account (or a colleague with an Azure account) with enough access to create and manage an App Registration in Microsoft Entra ID.
A Python environment with Python 3.12 or later (it may work with older versions of Python, but we haven’t tried it).
Access to a Microsoft Teams account for testing and bot configuration.
The ability to side-load apps into your Teams organization.
The ability to use
ngrokordevtunnel(or a similar tool) so that your bot can receive messages from Teams as you’re building.
Useful bookmarks
You’ll also want to have the following URLs bookmarked, since you’ll be using them a lot:
The Microsoft Teams Developer Portal (https://dev.teams.microsoft.com/)
The App Management page of the Teams Admin Panel (https://admin.teams.microsoft.com/policies/manage-apps)
We’ll add some more specific bookmarks as we scaffold out our app in the next section.
Step 1: Scaffold the app
The first thing we need to do is scaffold our app so that we can quickly get into a feedback loop. We’ll start by setting up a very basic Flask application, starting an ngrok tunnel, and then setting up the Microsoft entities necessary to get Teams to start sending direct messages to our bot through that tunnel.
Scaffold a simple Flask app
We’ll start by standing up a very simple “hello world” Flask app. So that we can point our ngrok tunnel at it.
Create and activate a new virtualenv for the project, and install Flask
We’re using Python’s built-in venv module for simplicity, but you can feel free to use your favorite dependency manager (uv, poetry, pipenv, etc) if you like.
# Create a directory for the project
$ mkdir teams-bot
$ cd teams-bot

# Create a new virtual environment in a .venv folder in our project
$ python -m venv .venv

# Activate the virtual environment
$ . .venv/bin/activate

# Install Flask
$ pip
Create a “hello world” app
Now that we’ve got a virtual environment ready to go, we can create a simple Flask app just to serve up the text “hello world”. Create a new file called app.py with the following contents:
from flask import Flask

app = Flask(__name__)

@app.route("/")
def hello_world():
    return "<p>Hello, World!</p>"
Start the app and make it listen on all hosts
Back in your terminal, start the app:
$ flask --app=app run --host=0.0.0.0 --port=5001

 * Serving Flask app 'app'
 * Debug mode: off
WARNING: This is a development server. Do not use it in
⚠️ You can use whatever port you like here, but note that Flask’s default of 5000 is typically already in use by MacOS’ *AirDrop & Handoff* feature, so we’re using 5001
Make sure the app is working
Open up a browser and head to http://127.0.0.1:5001/. You should see a page like this:
Open a tunnel
With your app listening, open up a new terminal in a separate tab or window, and start an ngrok tunnel pointing to the Flask app:
You should see something like this:
Make sure the tunnel is working
With the tunnel open, navigate to the URL it assigned to you on the “Forwarding” line (ending in ngrok-free.app. You’ll get a page like this one:
Be sure to click the Visit Site button to make sure that the tunnel is opened. Once you click it, you should see your app again.
You only have to click the “Visit Site” link once for each tunnel opened, so as long as you leave the tunnel running, you won’t have to click it again.
Just remember that if you do close your tunnel and open a new one, you’ll need to click through before Teams will be able to send you messages!
Step 2. Bot configuration
Before we can start writing the bot-specific code (we'll provide code samples for this later), we need to scaffold a few administrative things in order to create a package that we can install (or rather, “side-load”) in a Teams organization.
From the Teams Developer Portal, click Create a new app and give it whatever name you like, then click Add.
Navigate to Configure → App features, and click Bot.
Click the Create a new bot link below the “Select an existing bot” dropdown.
Click New bot, and give your bot a name (I typically use the same name as the app), and click Add.
Note that this may take a moment, as it will create a new “app registration” in the Azure portal behind the scenes.
Click on the bot you created.
Navigate to Configure in the sidebar, and set the Endpoint address to (your ngrok tunnel URL)/events (e.g.,
https://9999-111-22-333-444.ngrok-free.app/events). Note that we haven’t created this endpoint yet, but we’ll do that in the next section.You may also find it helpful to to bookmark this page so that you can update the URL in the future.
Navigate to Client secrets in the sidebar, and click Add a client secret for your bot.
Copy the generated secret and keep it somewhere safe, like a password manager, then click OK.
Navigate back to the Bots list (you can use the button at the top of the page).
Copy the Bot ID for your bot.
Navigate back to Apps → (your app) → Configure → Basic Information, and fill in all of the required fields (using the Bot ID you copied for the Application (client) ID field), then click Save.
Note that you can use fake information (e.g., example.com URLs) for things you don’t have yet. They just need to have valid values for now.
Navigate to Configure → App features, and click Bot.
In the Select an existing bot dropdown, select the bot you created.
Under the Select the scopes where people can use your bot, check the Personal and Team checkboxes.
Next, navigate to Configure → Permissions → Team Permissions → Application, check the box for
ChannelMessage.Send.Group, to make sure our bot can reply to the messages it receives.Scroll to the bottom and click Save.
Boom! Bot configuration complete ✅
Review
You should now have:
An app with all of the basic information filled in.
A bot with its endpoint address configured to send messages to our
ngroktunnel.A client ID (the Bot ID) and secret that we’ll use to authenticate our app.
Step 3. Publish the Teams app
Before we can install our bot into our organization, we need to:
Publish it to the organization.
Make sure our organization supports installing “custom apps”.
Approve our app for installation.
Let’s get started.
Publish the app to the organization
From the Teams App Developer Portal, navigate to Apps → (your app) → Publish → Publish to org.
Click Publish.
Enable custom app installation for your organization
In a new browser tab, navigate to the Microsoft Teams Admin Center, and then to Teams apps → Manage apps in the sidebar.
Click the Actions dropdown in the upper right, and then click Org-wide app settings.
Make sure the Custom apps toggle is “on”.
Click Save, then use the sidebar to navigate to Teams apps → Permission policies.
Click Global (Org-wide default).
Ensure that the Custom apps dropdown is set to Allow all apps.
These settings will allow you to install “custom” (i.e., unpublished) apps like the one we’re building.
Approve the app for installation
Finally, we need to approve our custom app that we published to our organization, so that we can request to install it.
Navigate to Teams apps → Manage apps.
Search for the name of your app in the table’s search field.
Your app probably says it’s “blocked”, which is what we’re going to fix.
Click on the name of your app.
Click Publish, and confirm the action in the modal that appears.
Install the app
Finally, we can install our app into our team!
From the Teams App Developer Portal, navigate to Apps → (your app).
Click the Preview In Teams button in the upper right of the page.
Teams will open to an installation page for your bot.
Click Add to a team.
Select the team to which you want to add your bot, and then click Set up a bot.
Congrats, you’ve installed your app in Teams! 🎉
Make sure messages are making it to our app
While we haven’t set up the webhook endpoint (/events) yet, we can still try to send our bot a message and see if a request shows up in our logs.
Create a new Teams post in the channel where you installed your bot, and make sure to tag your bot in it.
You should see some 404s in the ngrok and Flask logs in your terminal, letting us know that Teams tried to POST a message to our /events webhook (albeit unsuccessfully):
Review
We’ve now configured our organization to:
Allow the installation of “custom” (unpublished) apps in our organization.
Approved our app for installation within our organization while we develop it.
Installed our app into a team.
Checked that messages are making from Teams to our Flask app through our tunnel.
Next up: let’s write some code!
Get access to the infra knowledge graph that power's Aptible's AI SRE Agent 👇
Step 4. Build the bot
Now that we’ve got messages flowing, we can start building out our bot. We’ll start by building a simple “echo bot” that simply echoes back whatever message it receives.
Echo bot
Let’s update our app.py to implement an echo bot.
Install some new packages
First, we need a few more packages:
botbuilder-core, which is Microsoft’s Bot Framework SDK for Python.flask[async]andaiohttp, sincebotbuilder-coreuses async Python features for the most part, and so we’ll want to update our Flask app to behave asynchronously as well.
In your virtualenv, go ahead and install these packages:
$ pip install aiohttp botbuilder-core 'flask[async]'
Update our Flask app
Next, we’ll want to update our Flask app with the following code. Read the comments
import json
import os

from azure.core.exceptions import DeserializationError
from botbuilder.core import (
    BotFrameworkAdapter,
    BotFrameworkAdapterSettings,
    TurnContext,
)
from botbuilder.core.teams import TeamsActivityHandler
from botbuilder.schema import Activity, ActivityTypes
from flask import Flask, jsonify, request

# Create a Flask app, which can also store our config.
app = Flask(__name__)

# Extract environment variables that we'll need to authenticate our bot.
try:
    app.config.update(
        TEAMS_BOT_CLIENT_ID=os.environ["TEAMS_BOT_CLIENT_ID"],
        TEAMS_BOT_CLIENT_SECRET=os.environ["TEAMS_BOT_CLIENT_SECRET"],
    )
except KeyError:
    raise LookupError(
        "Environment variables TEAMS_BOT_CLIENT_ID and TEAMS_BOT_CLIENT_SECRET "
        "must be set."
    )

# Create a "handler" that implements various callbacks for events that Teams sends us.
class BotHandler(TeamsActivityHandler):
    """
    Determines what to do for incoming events with per-category methods.

    <https://learn.microsoft.com/en-us/microsoftteams/platform/bots/bot-basics?tabs=python>
    """

    async def on_message_activity(self, turn_context: TurnContext) -> None:
        """Handle “message activity” events."""
        return await turn_context.send_activity(
            Activity(
                type=ActivityTypes.message,
                text_format="markdown",
                text=f"**Received:** {turn_context.activity.text}",
            )
        )

bot = BotHandler()

# Create an adapter that will handle authentication and routing of messages to the bot.
bot_adapter = BotFrameworkAdapter(
    BotFrameworkAdapterSettings(
        # Replace these with settings from environment variables in a real app.
        # None values allow requests from the Bot Framework Emulator.
        app_id=app.config["TEAMS_BOT_CLIENT_ID"],
        app_password=app.config["TEAMS_BOT_CLIENT_SECRET"],
    )
)

# Add a route to handle Teams messages.
@app.route("/events", methods=["POST"])
async def handle_event():
    """Respond to an event from Microsoft Teams."""
    try:
        payload = request.json
    except json.JSONDecodeError:
        print(request)
        return jsonify({"error": "Bad request"}), 400

    # React to the activity
    try:
        activity = Activity.deserialize(payload)
    except DeserializationError:
        return jsonify({"error": "Bad request"}), 400

    auth_header = request.headers.get("authorization", "")
    try:
        invoke_response = await bot_adapter.process_activity(
            activity,
            auth_header,
            bot.on_turn,
        )

    except TypeError:
        return jsonify({"error": "Bad request"}), 400
    else:
        if invoke_response:
            return jsonify(invoke_response.body), invoke_response.status
        else:
            return jsonify({}), 204
Try it out
Let’s try it out!
If you still have your Flask app running from before, stop it with CTRL+C.
Export your bot’s client ID and secret so your app can get them from the environment.
$ export TEAMS_BOT_CLIENT_ID=your-client-id-here
$ export TEAMS_BOT_CLIENT_SECRET
Re-run your app, this time specifying
--reloadso that we don’t have to remember to restart it every time.
$ flask --app=app run --host=0.0.0.0 --port=5001 --reload
Tag your bot in a Teams post (or in a reply to an existing post)
Step 5: Adding asynchronous processing
At this point, you’ve implemented a pretty basic “hello world”-style bot — a dime-a-dozen as far as tutorials go — so let’s do something a bit more interesting: let’s add asynchronous processing.
You’re likely to need asynchronous processing if you’re doing anything even mildly time-consuming behind the scenes. For example, it’s pretty likely these days that you’ll want to call out to an LLM service like OpenAI — which will take at least a few seconds or more — so let’s build in that direction.
This is especially important in Teams, because your bot is expected to reply within a couple of seconds (as a requirement for publishing to the Microsoft Store, anyway).
There are several options for async processing in Python, but for the sake of simplicity, let’s just use a background thread, which we can do using Python’s built-in asyncio and threading modules. (Note, however, that you can handle asynchronous processing using whatever strategy you like (Celery, RQ, etc); the principles are the same!)
Handle replies in the background
First, let’s add a function to handle a Teams “activity” (e.g., a received message) separate from the rest of the bot handler so that we can call it as a background task:
import asyncio

# ...

async def handle_activity(serialized_activity: dict) -> None:
    """Handle an activity."""
    # Simulate a delay as if we enqueued this job within
    # a busy production workload.
    await asyncio.sleep(3)

    print("Handling activity...")

		# Deserialize the activity, and get a reference to the conversation
		# from which the activity originated.
    activity = Activity.deserialize(serialized_activity)
    conversation_reference = activity.get_conversation_reference()

		# "Continue" the conversation by replying with a message.
    await bot_adapter.continue_conversation(
        conversation_reference,
        lambda turn_context: turn_context.send_activity(
            Activity(
                type=ActivityTypes.message,
                text_format="markdown",
                text=f"**Received:** {activity.text}",
            )
        ),
        bot_id=app.config["TEAMS_BOT_CLIENT_ID"],
    )

# ...
The important part here is that we’re retrieving a “conversation reference” from our serialized activity and using it to “continue” an existing conversation; it’s not as simple as sending a message to a channel — you need to specify which conversation to reply to so that Teams can properly ingest your response.
Next, we’ll implement a (very basic) worker thread that can handle our activity in the background. Put this code somewhere in your
app.py:
from threading import Thread

# ...

[class BackgroundWorker(Thread):
    """A very basic background worker implementation using asyncio."""

    _loop: asyncio.AbstractEventLoop

    def __init__(self) -> None:
        super().__init__(daemon=True)
        self._loop = asyncio.new_event_loop()

    def run(self) -> None:
        """Run the background worker."""
        asyncio.set_event_loop(self._loop)
        self._loop.run_forever()

    async def wrap_task(self, task: Coroutine) -> Coroutine:
        """Wrap a coroutine in a try/except block to catch errors.

        Prints the error to the console.
        """
        try:
            await task
        except Exception:
            traceback.print_exc()

    def run_task(self, task: Coroutine) -> None:
        """Run a coroutine in the background."""
        # Start the background worker thread if it's not already running.
        if not self.is_alive():
            self.start()

        # Run the task in the background worker thread's event loop.
        asyncio.run_coroutine_threadsafe(
            coro=self.wrap_task(task),
            loop=self._loop,
        )

# Create a background worker for running tasks asynchronously.
background_worker = BackgroundWorker()](<https://www.notion.so/Aptible-AI-for-PaaS-145509e56b41800da6d9c8311f86be95?pvs=21>)
Note: you don’t need to understand this part deeply; in a “real” app, you’d use something like Celery or RQ — we’re only using this threading approach so that we don’t have to set those things up, so don’t feel bad about copy/pasting this piece.
Finally, we’ll update our
BotHandler'son_message_activitymethod to handle our activity in the background:
class BotHandler(TeamsActivityHandler):

    # ...

    async def on_message_activity(self, turn_context: TurnContext) -> None:
        """Handle “message activity” events."""
        # Generate an immediately reply to let the user know we've
        # seen their message.
        reply = await turn_context.send_activity(
            Activity(
                type=ActivityTypes.message,
                text_format="markdown",
                text="One moment please...",
            )
        )

        # Serialize the activity we received so that we can enqueue
        # the job.
        serialized_activity = turn_context.activity.serialize()

        # Handle the activity in the background. You can (and should) use
        # Celery or another background task strategy here instead for real
        # workloads.
        background_worker.run_task(handle_activity(serialized_activity))

        # Return our reply.
        return reply
The important part here is that we serialize the activity before we enqueue it, which is required for most background processing implementations.
Try it out
Now when you send a message, you’ll get a “One moment please…”, followed by a reply a few seconds later, like so:
Now we can do whatever we want in that background task without worrying too much about how long it takes.
If I only had a brain
Now that we can handle activities in the background, let’s wire it up to do something interesting: let’s send the message to OpenAI and get a response for the user.
Install the
openaipackage:
$ pipAdd configuration variables:
# ...

# Extract environment variables that we'll need to authenticate our bot.
try:
    app.config.update(
        TEAMS_BOT_CLIENT_ID=os.environ["TEAMS_BOT_CLIENT_ID"],
        TEAMS_BOT_CLIENT_SECRET=os.environ["TEAMS_BOT_CLIENT_SECRET"],
        OPENAI_API_KEY=os.environ["OPENAI_API_KEY"],
    )
except KeyError:
    raise LookupError(
        "Environment variables TEAMS_BOT_CLIENT_ID, TEAMS_BOT_CLIENT_SECRET, and "
        "OPENAI_API_KEY must be set."
    )

# ...
Update your
handle_activityfunction to call OpenAI with the user’s message, and reply with the response. Let’s remove ourasyncio.sleep(3)as well, since we’re doing some real work now.
from openai import AsyncOpenAI

# ...

openai_client = AsyncOpenAI(
    api_key=app.config["OPENAI_API_KEY"],
)

# ...

async def handle_activity(serialized_activity: dict) -> None:
    """Handle an activity."""
    activity = Activity.deserialize(serialized_activity)
    conversation_reference = activity.get_conversation_reference()

    completion = client.chat.completions.create(
		  model="gpt-4o-mini",
		  messages=[{"role": "user", "content": activity.text}],
		)

    await bot_adapter.continue_conversation(
        conversation_reference,
        lambda turn_context: turn_context.send_activity(
            Activity(
                type=ActivityTypes.message,
                text_format="markdown",
                text=completion.choices[0].message.content,
            )
        ),
        bot_id=app.config["TEAMS_BOT_CLIENT_ID"],
    )

# ...
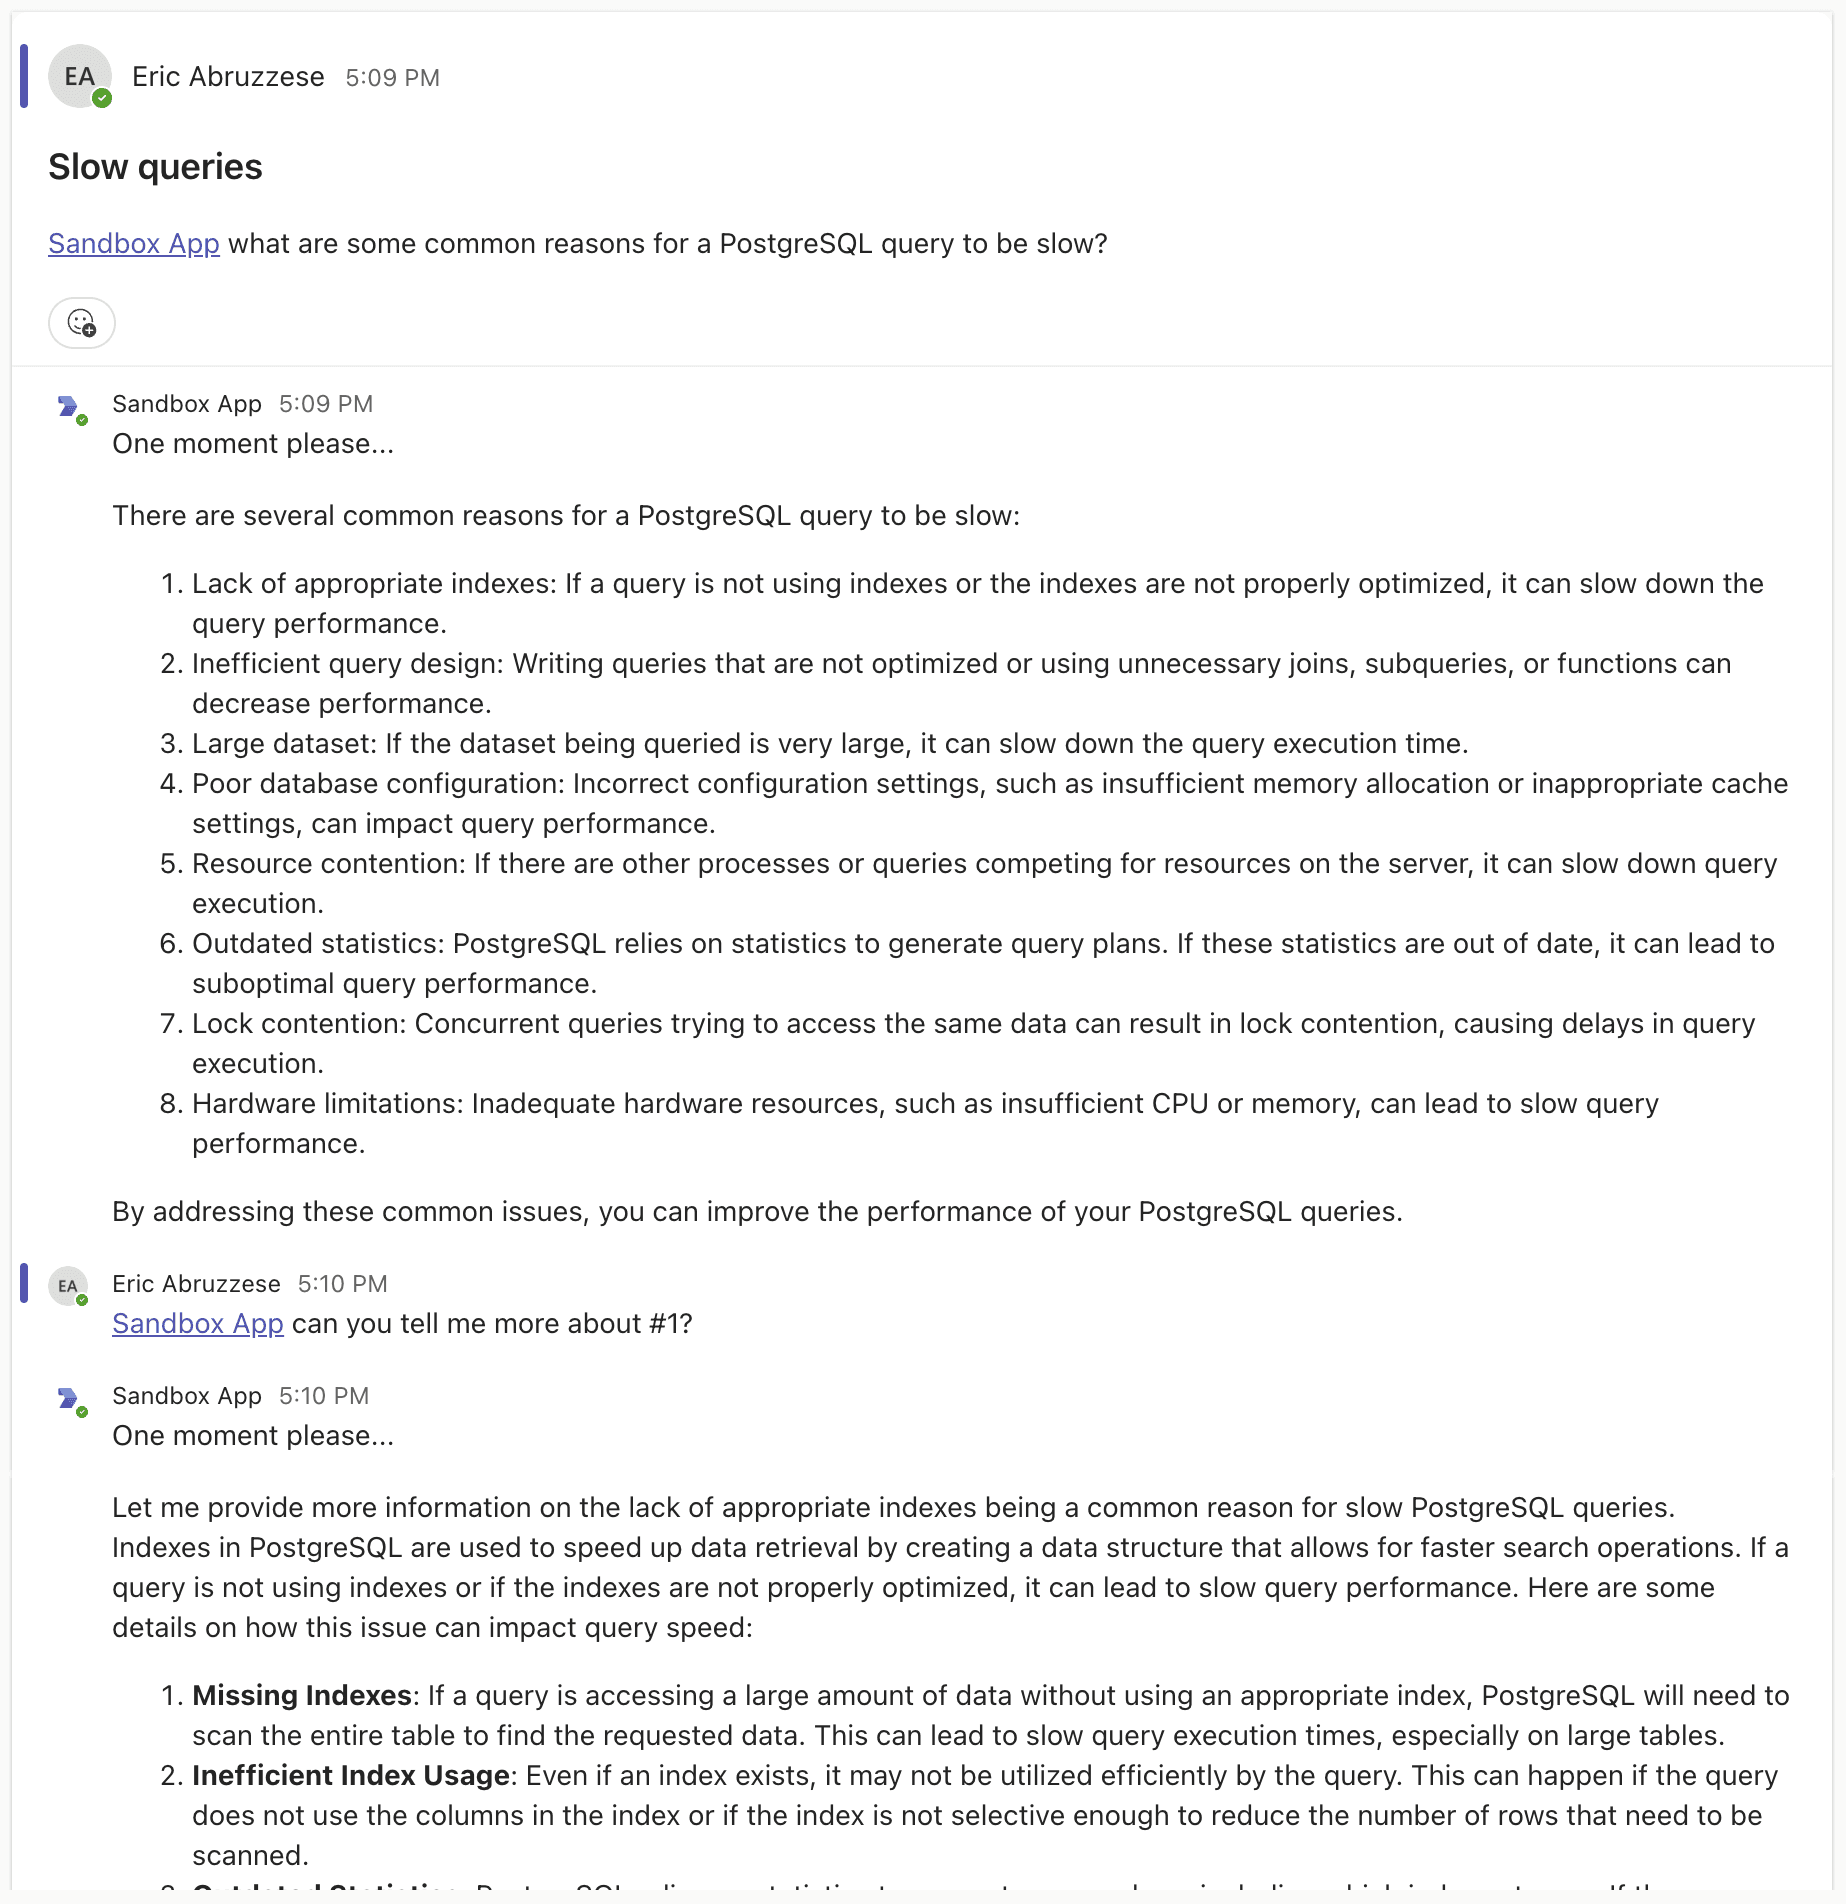
Try it out
Now when you send a message, you’ll get a reply from an LLM!
You may notice, however, that asking follow up questions doesn’t quite work:
That’s because we’re essentially starting a new conversation every time we send a message. Let’s continue on and fix that by retrieving all of the messages in the conversation and sending them along with our message so that our bot can follow the conversation.
Step 6. Retrieve conversation history
Now that we have an LLM responding to our messages, we’ll want to give it the ability to read the whole conversation so that it can effectively respond to follow-up messages.
Perhaps surprisingly, the Microsoft Bot Framework itself doesn’t provide the ability to retrieve the conversation history for a thread. To achieve this, we’ll have to use the Microsoft Graph SDK, and make an API call to retrieve all of the messages for the thread so that we can send them along with the latest message to the LLM.
Install the
msgraph-sdkpackage:
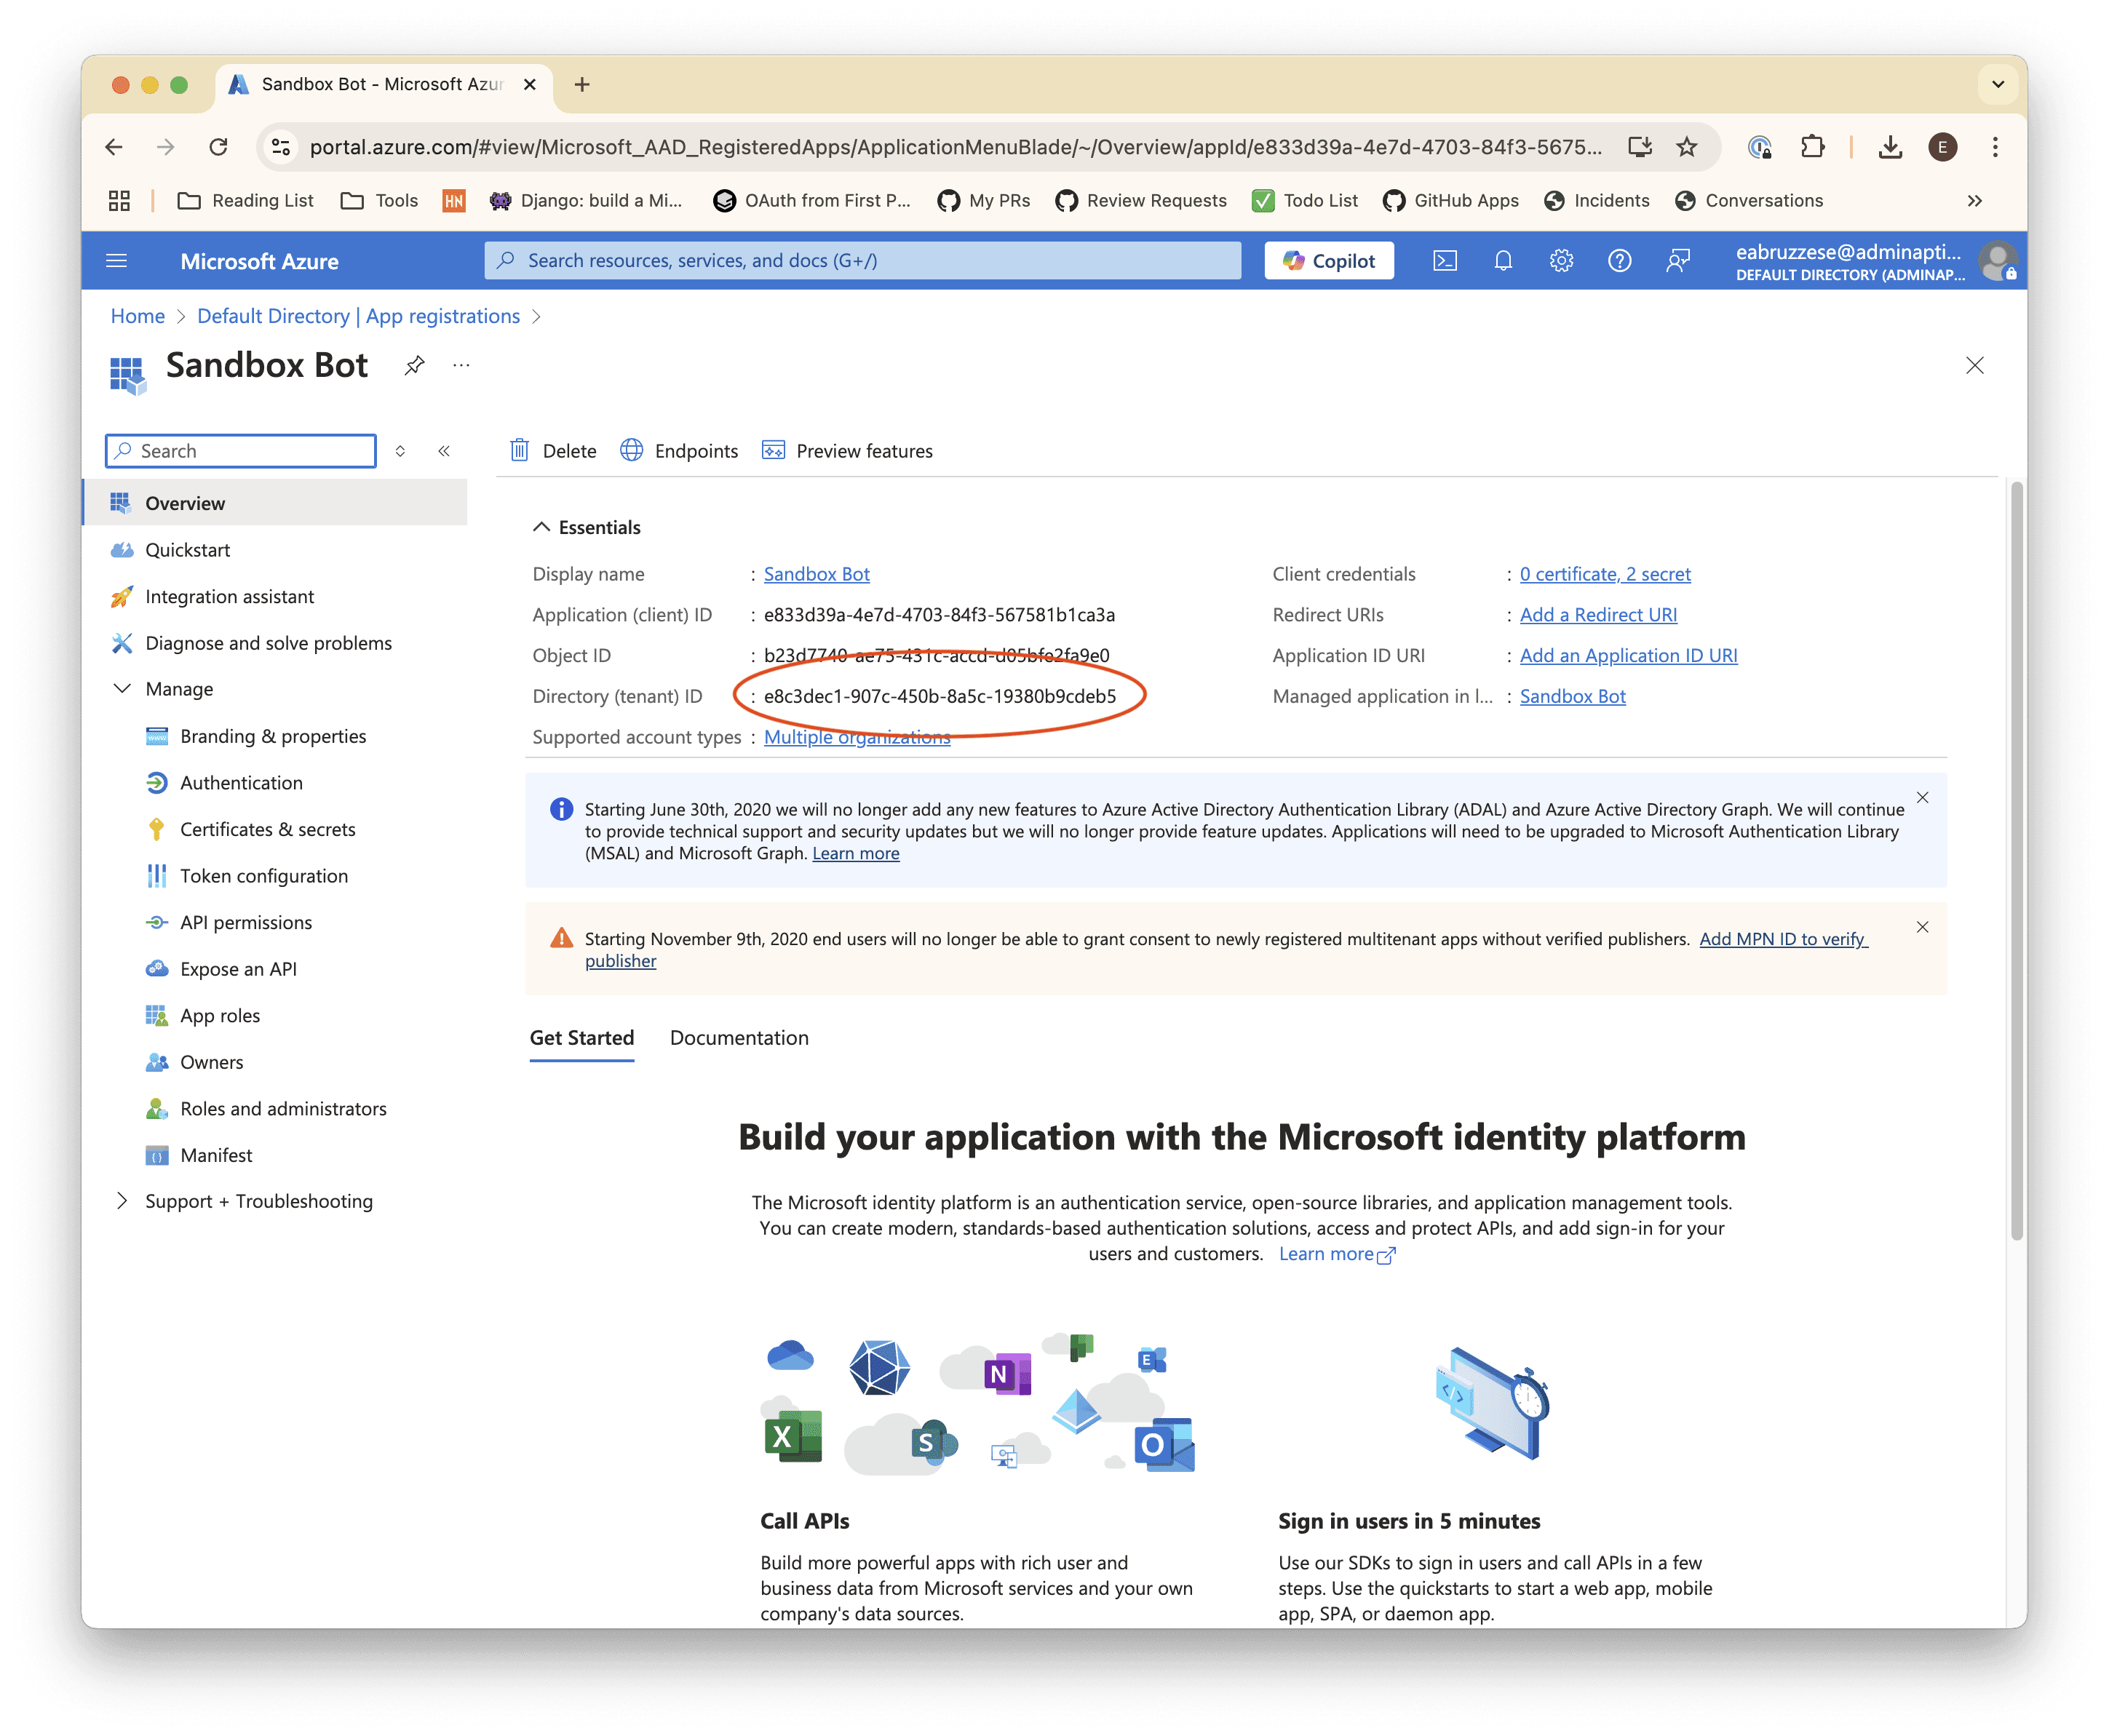
$ pip install msgraph-sdkRetrieve the “Tenant ID” of your bot’s “app” from the Azure Portal (this was created behind the scenes when we created the Bot in the Teams Developer Portal). We’ll need this so that we can query the right organization for its Teams messages.
a) Log in to the Azure Portal and navigate to the App Registrations page (https://portal.azure.com/#view/Microsoft_AAD_IAM/ActiveDirectoryMenuBlade/~/RegisteredApps)
b) Locate and click on the bot’s app (it’ll have the same name as your bot in the Teams Developer Portal)
c) Copy the “Directory (tenant) ID”
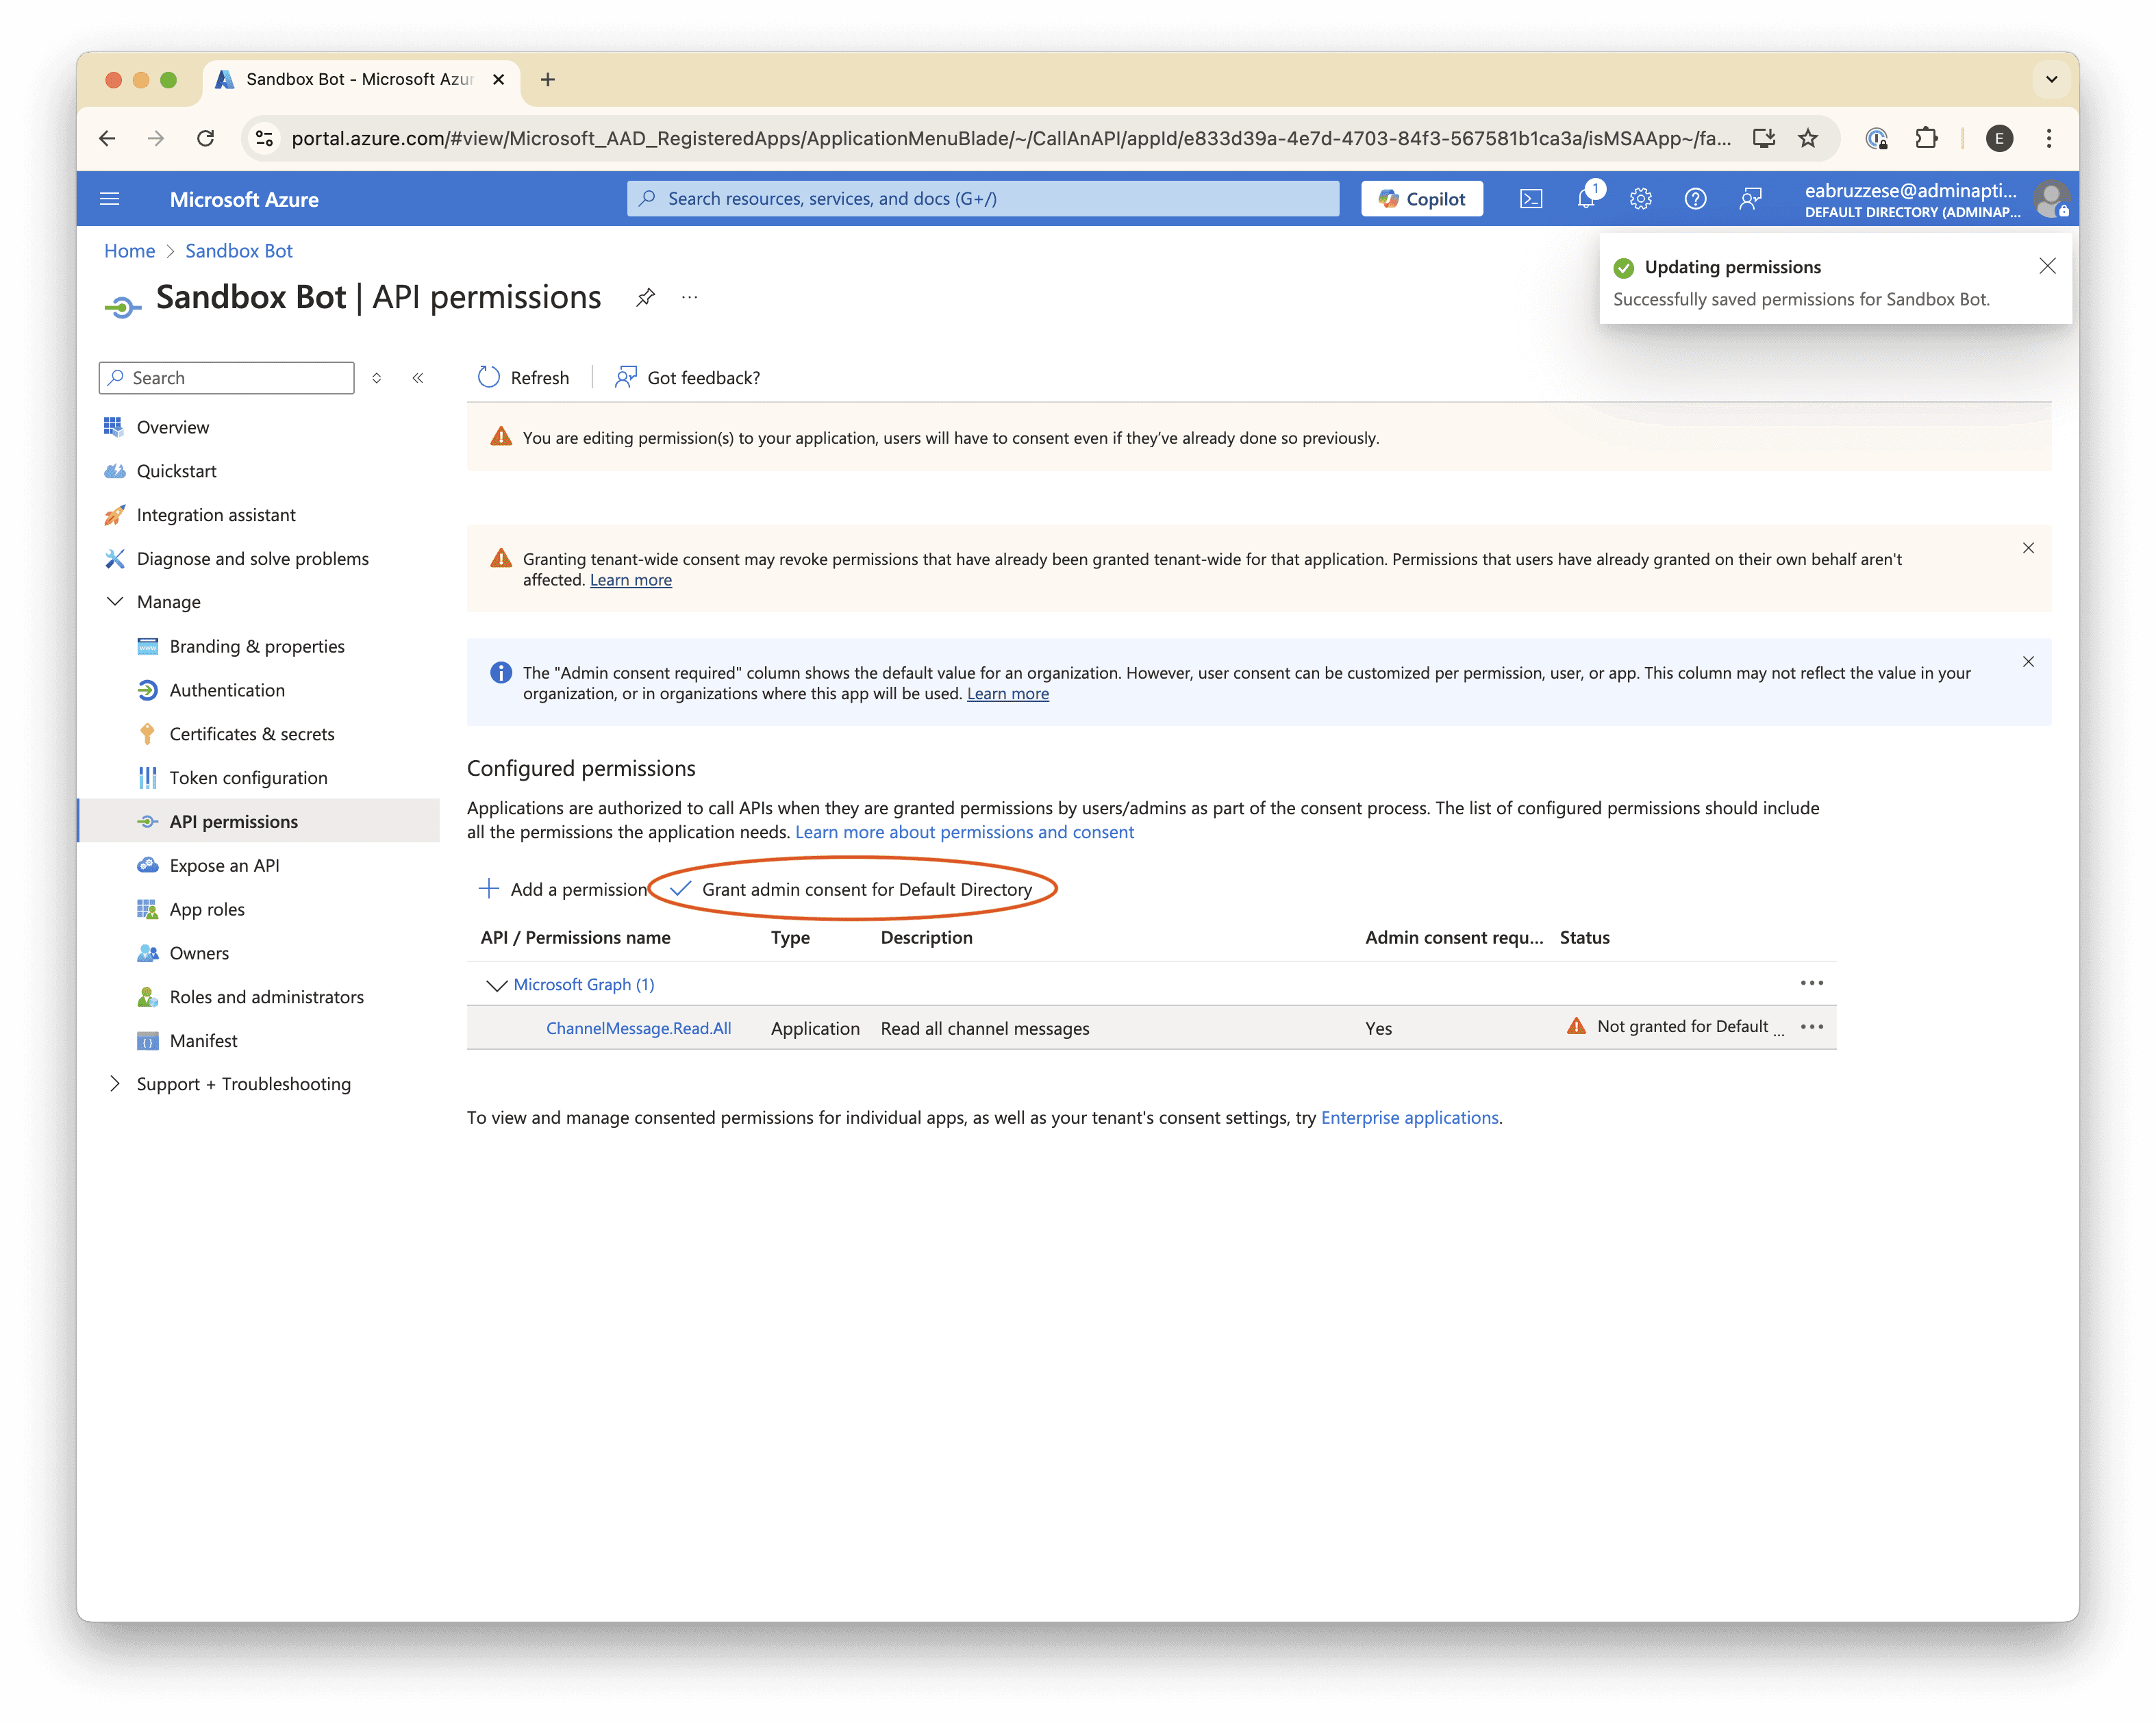
Give your bot permission to access channel messages for your organization:
a) In the Azure Portal for your bot’s app registration, navigate to Manage → API permissions, and click Add a permission.
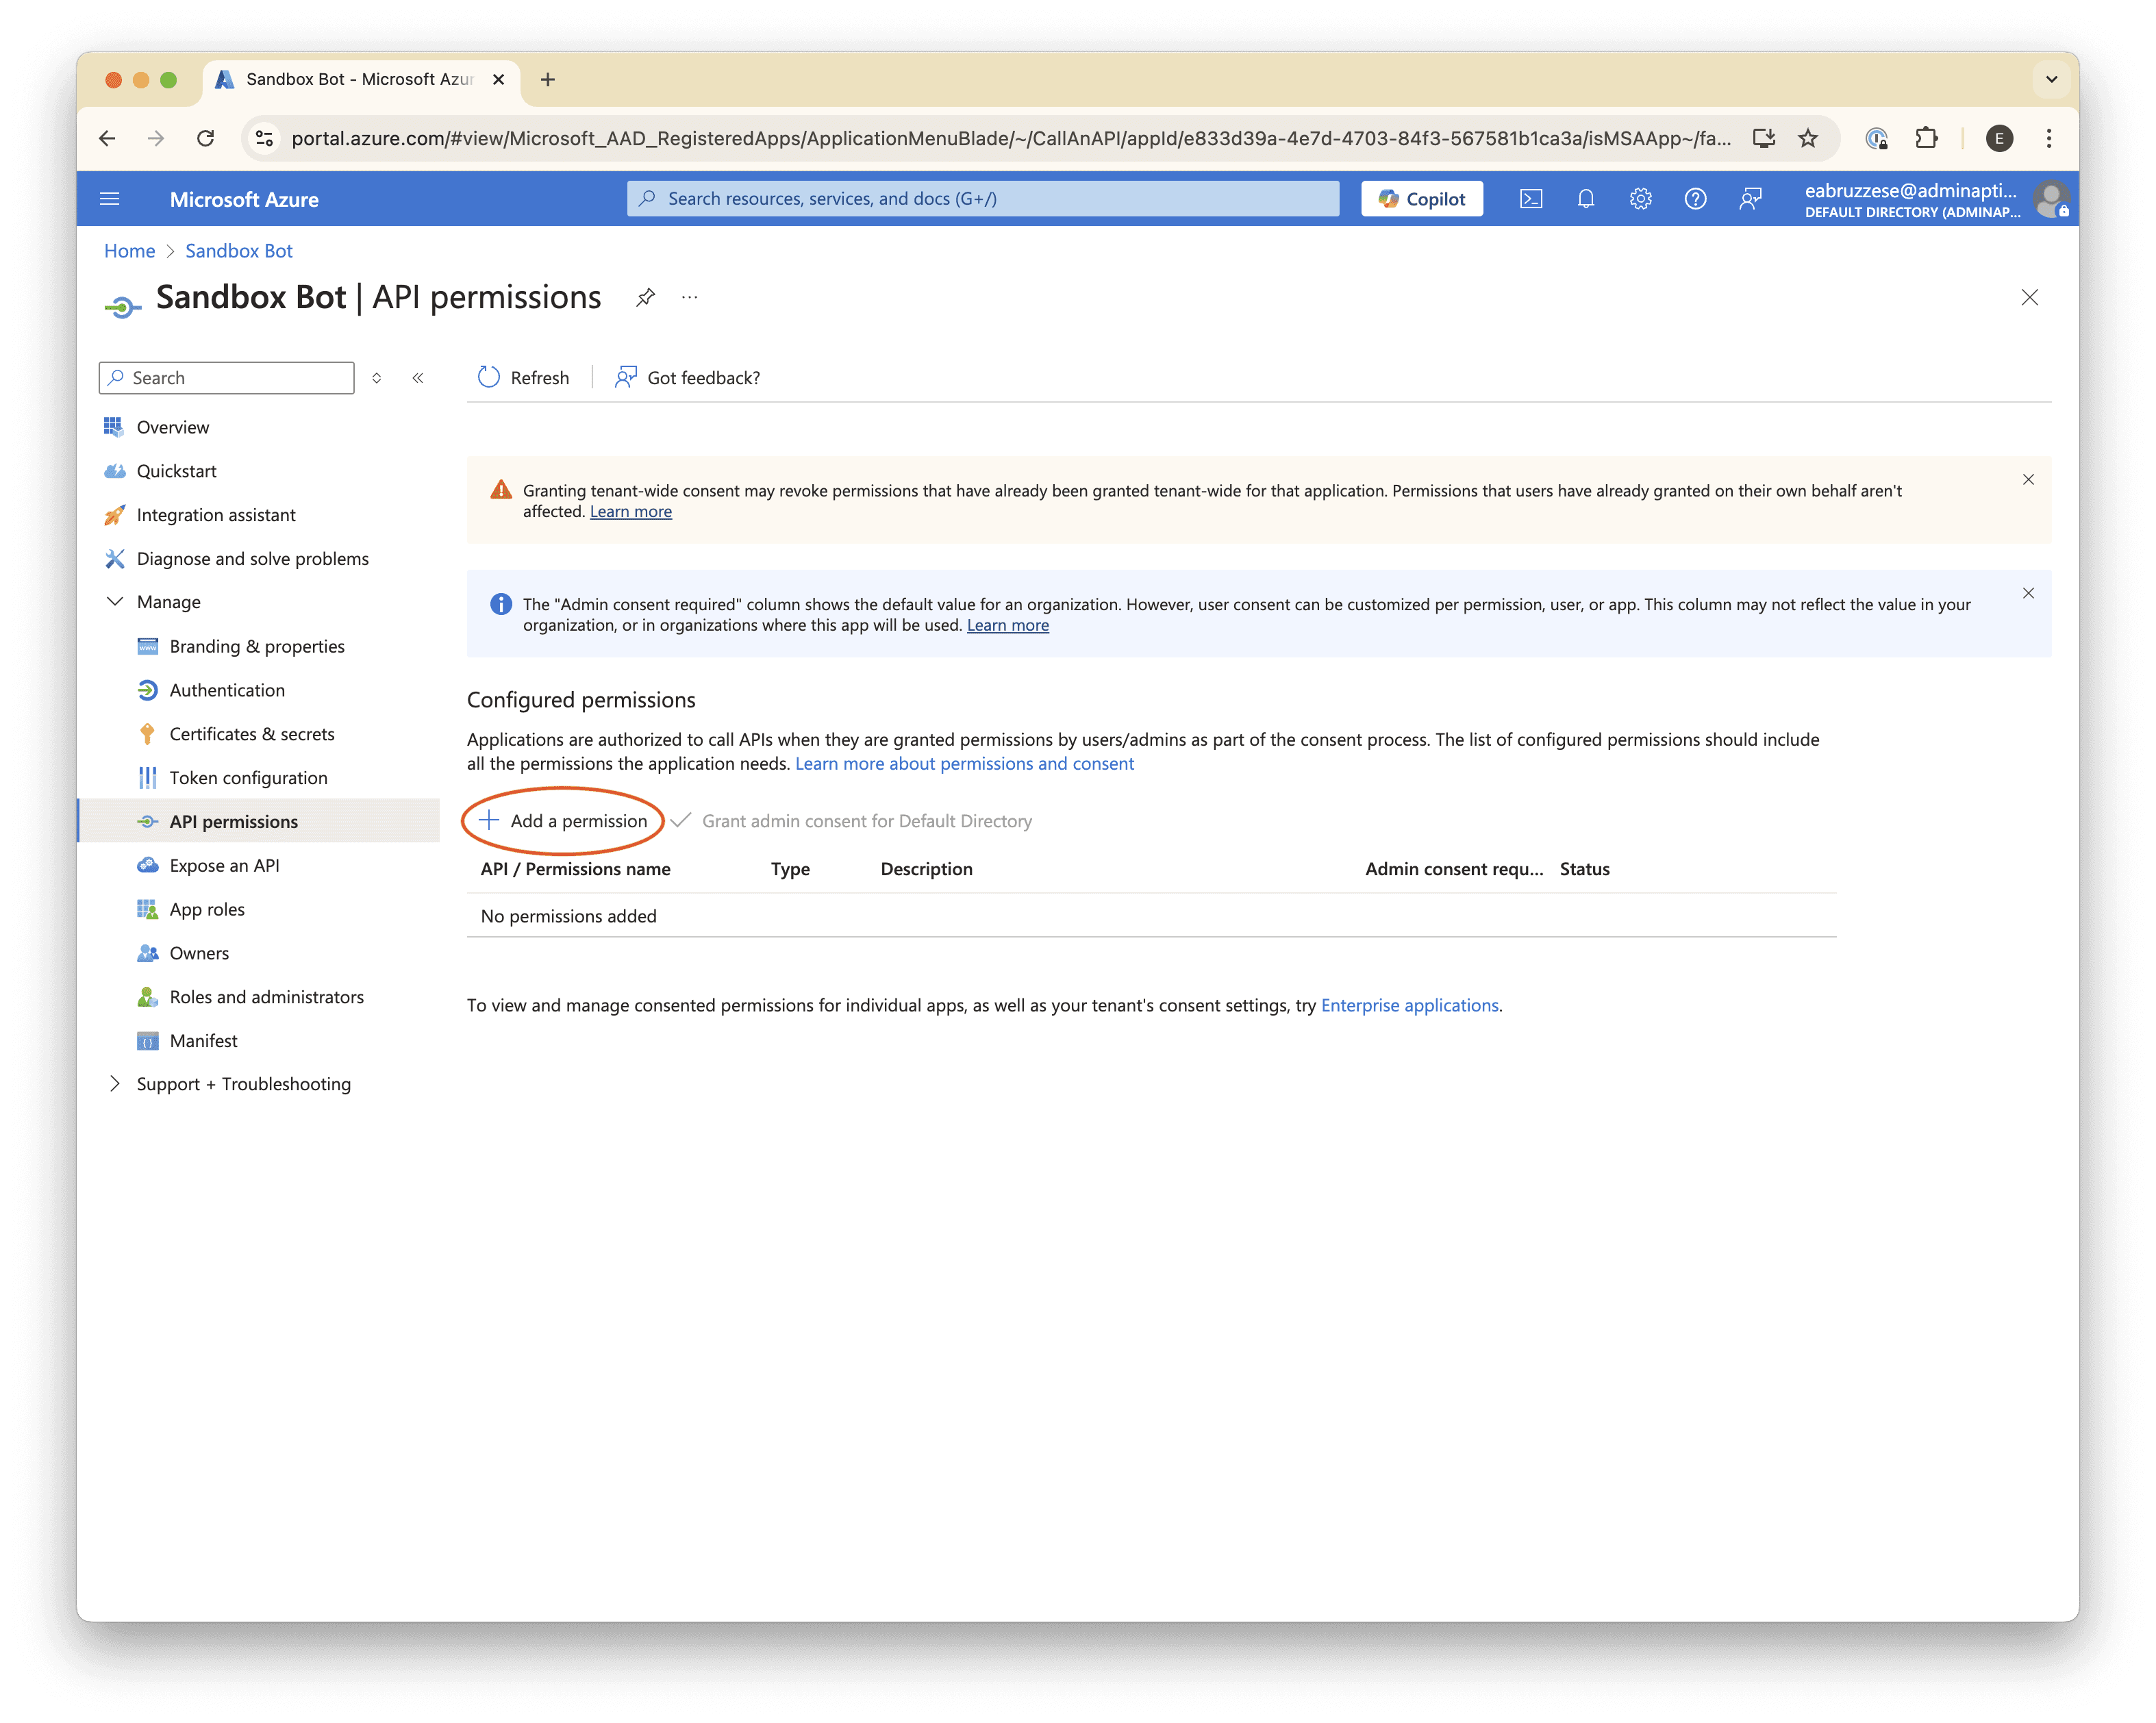
b) Choose Microsoft Graph

c) Select Application permissions

d) Add the ChannelMessage.Read.All permission, then click Add permissions

e) Click Grant admin consent for (your directory)
Add a new configuration variable for our
TEAMS_BOT_TENANT_ID:
# ...

# Extract environment variables that we'll need to authenticate our bot.
try:
    app.config.update(
        # ...
        TEAMS_BOT_TENANT_ID=os.environ["TEAMS_BOT_TENANT_ID"],
        # ...
    )
except KeyError:
    raise LookupError(
        "Environment variables TEAMS_BOT_CLIENT_ID, TEAMS_BOT_CLIENT_SECRET, and "
        "OPENAI_API_KEY, TEAMS_BOT_TENANT_ID must be set."
    )

# ...
Create a new function for retrieving conversation messages in reverse chronological order (newest first):
import re
from typing import AsyncIterator, cast
from azure.identity.aio import ClientSecretCredential
from kiota_abstractions.base_request_configuration import RequestConfiguration
from msgraph import GraphServiceClient
from msgraph.generated.models.chat_message import ChatMessage

# ...

async def iter_conversation_messages(
    tenant_id: str,
    team_id: str,
    channel_id: str,
    conversation_id: str,
) -> AsyncIterator[ChatMessage]:
    """Yield all messages in a conversation thread."""
    print(tenant_id, team_id, channel_id, conversation_id)

    # Create a Microsoft Graph Client.
    client = GraphServiceClient(
        credentials=ClientSecretCredential(
            client_id=app.config["TEAMS_BOT_CLIENT_ID"],
            client_secret=app.config["TEAMS_BOT_CLIENT_SECRET"],
            tenant_id=tenant_id,
        )
    )

    # Parse the message ID from the conversation ID
    if parsed_conversation_id := re.search(r"messageid=(\\d+)", conversation_id):
        original_message_id = parsed_conversation_id.group(1)
    else:
        raise ValueError(
            f"Could not parse message ID from conversation ID: {conversation_id}"
        )

    channel_messages = (
        client.teams.by_team_id(team_id).channels.by_channel_id(channel_id).messages
    )
    original_message = channel_messages.by_chat_message_id(original_message_id)
    thread_replies = channel_messages.by_chat_message_id(original_message_id).replies

    # Request the maximmum number of replies at a time to minimize requests.
    request_configuration = RequestConfiguration(
        query_parameters=thread_replies.RepliesRequestBuilderGetQueryParameters(
            top=50,
        )
    )

    # Yield all messages in the thread, page by page.
    next_link: str | None = None
    while True:
        # Get the first page or the subsequent pages if there's a next link
        if next_link:
            replies_page = await thread_replies.with_url(next_link).get(
                request_configuration
            )
        else:
            replies_page = await thread_replies.get(request_configuration)

        # Break if there are no results in the page.
        if not replies_page or not replies_page.value:
            break

        # Yield the messages from the current page.
        for message in replies_page.value:
            yield message

        next_link = replies_page.odata_next_link

        # Break when there are no more pages.
        if not next_link:
            break

    # Finally, yield the original message that started the thread.
    yield cast(ChatMessage, await original_message.get())
Use the new function to reconstruct the whole conversation when we interact with the LLM. Let’s update our
handle_activitymethod to the following:
async def handle_activity(serialized_activity: dict) -> None:
    """Handle an activity."""
    activity = cast(Activity, Activity.deserialize(serialized_activity))
    conversation_reference = cast(
        ConversationReference, activity.get_conversation_reference()
    )

    async def _generate_reply(turn_context: TurnContext) -> str:
        channel_data = activity.channel_data

        # Insert our activity's channel data into the turn context so that we
        # can use it to retrieve the original team context.
        turn_context.activity.channel_data = channel_data
        teams_info = await TeamsInfo.get_team_details(turn_context)

        channel_id = channel_data["channel"]["id"]
        tenant_id = channel_data["tenant"]["id"]
        team_id = teams_info.aad_group_id
        conversation_id = conversation_reference.conversation.id

        # Get all messages in the conversation in OpenAI format, skipping the
        # first message (since it's the most recent "one moment please..."
        # message from the bot), then reversing them so that they're in
        # chronological order (the Microsoft Graph API returns them in reverse).
        openai_messages = reversed(
            [
                {
                    "role": "user" if message.from_.user else "assistant",
                    "content": message.body.content,
                }
                async for message in iter_conversation_messages(
                    tenant_id=tenant_id,
                    team_id=team_id,
                    channel_id=channel_id,
                    conversation_id=conversation_id,
                )
            ][1:]
        )

        # Generate a reply using OpenAI.
        completion = await openai_client.chat.completions.create(
            model="gpt-3.5-turbo",
            messages=openai_messages,
        )

        await turn_context.send_activity(
            Activity(
                type=ActivityTypes.message,
                text_format="markdown",
                text=completion.choices[0].message.content,
            )
        )

    await bot_adapter.continue_conversation(
        conversation_reference,
        _generate_reply,
        bot_id=app.config["TEAMS_BOT_CLIENT_ID"],
    )
Try it out
Now that we’re passing along the entire thread history to the LLM, we can ask follow-up questions!
The full picture
Here’s the complete code, in case you find it helpful as a starting point:
import asyncio
import json
import os
import re
import traceback
from collections.abc import Coroutine
from threading import Thread
from typing import AsyncIterator, cast

from azure.core.exceptions import DeserializationError
from azure.identity.aio import ClientSecretCredential
from botbuilder.core import (
    BotFrameworkAdapter,
    BotFrameworkAdapterSettings,
    TurnContext,
)
from botbuilder.core.teams import TeamsActivityHandler, TeamsInfo
from botbuilder.schema import Activity, ActivityTypes, ConversationReference
from flask import Flask, jsonify, request
from kiota_abstractions.base_request_configuration import RequestConfiguration
from msgraph import GraphServiceClient
from msgraph.generated.models.chat_message import ChatMessage
from openai import AsyncOpenAI

# Create a Flask app, which can also store our config.
app = Flask(__name__)

# Extract environment variables that we'll need to authenticate our bot.
try:
    app.config.update(
        TEAMS_BOT_CLIENT_ID=os.environ["TEAMS_BOT_CLIENT_ID"],
        TEAMS_BOT_CLIENT_SECRET=os.environ["TEAMS_BOT_CLIENT_SECRET"],
        OPENAI_API_KEY=os.environ["OPENAI_API_KEY"],
    )
except KeyError:
    raise LookupError(
        "Environment variables TEAMS_BOT_CLIENT_ID, TEAMS_BOT_CLIENT_SECRET, and "
        "OPENAI_API_KEY must be set."
    )

openai_client = AsyncOpenAI(api_key=app.config["OPENAI_API_KEY"])

class BackgroundWorker(Thread):
    """A very basic background worker implementation using asyncio."""

    _loop: asyncio.AbstractEventLoop

    def __init__(self):
        super().__init__(daemon=True)
        self._loop = asyncio.new_event_loop()

    def run(self) -> None:
        """Run the background worker."""
        asyncio.set_event_loop(self._loop)
        self._loop.run_forever()

    async def wrap_task(self, task: Coroutine) -> Coroutine:
        """Wrap a coroutine in a try/except block to catch errors.

        Prints the error to the console.
        """
        try:
            await task
        except Exception:
            traceback.print_exc()

    def run_task(self, task: Coroutine) -> None:
        """Run a coroutine in the background."""
        # Start the background worker thread if it's not already running.
        if not self.is_alive():
            self.start()

        # Run the task in the background worker thread's event loop.
        asyncio.run_coroutine_threadsafe(
            coro=self.wrap_task(task),
            loop=self._loop,
        )

background_worker = BackgroundWorker()

async def iter_conversation_messages(
    tenant_id: str,
    team_id: str,
    channel_id: str,
    conversation_id: str,
) -> AsyncIterator[ChatMessage]:
    """Yield all messages in a conversation thread."""
    print(tenant_id, team_id, channel_id, conversation_id)

    # Create a Microsoft Graph Client.
    client = GraphServiceClient(
        credentials=ClientSecretCredential(
            client_id=app.config["TEAMS_BOT_CLIENT_ID"],
            client_secret=app.config["TEAMS_BOT_CLIENT_SECRET"],
            tenant_id=tenant_id,
        )
    )

    # Parse the message ID from the conversation ID
    if parsed_conversation_id := re.search(r"messageid=(\\d+)", conversation_id):
        original_message_id = parsed_conversation_id.group(1)
    else:
        raise ValueError(
            f"Could not parse message ID from conversation ID: {conversation_id}"
        )

    channel_messages = (
        client.teams.by_team_id(team_id).channels.by_channel_id(channel_id).messages
    )
    original_message = channel_messages.by_chat_message_id(original_message_id)
    thread_replies = channel_messages.by_chat_message_id(original_message_id).replies

    # Request the maximmum number of replies at a time to minimize requests.
    request_configuration = RequestConfiguration(
        query_parameters=thread_replies.RepliesRequestBuilderGetQueryParameters(
            top=50,
        )
    )

    # Yield all messages in the thread, page by page.
    next_link: str | None = None
    while True:
        # Get the first page or the subsequent pages if there's a next link
        if next_link:
            replies_page = await thread_replies.with_url(next_link).get(
                request_configuration
            )
        else:
            replies_page = await thread_replies.get(request_configuration)

        # Break if there are no results in the page.
        if not replies_page or not replies_page.value:
            break

        # Yield the messages from the current page.
        for message in replies_page.value:
            yield message

        next_link = replies_page.odata_next_link

        # Break when there are no more pages.
        if not next_link:
            break

    # Finally, yield the original message that started the thread.
    yield cast(ChatMessage, await original_message.get())

async def handle_activity(serialized_activity: dict) -> None:
    """Handle an activity."""
    activity = cast(Activity, Activity.deserialize(serialized_activity))
    conversation_reference = cast(
        ConversationReference, activity.get_conversation_reference()
    )

    async def _generate_reply(turn_context: TurnContext) -> str:
        channel_data = activity.channel_data

        # Insert our activity's channel data into the turn context so that we
        # can use it to retrieve the original team context.
        turn_context.activity.channel_data = channel_data
        teams_info = await TeamsInfo.get_team_details(turn_context)

        channel_id = channel_data["channel"]["id"]
        tenant_id = channel_data["tenant"]["id"]
        team_id = teams_info.aad_group_id
        conversation_id = conversation_reference.conversation.id

        # Get all messages in the conversation in OpenAI format, skipping the
        # first message (since it's the most recent "one moment please..."
        # message from the bot), then reversing them so that they're in
        # chronological order (the Microsoft Graph API returns them in reverse).
        openai_messages = reversed(
            [
                {
                    "role": "user" if message.from_.user else "assistant",
                    "content": message.body.content,
                }
                async for message in iter_conversation_messages(
                    tenant_id=tenant_id,
                    team_id=team_id,
                    channel_id=channel_id,
                    conversation_id=conversation_id,
                )
            ][1:]
        )

        # Generate a reply using OpenAI.
        completion = await openai_client.chat.completions.create(
            model="gpt-3.5-turbo",
            messages=openai_messages,
        )

        await turn_context.send_activity(
            Activity(
                type=ActivityTypes.message,
                text_format="markdown",
                text=completion.choices[0].message.content,
            )
        )

    await bot_adapter.continue_conversation(
        conversation_reference,
        _generate_reply,
        bot_id=app.config["TEAMS_BOT_CLIENT_ID"],
    )

# Create a "handler" that implements various callbacks for events that Teams sends us.
class BotHandler(TeamsActivityHandler):
    """
    Determines what to do for incoming events with per-category methods.

    <https://learn.microsoft.com/en-us/microsoftteams/platform/bots/bot-basics?tabs=python>
    """

    async def on_message_activity(self, turn_context: TurnContext) -> None:
        """Handle "message activity" events."""
        reply = await turn_context.send_activity(
            Activity(
                type=ActivityTypes.message,
                text_format="markdown",
                text="One moment please...",
            )
        )

        serialized_activity = turn_context.activity.serialize()

        background_worker.run_task(handle_activity(serialized_activity))

        return reply

bot = BotHandler()

# Create an adapter that will handle authentication and routing of messages to the bot.
bot_adapter = BotFrameworkAdapter(
    BotFrameworkAdapterSettings(
        # Replace these with settings from environment variables in a real app.
        # None values allow requests from the Bot Framework Emulator.
        app_id=app.config["TEAMS_BOT_CLIENT_ID"],
        app_password=app.config["TEAMS_BOT_CLIENT_SECRET"],
    )
)

# Add a route to handle Teams messages.
@app.route("/events", methods=["POST"])
async def handle_event():
    """Respond to an event from Microsoft Teams."""
    try:
        payload = request.json
    except json.JSONDecodeError:
        print(request)
        return jsonify({"error": "Bad request"}), 400

    # React to the activity
    try:
        activity = Activity.deserialize(payload)
    except DeserializationError:
        return jsonify({"error": "Bad request"}), 400

    auth_header = request.headers.get("authorization", "")
    try:
        invoke_response = await bot_adapter.process_activity(
            activity,
            auth_header,
            bot.on_turn,
        )
    # Note: more more except blocks may be needed, per:
    # <https://github.com/microsoft/botbuilder-python/blob/main/libraries/botbuilder-core/botbuilder/core/integration/aiohttp_channel_service_exception_middleware.py#L19>
    except TypeError:
        return jsonify({"error": "Bad request"}), 400
    else:
        if invoke_response:
            return jsonify(invoke_response.body), invoke_response.status
        else:
            return jsonify({}), 204
Want to try out Aptible AI for Microsoft Teams? Let us know below and we'll be in touch shortly.
Step 4. Build the bot
Now that we’ve got messages flowing, we can start building out our bot. We’ll start by building a simple “echo bot” that simply echoes back whatever message it receives.
Echo bot
Let’s update our app.py to implement an echo bot.
Install some new packages
First, we need a few more packages:
botbuilder-core, which is Microsoft’s Bot Framework SDK for Python.flask[async]andaiohttp, sincebotbuilder-coreuses async Python features for the most part, and so we’ll want to update our Flask app to behave asynchronously as well.
In your virtualenv, go ahead and install these packages:
$ pip install aiohttp botbuilder-core 'flask[async]'
Update our Flask app
Next, we’ll want to update our Flask app with the following code. Read the comments
import json
import os

from azure.core.exceptions import DeserializationError
from botbuilder.core import (
    BotFrameworkAdapter,
    BotFrameworkAdapterSettings,
    TurnContext,
)
from botbuilder.core.teams import TeamsActivityHandler
from botbuilder.schema import Activity, ActivityTypes
from flask import Flask, jsonify, request

# Create a Flask app, which can also store our config.
app = Flask(__name__)

# Extract environment variables that we'll need to authenticate our bot.
try:
    app.config.update(
        TEAMS_BOT_CLIENT_ID=os.environ["TEAMS_BOT_CLIENT_ID"],
        TEAMS_BOT_CLIENT_SECRET=os.environ["TEAMS_BOT_CLIENT_SECRET"],
    )
except KeyError:
    raise LookupError(
        "Environment variables TEAMS_BOT_CLIENT_ID and TEAMS_BOT_CLIENT_SECRET "
        "must be set."
    )

# Create a "handler" that implements various callbacks for events that Teams sends us.
class BotHandler(TeamsActivityHandler):
    """
    Determines what to do for incoming events with per-category methods.

    <https://learn.microsoft.com/en-us/microsoftteams/platform/bots/bot-basics?tabs=python>
    """

    async def on_message_activity(self, turn_context: TurnContext) -> None:
        """Handle “message activity” events."""
        return await turn_context.send_activity(
            Activity(
                type=ActivityTypes.message,
                text_format="markdown",
                text=f"**Received:** {turn_context.activity.text}",
            )
        )

bot = BotHandler()

# Create an adapter that will handle authentication and routing of messages to the bot.
bot_adapter = BotFrameworkAdapter(
    BotFrameworkAdapterSettings(
        # Replace these with settings from environment variables in a real app.
        # None values allow requests from the Bot Framework Emulator.
        app_id=app.config["TEAMS_BOT_CLIENT_ID"],
        app_password=app.config["TEAMS_BOT_CLIENT_SECRET"],
    )
)

# Add a route to handle Teams messages.
@app.route("/events", methods=["POST"])
async def handle_event():
    """Respond to an event from Microsoft Teams."""
    try:
        payload = request.json
    except json.JSONDecodeError:
        print(request)
        return jsonify({"error": "Bad request"}), 400

    # React to the activity
    try:
        activity = Activity.deserialize(payload)
    except DeserializationError:
        return jsonify({"error": "Bad request"}), 400

    auth_header = request.headers.get("authorization", "")
    try:
        invoke_response = await bot_adapter.process_activity(
            activity,
            auth_header,
            bot.on_turn,
        )

    except TypeError:
        return jsonify({"error": "Bad request"}), 400
    else:
        if invoke_response:
            return jsonify(invoke_response.body), invoke_response.status
        else:
            return jsonify({}), 204
Try it out
Let’s try it out!
If you still have your Flask app running from before, stop it with CTRL+C.
Export your bot’s client ID and secret so your app can get them from the environment.
$ export TEAMS_BOT_CLIENT_ID=your-client-id-here
$ export TEAMS_BOT_CLIENT_SECRET
Re-run your app, this time specifying
--reloadso that we don’t have to remember to restart it every time.
$ flask --app=app run --host=0.0.0.0 --port=5001 --reload
Tag your bot in a Teams post (or in a reply to an existing post)
Step 5: Adding asynchronous processing
At this point, you’ve implemented a pretty basic “hello world”-style bot — a dime-a-dozen as far as tutorials go — so let’s do something a bit more interesting: let’s add asynchronous processing.
You’re likely to need asynchronous processing if you’re doing anything even mildly time-consuming behind the scenes. For example, it’s pretty likely these days that you’ll want to call out to an LLM service like OpenAI — which will take at least a few seconds or more — so let’s build in that direction.
This is especially important in Teams, because your bot is expected to reply within a couple of seconds (as a requirement for publishing to the Microsoft Store, anyway).
There are several options for async processing in Python, but for the sake of simplicity, let’s just use a background thread, which we can do using Python’s built-in asyncio and threading modules. (Note, however, that you can handle asynchronous processing using whatever strategy you like (Celery, RQ, etc); the principles are the same!)
Handle replies in the background
First, let’s add a function to handle a Teams “activity” (e.g., a received message) separate from the rest of the bot handler so that we can call it as a background task:
import asyncio

# ...

async def handle_activity(serialized_activity: dict) -> None:
    """Handle an activity."""
    # Simulate a delay as if we enqueued this job within
    # a busy production workload.
    await asyncio.sleep(3)

    print("Handling activity...")

		# Deserialize the activity, and get a reference to the conversation
		# from which the activity originated.
    activity = Activity.deserialize(serialized_activity)
    conversation_reference = activity.get_conversation_reference()

		# "Continue" the conversation by replying with a message.
    await bot_adapter.continue_conversation(
        conversation_reference,
        lambda turn_context: turn_context.send_activity(
            Activity(
                type=ActivityTypes.message,
                text_format="markdown",
                text=f"**Received:** {activity.text}",
            )
        ),
        bot_id=app.config["TEAMS_BOT_CLIENT_ID"],
    )

# ...
The important part here is that we’re retrieving a “conversation reference” from our serialized activity and using it to “continue” an existing conversation; it’s not as simple as sending a message to a channel — you need to specify which conversation to reply to so that Teams can properly ingest your response.
Next, we’ll implement a (very basic) worker thread that can handle our activity in the background. Put this code somewhere in your
app.py:
from threading import Thread

# ...

[class BackgroundWorker(Thread):
    """A very basic background worker implementation using asyncio."""

    _loop: asyncio.AbstractEventLoop

    def __init__(self) -> None:
        super().__init__(daemon=True)
        self._loop = asyncio.new_event_loop()

    def run(self) -> None:
        """Run the background worker."""
        asyncio.set_event_loop(self._loop)
        self._loop.run_forever()

    async def wrap_task(self, task: Coroutine) -> Coroutine:
        """Wrap a coroutine in a try/except block to catch errors.

        Prints the error to the console.
        """
        try:
            await task
        except Exception:
            traceback.print_exc()

    def run_task(self, task: Coroutine) -> None:
        """Run a coroutine in the background."""
        # Start the background worker thread if it's not already running.
        if not self.is_alive():
            self.start()

        # Run the task in the background worker thread's event loop.
        asyncio.run_coroutine_threadsafe(
            coro=self.wrap_task(task),
            loop=self._loop,
        )

# Create a background worker for running tasks asynchronously.
background_worker = BackgroundWorker()](<https://www.notion.so/Aptible-AI-for-PaaS-145509e56b41800da6d9c8311f86be95?pvs=21>)
Note: you don’t need to understand this part deeply; in a “real” app, you’d use something like Celery or RQ — we’re only using this threading approach so that we don’t have to set those things up, so don’t feel bad about copy/pasting this piece.
Finally, we’ll update our
BotHandler'son_message_activitymethod to handle our activity in the background:
class BotHandler(TeamsActivityHandler):

    # ...

    async def on_message_activity(self, turn_context: TurnContext) -> None:
        """Handle “message activity” events."""
        # Generate an immediately reply to let the user know we've
        # seen their message.
        reply = await turn_context.send_activity(
            Activity(
                type=ActivityTypes.message,
                text_format="markdown",
                text="One moment please...",
            )
        )

        # Serialize the activity we received so that we can enqueue
        # the job.
        serialized_activity = turn_context.activity.serialize()

        # Handle the activity in the background. You can (and should) use
        # Celery or another background task strategy here instead for real
        # workloads.
        background_worker.run_task(handle_activity(serialized_activity))

        # Return our reply.
        return reply
The important part here is that we serialize the activity before we enqueue it, which is required for most background processing implementations.
Try it out
Now when you send a message, you’ll get a “One moment please…”, followed by a reply a few seconds later, like so:
Now we can do whatever we want in that background task without worrying too much about how long it takes.
If I only had a brain
Now that we can handle activities in the background, let’s wire it up to do something interesting: let’s send the message to OpenAI and get a response for the user.
Install the
openaipackage:
$ pipAdd configuration variables:
# ...

# Extract environment variables that we'll need to authenticate our bot.
try:
    app.config.update(
        TEAMS_BOT_CLIENT_ID=os.environ["TEAMS_BOT_CLIENT_ID"],
        TEAMS_BOT_CLIENT_SECRET=os.environ["TEAMS_BOT_CLIENT_SECRET"],
        OPENAI_API_KEY=os.environ["OPENAI_API_KEY"],
    )
except KeyError:
    raise LookupError(
        "Environment variables TEAMS_BOT_CLIENT_ID, TEAMS_BOT_CLIENT_SECRET, and "
        "OPENAI_API_KEY must be set."
    )

# ...
Update your
handle_activityfunction to call OpenAI with the user’s message, and reply with the response. Let’s remove ourasyncio.sleep(3)as well, since we’re doing some real work now.
from openai import AsyncOpenAI

# ...

openai_client = AsyncOpenAI(
    api_key=app.config["OPENAI_API_KEY"],
)

# ...

async def handle_activity(serialized_activity: dict) -> None:
    """Handle an activity."""
    activity = Activity.deserialize(serialized_activity)
    conversation_reference = activity.get_conversation_reference()

    completion = client.chat.completions.create(
		  model="gpt-4o-mini",
		  messages=[{"role": "user", "content": activity.text}],
		)

    await bot_adapter.continue_conversation(
        conversation_reference,
        lambda turn_context: turn_context.send_activity(
            Activity(
                type=ActivityTypes.message,
                text_format="markdown",
                text=completion.choices[0].message.content,
            )
        ),
        bot_id=app.config["TEAMS_BOT_CLIENT_ID"],
    )

# ...
Try it out
Now when you send a message, you’ll get a reply from an LLM!
You may notice, however, that asking follow up questions doesn’t quite work:
That’s because we’re essentially starting a new conversation every time we send a message. Let’s continue on and fix that by retrieving all of the messages in the conversation and sending them along with our message so that our bot can follow the conversation.
Step 6. Retrieve conversation history
Now that we have an LLM responding to our messages, we’ll want to give it the ability to read the whole conversation so that it can effectively respond to follow-up messages.
Perhaps surprisingly, the Microsoft Bot Framework itself doesn’t provide the ability to retrieve the conversation history for a thread. To achieve this, we’ll have to use the Microsoft Graph SDK, and make an API call to retrieve all of the messages for the thread so that we can send them along with the latest message to the LLM.
Install the
msgraph-sdkpackage:
$ pip install msgraph-sdkRetrieve the “Tenant ID” of your bot’s “app” from the Azure Portal (this was created behind the scenes when we created the Bot in the Teams Developer Portal). We’ll need this so that we can query the right organization for its Teams messages.
a) Log in to the Azure Portal and navigate to the App Registrations page (https://portal.azure.com/#view/Microsoft_AAD_IAM/ActiveDirectoryMenuBlade/~/RegisteredApps)
b) Locate and click on the bot’s app (it’ll have the same name as your bot in the Teams Developer Portal)
c) Copy the “Directory (tenant) ID”
Give your bot permission to access channel messages for your organization:
a) In the Azure Portal for your bot’s app registration, navigate to Manage → API permissions, and click Add a permission.
b) Choose Microsoft Graph
c) Select Application permissions
d) Add the ChannelMessage.Read.All permission, then click Add permissions
e) Click Grant admin consent for (your directory)
Add a new configuration variable for our
TEAMS_BOT_TENANT_ID:
# ...

# Extract environment variables that we'll need to authenticate our bot.
try:
    app.config.update(
        # ...
        TEAMS_BOT_TENANT_ID=os.environ["TEAMS_BOT_TENANT_ID"],
        # ...
    )
except KeyError:
    raise LookupError(
        "Environment variables TEAMS_BOT_CLIENT_ID, TEAMS_BOT_CLIENT_SECRET, and "
        "OPENAI_API_KEY, TEAMS_BOT_TENANT_ID must be set."
    )

# ...
Create a new function for retrieving conversation messages in reverse chronological order (newest first):
import re
from typing import AsyncIterator, cast
from azure.identity.aio import ClientSecretCredential
from kiota_abstractions.base_request_configuration import RequestConfiguration
from msgraph import GraphServiceClient
from msgraph.generated.models.chat_message import ChatMessage

# ...

async def iter_conversation_messages(
    tenant_id: str,
    team_id: str,
    channel_id: str,
    conversation_id: str,
) -> AsyncIterator[ChatMessage]:
    """Yield all messages in a conversation thread."""
    print(tenant_id, team_id, channel_id, conversation_id)

    # Create a Microsoft Graph Client.
    client = GraphServiceClient(
        credentials=ClientSecretCredential(
            client_id=app.config["TEAMS_BOT_CLIENT_ID"],
            client_secret=app.config["TEAMS_BOT_CLIENT_SECRET"],
            tenant_id=tenant_id,
        )
    )

    # Parse the message ID from the conversation ID
    if parsed_conversation_id := re.search(r"messageid=(\\d+)", conversation_id):
        original_message_id = parsed_conversation_id.group(1)
    else:
        raise ValueError(
            f"Could not parse message ID from conversation ID: {conversation_id}"
        )

    channel_messages = (
        client.teams.by_team_id(team_id).channels.by_channel_id(channel_id).messages
    )
    original_message = channel_messages.by_chat_message_id(original_message_id)
    thread_replies = channel_messages.by_chat_message_id(original_message_id).replies

    # Request the maximmum number of replies at a time to minimize requests.
    request_configuration = RequestConfiguration(
        query_parameters=thread_replies.RepliesRequestBuilderGetQueryParameters(
            top=50,
        )
    )

    # Yield all messages in the thread, page by page.
    next_link: str | None = None
    while True:
        # Get the first page or the subsequent pages if there's a next link
        if next_link:
            replies_page = await thread_replies.with_url(next_link).get(
                request_configuration
            )
        else:
            replies_page = await thread_replies.get(request_configuration)

        # Break if there are no results in the page.
        if not replies_page or not replies_page.value:
            break

        # Yield the messages from the current page.
        for message in replies_page.value:
            yield message

        next_link = replies_page.odata_next_link

        # Break when there are no more pages.
        if not next_link:
            break

    # Finally, yield the original message that started the thread.
    yield cast(ChatMessage, await original_message.get())
Use the new function to reconstruct the whole conversation when we interact with the LLM. Let’s update our
handle_activitymethod to the following:
async def handle_activity(serialized_activity: dict) -> None:
    """Handle an activity."""
    activity = cast(Activity, Activity.deserialize(serialized_activity))
    conversation_reference = cast(
        ConversationReference, activity.get_conversation_reference()
    )

    async def _generate_reply(turn_context: TurnContext) -> str:
        channel_data = activity.channel_data

        # Insert our activity's channel data into the turn context so that we
        # can use it to retrieve the original team context.
        turn_context.activity.channel_data = channel_data
        teams_info = await TeamsInfo.get_team_details(turn_context)

        channel_id = channel_data["channel"]["id"]
        tenant_id = channel_data["tenant"]["id"]
        team_id = teams_info.aad_group_id
        conversation_id = conversation_reference.conversation.id

        # Get all messages in the conversation in OpenAI format, skipping the
        # first message (since it's the most recent "one moment please..."
        # message from the bot), then reversing them so that they're in
        # chronological order (the Microsoft Graph API returns them in reverse).
        openai_messages = reversed(
            [
                {
                    "role": "user" if message.from_.user else "assistant",
                    "content": message.body.content,
                }
                async for message in iter_conversation_messages(
                    tenant_id=tenant_id,
                    team_id=team_id,
                    channel_id=channel_id,
                    conversation_id=conversation_id,
                )
            ][1:]
        )

        # Generate a reply using OpenAI.
        completion = await openai_client.chat.completions.create(
            model="gpt-3.5-turbo",
            messages=openai_messages,
        )

        await turn_context.send_activity(
            Activity(
                type=ActivityTypes.message,
                text_format="markdown",
                text=completion.choices[0].message.content,
            )
        )

    await bot_adapter.continue_conversation(
        conversation_reference,
        _generate_reply,
        bot_id=app.config["TEAMS_BOT_CLIENT_ID"],
    )
Try it out
Now that we’re passing along the entire thread history to the LLM, we can ask follow-up questions!
The full picture
Here’s the complete code, in case you find it helpful as a starting point:
import asyncio
import json
import os
import re
import traceback
from collections.abc import Coroutine
from threading import Thread
from typing import AsyncIterator, cast

from azure.core.exceptions import DeserializationError
from azure.identity.aio import ClientSecretCredential
from botbuilder.core import (
    BotFrameworkAdapter,
    BotFrameworkAdapterSettings,
    TurnContext,
)
from botbuilder.core.teams import TeamsActivityHandler, TeamsInfo
from botbuilder.schema import Activity, ActivityTypes, ConversationReference
from flask import Flask, jsonify, request
from kiota_abstractions.base_request_configuration import RequestConfiguration
from msgraph import GraphServiceClient
from msgraph.generated.models.chat_message import ChatMessage
from openai import AsyncOpenAI

# Create a Flask app, which can also store our config.
app = Flask(__name__)

# Extract environment variables that we'll need to authenticate our bot.
try:
    app.config.update(
        TEAMS_BOT_CLIENT_ID=os.environ["TEAMS_BOT_CLIENT_ID"],
        TEAMS_BOT_CLIENT_SECRET=os.environ["TEAMS_BOT_CLIENT_SECRET"],
        OPENAI_API_KEY=os.environ["OPENAI_API_KEY"],
    )
except KeyError:
    raise LookupError(
        "Environment variables TEAMS_BOT_CLIENT_ID, TEAMS_BOT_CLIENT_SECRET, and "
        "OPENAI_API_KEY must be set."
    )

openai_client = AsyncOpenAI(api_key=app.config["OPENAI_API_KEY"])

class BackgroundWorker(Thread):
    """A very basic background worker implementation using asyncio."""

    _loop: asyncio.AbstractEventLoop

    def __init__(self):
        super().__init__(daemon=True)
        self._loop = asyncio.new_event_loop()

    def run(self) -> None:
        """Run the background worker."""
        asyncio.set_event_loop(self._loop)
        self._loop.run_forever()

    async def wrap_task(self, task: Coroutine) -> Coroutine:
        """Wrap a coroutine in a try/except block to catch errors.

        Prints the error to the console.
        """
        try:
            await task
        except Exception:
            traceback.print_exc()

    def run_task(self, task: Coroutine) -> None:
        """Run a coroutine in the background."""
        # Start the background worker thread if it's not already running.
        if not self.is_alive():
            self.start()

        # Run the task in the background worker thread's event loop.
        asyncio.run_coroutine_threadsafe(
            coro=self.wrap_task(task),
            loop=self._loop,
        )

background_worker = BackgroundWorker()

async def iter_conversation_messages(
    tenant_id: str,
    team_id: str,
    channel_id: str,
    conversation_id: str,
) -> AsyncIterator[ChatMessage]:
    """Yield all messages in a conversation thread."""
    print(tenant_id, team_id, channel_id, conversation_id)

    # Create a Microsoft Graph Client.
    client = GraphServiceClient(
        credentials=ClientSecretCredential(
            client_id=app.config["TEAMS_BOT_CLIENT_ID"],
            client_secret=app.config["TEAMS_BOT_CLIENT_SECRET"],
            tenant_id=tenant_id,
        )
    )

    # Parse the message ID from the conversation ID
    if parsed_conversation_id := re.search(r"messageid=(\\d+)", conversation_id):
        original_message_id = parsed_conversation_id.group(1)
    else:
        raise ValueError(
            f"Could not parse message ID from conversation ID: {conversation_id}"
        )

    channel_messages = (
        client.teams.by_team_id(team_id).channels.by_channel_id(channel_id).messages
    )
    original_message = channel_messages.by_chat_message_id(original_message_id)
    thread_replies = channel_messages.by_chat_message_id(original_message_id).replies

    # Request the maximmum number of replies at a time to minimize requests.
    request_configuration = RequestConfiguration(
        query_parameters=thread_replies.RepliesRequestBuilderGetQueryParameters(
            top=50,
        )
    )

    # Yield all messages in the thread, page by page.
    next_link: str | None = None
    while True:
        # Get the first page or the subsequent pages if there's a next link
        if next_link:
            replies_page = await thread_replies.with_url(next_link).get(
                request_configuration
            )
        else:
            replies_page = await thread_replies.get(request_configuration)

        # Break if there are no results in the page.
        if not replies_page or not replies_page.value:
            break

        # Yield the messages from the current page.
        for message in replies_page.value:
            yield message

        next_link = replies_page.odata_next_link

        # Break when there are no more pages.
        if not next_link:
            break

    # Finally, yield the original message that started the thread.
    yield cast(ChatMessage, await original_message.get())

async def handle_activity(serialized_activity: dict) -> None:
    """Handle an activity."""
    activity = cast(Activity, Activity.deserialize(serialized_activity))
    conversation_reference = cast(
        ConversationReference, activity.get_conversation_reference()
    )

    async def _generate_reply(turn_context: TurnContext) -> str:
        channel_data = activity.channel_data

        # Insert our activity's channel data into the turn context so that we
        # can use it to retrieve the original team context.
        turn_context.activity.channel_data = channel_data
        teams_info = await TeamsInfo.get_team_details(turn_context)

        channel_id = channel_data["channel"]["id"]
        tenant_id = channel_data["tenant"]["id"]
        team_id = teams_info.aad_group_id
        conversation_id = conversation_reference.conversation.id

        # Get all messages in the conversation in OpenAI format, skipping the
        # first message (since it's the most recent "one moment please..."
        # message from the bot), then reversing them so that they're in
        # chronological order (the Microsoft Graph API returns them in reverse).
        openai_messages = reversed(
            [
                {
                    "role": "user" if message.from_.user else "assistant",
                    "content": message.body.content,
                }
                async for message in iter_conversation_messages(
                    tenant_id=tenant_id,
                    team_id=team_id,
                    channel_id=channel_id,
                    conversation_id=conversation_id,
                )
            ][1:]
        )

        # Generate a reply using OpenAI.
        completion = await openai_client.chat.completions.create(
            model="gpt-3.5-turbo",
            messages=openai_messages,
        )

        await turn_context.send_activity(
            Activity(
                type=ActivityTypes.message,
                text_format="markdown",
                text=completion.choices[0].message.content,
            )
        )

    await bot_adapter.continue_conversation(
        conversation_reference,
        _generate_reply,
        bot_id=app.config["TEAMS_BOT_CLIENT_ID"],
    )

# Create a "handler" that implements various callbacks for events that Teams sends us.
class BotHandler(TeamsActivityHandler):
    """
    Determines what to do for incoming events with per-category methods.

    <https://learn.microsoft.com/en-us/microsoftteams/platform/bots/bot-basics?tabs=python>
    """

    async def on_message_activity(self, turn_context: TurnContext) -> None:
        """Handle "message activity" events."""
        reply = await turn_context.send_activity(
            Activity(
                type=ActivityTypes.message,
                text_format="markdown",
                text="One moment please...",
            )
        )

        serialized_activity = turn_context.activity.serialize()

        background_worker.run_task(handle_activity(serialized_activity))

        return reply

bot = BotHandler()

# Create an adapter that will handle authentication and routing of messages to the bot.
bot_adapter = BotFrameworkAdapter(
    BotFrameworkAdapterSettings(
        # Replace these with settings from environment variables in a real app.
        # None values allow requests from the Bot Framework Emulator.
        app_id=app.config["TEAMS_BOT_CLIENT_ID"],
        app_password=app.config["TEAMS_BOT_CLIENT_SECRET"],
    )
)

# Add a route to handle Teams messages.
@app.route("/events", methods=["POST"])
async def handle_event():
    """Respond to an event from Microsoft Teams."""
    try:
        payload = request.json
    except json.JSONDecodeError:
        print(request)
        return jsonify({"error": "Bad request"}), 400

    # React to the activity
    try:
        activity = Activity.deserialize(payload)
    except DeserializationError:
        return jsonify({"error": "Bad request"}), 400

    auth_header = request.headers.get("authorization", "")
    try:
        invoke_response = await bot_adapter.process_activity(
            activity,
            auth_header,
            bot.on_turn,
        )
    # Note: more more except blocks may be needed, per:
    # <https://github.com/microsoft/botbuilder-python/blob/main/libraries/botbuilder-core/botbuilder/core/integration/aiohttp_channel_service_exception_middleware.py#L19>
    except TypeError:
        return jsonify({"error": "Bad request"}), 400
    else:
        if invoke_response:
            return jsonify(invoke_response.body), invoke_response.status
        else:
            return jsonify({}), 204
Want to try out Aptible AI for Microsoft Teams? Let us know below and we'll be in touch shortly.

Don't want to build your own? Try Aptible AI.

Don't want to build your own? Try Aptible AI.
Don't want to build your own? Try Aptible AI.